CoPilot® 2002 Quick Start If you're in a hurry to begin using CoPilot 2002: 1. Install Application: Boot up your computer. After Windows® (95, 98, NT®, 2000, ME®) has finished booting up, install CoPilot 2002 by placing the Install CD into your CD-ROM drive. Select Install CoPilot from the pop-up menu and follow the on-screen instructions. (If the Installation menu does not automatically appear, see Installation on page 5).
6. Start Application: Double-click on the CoPilot 2002 icon on your desktop. If your GPS receiver is plugged in the first time you start the program, you will be greeted and asked to enter a nearby city for the initial satellite search. A dialog box will then appear with a variety of options for entering your destination. Click on any button to enter that type of destination. After just a few seconds, CoPilot will generate a route for you highlighted in green on the map.
Table of Contents CoPilot® 2002 Quick Start . . . . . . . . . . . . . Inside front cover Requirements . . . . . . . . . . . . . . . . . . . . . . . . . .1 How Reliable is CoPilot 2002? . . . . . . . . . . . . . . . . . . . . . . .2 Installation . . . . . . . . . . . . . . . . . . . . . . . . . . . . . . . . . . . . . . 5 Uninstalling . . . . . . . . . . . . . . . . . . . . . . . . . . . . . . . . . . . . . .7 Setting Up the Hardware. . . . . . . . . . . . . . . . . . . . . . . . . . . .
Requirements System Requirements: --------- Microsoft® Windows® 95, 98, 2000, ME® or Windows NT® (4.0 or higher) An IBM® compatible PC (portable required for in-car navigation) Pentium® II processor (or faster) 4X CD-ROM (12X recommended if using CDs as data source) 32 MB of RAM and a hard drive with at least 100 MB of available disk space. For best performance of "talking maps" and GPS track files, we recommend 64 MB RAM.
How Reliable is CoPilot® 2002? The CoPilot map database is remarkably accurate, providing comprehensive, detailed street information for the entire United States. From the most populated cities to the smallest hamlets, CoPilot map data has been created to support your travels wherever they may take you. Data Quality Due to the complexity and constantly changing face of the United States road system, you may encounter roads that have not been updated in the CoPilot map database.
About GPS Technology The Global Positioning System (GPS) is a tracking and navigation system developed by the U.S. Department of Defense. The system uses 24 satellites that orbit the earth, sending out radio waves that can be picked up by GPS sensors (hardware devices for receiving data). Normally, a GPS sensor relies on receiving signals from four satellites simultaneously to track its position.
obstructing satellite communications will interfere with CoPilot's ability to track your location. Like your car radio, GPS tracking can also be affected by weather conditions if severe. CoPilot will continue tracking as soon as adequate signals are available. NOTE: The GPS unit should be placed far forward on the dashboard to maximize the satellite reception area.
Installation NOTE: If you are updating from an older version of CoPilot®, you will need to uninstall the older version first. Refer to the Uninstalling section, pages 7-8. To install CoPilot, first turn on your computer (and the external CD-ROM drive if necessary) and insert the Install CD. Have the Installation Key Code from the front of the CoPilot CD holder ready. NOTE: Do not lose this number. You will need it for installation and registration.
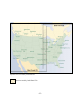
Specific areas covered by each Data CD Area covered by both Data CDs -6-
Uninstalling The following steps outline the procedure for uninstalling CoPilot® 2002 and older versions of CoPilot: To uninstall the CoPilot software: 1. 2. 3. 4. 5. Exit out of any other programs that are running. On your desktop, double-click on My Computer. Double-click on Control Panel. Double-click on Add/Remove Programs. Scroll down the list of applications until you see TravRoute CoPilot [Version]. Click on it to highlight it, then click on the Add/Remove button.
To Uninstall Data From Previous Versions of CoPilot: 1. 2. 3. 4. 5. Exit out of any other programs that are running. On your desktop, double-click on My Computer. Double-click on Control Panel. Double-click on Add/Remove Programs. Scroll down the list of applications until you see CoPilot 2001 Data CD or Data CD setup for CoPilot 2000. Click on it to highlight it, then click on the Add/Remove button.
USB Connection If you are using a USB connection you will have one wire which attaches the GPS receiver to the laptop through its USB port. Plug the receiver into the laptop after Windows is finished booting up.
Serial Connection When connecting to a laptop through a serial port the receiver is powered through the laptops battery. Plug the PS/2 port connector on your GPS unit into the PS/2 port of your laptop. Do not plug the serial port connector into your laptop until after Windows has finished booting up. TIP: To see the serial ports available on your PC, open the Control Panel, select System, click on the Device Manager tab, then click on the plus sign next to Ports in the list of devices.
CoPilot 2002 Overview Planning Mode Guidance Mode (Passenger screen shown) CoPilot can be used for both in-vehicle navigation (Guidance Mode) and desktop trip planning (Planning Mode). To move from Planning Mode to Guidance Mode at any time, select Driver Mode from the Window menu or click the CoPilot icon on the tool bar. To move from Guidance Mode to Planning Mode, click the Planning button in the control panel. Guidance Mode is for in-vehicle navigation.
Initializing Your GPS Receiver In order to decrease the amount of time needed for an initial satellite acquisition, CoPilot will ask you to enter a nearby city and state the first time the program is started with a GPS antenna attached. This request may also appear if you do not use CoPilot with the antenna attached for about two weeks, or if you take it on an airline flight without using it.
Guidance Mode Start Navigating If your GPS receiver is attached you're ready to start driving! The CoPilot navigation system will guide you to the destination(s) you enter, and recalculate your route should you miss a turn. Because CoPilot needs to know where you're going in order to give you navigation advice, you must enter a destination. (You do not need to enter an origin. If your GPS receiver is picking up signals, CoPilot will automatically fill in the start place.
Using the Control Panel At the top of the control panel, Passenger/Driver may be clicked to toggle between one screen and the other. The active screen will be shown in larger print. To exit CoPilot at any time, click Quit CoPilot. In the Driver Safety screen, at over 10 m.p.h. the background will be black and you will receive simple turn instructions on screen, as well as receiving voice commands. In the Passenger screen, the map will always be shown.
Map Display In the control panel, the button below Passenger/Driver allows you to toggle between three different map views. To switch from one view to the next you simply click on the button or use the Enter key on your keyboard to cycle through Next Turn, Where Am I, and Going To. Next Turn: This view shows your upcoming turn and the immediate area between your current location and the turn.
Entering a Destination When you launch CoPilot for the first time, with the GPS receiver attached, you will be prompted to enter a destination (refer to Destination Entry window below). Select any one of the destination options, and enter your destination. When entering a City/State, enter the city name and state abbreviation separated by a comma and space, then hit Enter. Case is not important (e.g. princeton, nj is a valid entry).
The first time you select the Home or Work buttons you will be prompted with an Address Entry window like the one shown here in which you can enter your home and/or work addresses. In subsequent selections, choosing these buttons will automatically enter your home or work address as your destination. NOTE: To edit your Home or Work address, switch to Planning Mode and use the Favorites tab in the Trip Planner window (see pages 30-31).
When you select the Point of Interest button you will be prompted with an entry window. In the City/State box you will see the city in which you have most recently been navigating. If you want to find POIs in a different location, simply edit the City/State entry. You can also use a Smart POI search during a trip. If you select Near my current route, the City/State box will be removed and the POI search will find matches close to your current route.
Trip Confirmation The Trip Confirmation window appears every time you enter a new stop in an active trip. You can enter as many as 50 stops in any given trip. The screen will display your next few stops, and your final destination. In this screen you also have the option of selecting Go! to go immediately into the Passenger screen, Add to add stops to your trip, Edit to change the order or remove stops, and Clear to delete all stops.
Editing your Stops Edit Stops In Guidance Mode you will be given the option to alter your trips by clicking Edit. When this is selected the dialog box above will appear on your screen. From this screen you can manually change the order of your stops using the Up/Down arrows to the right of the itinerary, you can delete stops using the Delete Stop button, or you can take advantage of the Optimize feature.
Detour In Guidance Mode, clicking the Detour button will enable you to specify what the road conditions are in front of you so that CoPilot can generate an alternate route. This is useful when you need to get around traffic jams, roadwork, or other unexpected traffic slow-downs but dont know whether or not youll save any time by turning off your current route.
After selecting one of the alternate route options, the difference between your original route and the new route is displayed. You can either accept the new route or return to your original route. If you choose to accept the new route, the old route is highlighted in blue while the new route is highlighted in green. Detour functionality is also available from the Driver Safety screen (lower right corner).
Selective Routing CoPilot enables you to be selective about the roads you take on your trip. From the Passenger screen you can customize your Driving Directions so that entire segments of a trip can be avoided if you dont want to travel along the roads CoPilot has you taking. To do this, in the Passenger screen click the Itinerary button to bring up your turn-by-turn Driving Directions.
Options Click the Options button in Guidance Mode to open a window that enables you to view GPS status and change settings such as map orientation, voice options, and routing preferences. In the Options window, the Status button opens a dialog box that allows you to view and change advanced GPS settings see CoPilots Help Files for more information. North Up, when toggled on, sets the map view so that north will always be at the top of your computer screen when you are driving in Guidance Mode.
Click Preferences to open a window that enables you to set routing preferences for Guidance Mode. These preference categories are the same ones found in the Trip Options dialog box in Planning Mode, and the choices in each pick list will reflect sets of customized preferences that you have created using that dialog. To create such sets, switch to Planning Mode, then click on the New Trip tool bar button to open the Trip Planner window and click the Options button in that window (see page 29 for details).
Voice Commands CoPilot will not only speak to you to inform you of upcoming turns, but also respond to a number of commands you speak out loud. NOTE: Background noise may affect CoPilots ability to recognize spoken commands. To activate or deactivate the listening option select the Options button from the control panel and click on Listening to toggle it on or off.
A Sample Trip Suppose you and a friend want to go to a concert on the campus of Princeton University in Princeton, New Jersey. You know the approximate location of your destination, but you're unfamiliar with the area. There's no need to worry about the trip: CoPilot will guide you every step of the way! First, you enter your destination. (You wont need to enter a starting place if your GPS receiver is picking up signals, CoPilot already knows where you're starting from.
1. Driving on Witherspoon Street into Princeton, NJ 3. CoPilot creates a new route from your current position 2.
Planning Mode After launching CoPilot, if a GPS receiver is not attached you can access Planning Mode by clicking the Planning Mode button from the welcome screen. You can also access Planning Mode using the Planning button in the Passenger screen. In Planning Mode you can run trips on your desktop to print and take with you or save for a later time, search for points of interest, add favorite places, edit street restrictions, add custom places, and much more.
town you selected.) Again, a list of matches to your entry may appear; if so, highlight the one you want on the list and click Select, or click Map to see it on the map. Click the Add Stop button to put the place you entered on the Trip Itinerary. Once a place is listed in the Trip Itinerary, you may highlight it and click the Zoom To button to see that place on the map. TIP: Usually you will need to spell out words like "Saint", "Mount", "Fort", etc.
place to your trip, highlight it and click Add Stop. In this tab, you can also specify a Home and Work address. To do this, highlight an address on the list of favorites and click the circle next to Home or Work under the list. Now your home or work address can be quickly selected as a destination in Guidance Mode (see page 17). Remember that while you can access your Home and Work addres from Guidance Mode, they can only be changed through the Favorites tab in Planning Mode.
Trip Options The Trip Options window enables you to create sets of preferences that impact how CoPilot calculates routes. There are three categories that affect different aspects of of CoPilots routing: Routing Preferences, Vehicle Profile, and General. Each category has a default set that cannot be edited. In order to create a new set under any category, select New, give the new set a name, edit the settings, and save the changes.
Printing Your Map or Driving Directions After you Run a trip, the Trip Summary window will pop up over a split screen displaying the map of your trip, and detailed driving directions. Although the Trip Summary can not be printed, both the map and the directions can. Click OK to hide the Summary window. To alter the size of either the map window or the directions window, drag the gray bar in the center in the appropriate direction. To activate the window you must click on it.
Beyond the Basics If you are familiar with the basic features of CoPilot, you are probably ready to try some of the advanced features. For more information on these features see the Legend on page 47 of this manual, or see Trip Planning: Beyond the Basics in the Help Files (under Planning Mode in the Contents tab). Picking Stops from the Map To pick a stop from the map with the mouse, first zoom into the area from which you want to select a location.
Adding a New Place (Custom Places) CoPilot gives you the ability to add new places with your own custom names to the map database. After adding your custom place to the map database, you'll be able to enter it as a start place, end place, or intermediate stopover for any trip you run. To add a new place, click on the Add Custom Places button on the tool bar or select Add Custom Places from the sub-menu of Mouse Modes in the Map menu.
Customizing Your Driving Directions CoPilot gives you precise, turn-by-turn driving directions, plus time and distance calculations for every trip you run between a start place and a destination. Print these directions, and/or customize them by editing the font CoPilot uses and by controlling the number of nearby places -- that is, landmarks or places of interest in the area surrounding your route -- that appear in the report.
Landmark Reporting Dialog Box To control the number and type of landmarks reported, select Landmark Reporting from the Trip menu to open the Landmark Reporting dialog box. NOTE: You can use these options in Planning Mode, but not in Guidance Mode. Use the slide bar under Find landmarks within this distance of your route to control the size of the area around your route in which landmarks should be reported.
Importing Data Data Import Wizard CoPilot's Import Wizard gives you the ability to create new sets of pushpins from external data sources. The Import Wizard allows you to import a set of addresses directly from Microsoft Outlook, or Microsoft Access. If you are using another type of database or contact manager, you can save your contacts/locations as an Excel or text file and then use the Import Wizard to import that file.
3) Click on each column header and select an identifier for that column from the menu that pops up. Headers that must be included to import a text file are: Name, Address 1, City, State, and ZIP Code. You may also choose a pre-formatted set of columns from the Column Order list (click on the arrow to see the list).
Helpful Hints ENTERING LOCATION NAMES THAT INCLUDE ABBREVIATIONS: Usually you will need to spell out words like Saint, Mount, Fort, etc. Place names generally need to be spelled out; for example. John F. Kennedy International Airport instead of JFK Airport. Try alternate spellings if your entry isnt accepted the first time, or pick your place from the list under Your search found.
Trouble-shooting First things to check: Are all cables properly secured? Do all components have adequate power? Does your GPS receiver have a clear view of the sky? (Buildings, mountains and heavy foliage may block your satellite reception.) Why can't I get a satellite reading the first time I use CoPilot? The first time the GPS receiver is used it can take approximately 15 minutes to acquire a signal. This should not be the case with subsequent uses.
5. Double click on the SETUP.exe file and an "Installation Wizard" window will appear and guide you through the process. 6. In the "Choose a Data CD Location" window click on BROWSE. 7. Delete the default drive letter and replace it with the letter of your 2nd hard drive (D in this example) that you want to install the Data CD to and click on OK. 8. Click Yes to create the directory if prompted.
2. Click once on the black arrow so that all of your drives are shown. Your CD- ROM drive is the one that has the CD-ROM icon next to it. And next to the CD-ROM icon, there should be a letter - this is your CD-ROM drive letter. Please remember it and move to section B. B. Next, you need to check that CoPilot is looking to this drive to locate the Data CD. To do this: 1. Go to your Start button/Programs/Windows Explorer and click on the drive letter which corresponds to your hard drive (usually C). 2.
B. If you are powering the GPS unit through your laptop's PS/2 port, make sure the connection is snug and that your laptop's battery has enough power. If you've checked the power supply, and it is sufficient, see question 2. 2. Is the GPS unit plugged into the serial or USB port? A. The serial port is a 9-pin port usually on the back of your laptop. One end of the GPS unit cord should have a 9-pin head that should plug easily into your serial port. If you've checked the port connection, see question 3. 3.
D. Next at the bottom where it says Connect using select direct to Com 1 and click OK. E. Next in the Com Port Properties window the settings should read: -- Bits Per Second = 4800 -- Data Bits = 8 -- Parity = None -- Stop Bits = 1 -- Flow Control = Hardware If the settings are different you need to make the necessary changes and then click OK. If the GPS unit has power and is able to connect, you will see information flowing across the screen (random letter and numbers).
Can I use a different GPS unit with the CoPilot? If not, why? There are three main reasons why our software is designed to work with our hardware only: 1. Product quality. Because our software and hardware are developed as a complete navigation solution, the two components can be tightly integrated to give our customers the best overall user experience. There are a lot of GPS manufacturers out there and not everyone adheres to the same standard of high quality.
Legend Planning Mode Tool Bar Buttons: CoPilot: Takes you from Planning Mode to Guidance Mode. U.S.: Zooms to a map of the entire United States. Open/Save Trip: Allows you to save a trip you have outlined in Planning Mode, or access a previously saved trip. Zoom In/Out: Allows you to zoom in or out for various views of your map. Edit/New Trip: Prompts the Trip Planner window where you can enter addresses, search for points of interest, and recall favorites.
Label Cities and Places: Allows you to label or unlabel cities within your map. Pick Stops: Allows you to pick stops directly from the map and add them to your trip Itinerary. Add Custom Places: Allows you to label specific places on the map and save them in your Points of Interest database (map detail level must be at least 7.) Label Roads: Lets you determine whether individual roads on the map will be shown with or without names.
Notes: - 49 -
Notes: - 50 -
Using the CoPilot Help Files CoPilot provides extensive built-in Help to guide you through the program as you use it. Click on the Help button in a window to open a Help topic that describes how to use that window. For example, if youre entering a stop in the Trip Planner window, the Help button will open the Help Files at the topic Entering Additional Stops. From there, you can navigate through other Help topics, or do a search on a topic using the Search dialog box.