. Uninstall any previous version If you have a previous version of CoPilot installed on your Pocket PC and/or desktop computer, you must uninstall it before updating. Make sure your GPS receiver is NOT attached, then follow these steps: (1) On your Pocket PC: 1. Tap the Start menu and select Settings/System/Remove Programs 2. Select Pocket CoPilot and tap Remove. 3. Select Pocket Speech and tap Remove. 4a.
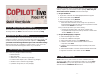
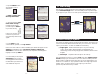
Quick Start Installation If your product shipped with a Quick Start storage card, just follow these simple steps to get started with CoPilot Live. Otherwise skip to the Install From CD section below. (1) Ensure your Pocket PC is fully charged and powered on. (2) Attach your GPS receiver to your Pocket PC. (3) Insert the Quick Start storage card in your Pocket PC. The software and map data will install automatically. If they do not, then follow these additional steps on your Pocket PC: a.
2. Choose where you would like data stored on the Pocket PC. CoPilot will scan your computer to detect which options are available. If you choose an option other than the device memory, click the pick list that appears and select a storage card name or the drive letter of your storage card reader. Click Next. NOTE: If data is stored on the device's memory and also on a Storage Card in the device, CoPilot will use the Storage Card by default.
Number, and E-mail Address where indicated and click Submit. Your Activation Code will immediately be e-mailed to you. 4. On your Pocket PC, type in your Activation Code where indicated and tap Activate. CoPilot will launch upon activation. 5. Select your desired map region (Step 6) and then see Step 7 (hardware setup) to configure your GPS receiver. 7.
2. Tap the Address button when asked to enter a destination. 10. Start driving Start driving! To toggle between the Driver Safety and the Passenger screens, tap the Driver/Passenger button. The Driver Safety screen only shows maps as you approach your next turn or when you’re traveling slower than 10 m.p.h. 3. Select a country from the drop-down menu. Step 2 Step 3 4. Using the keyboard, type in the name of a city. Possible matches will be provided. Tap the key to select the city.
Quick Reference: Pocket PC Guidance Screens Hints & Troubleshooting To ensure proper GPS reception, make sure that your Pocket PC is vertically mounted to your vent clip or windshield (not required if you are using the optional external GPS antenna). Also make sure to properly set the time and date on your Pocket PC. The first acquisition can take from 5 to 15 minutes, and you can minimize this time by positioning the GPS receiver with a clear view of the sky.
Contents Quick Start .......................................................................... i-xii Detour Feature ................................................................ Selective Routing ............................................................. Contact Integration ......................................................... Tool Menu Options ......................................................... POI Alert Options ........................................................... Modes ...........
CoPilot Overview A Safety Warning Your CoPilot Live | Pocket PC 4 Includes: Always keep your hands on the steering wheel and eyes on the road when driving! Install/Data Disks GPS Receiver (not in software-only packages) In-Vehicle Power Adapter (not in software-only packages) Vent Mount (not in software-only packages) Do not use this product in any way that interferes with safe and attentive operation of a vehicle.
Getting Started - Hardware Getting Started - Get Connected Both your desktop/laptop and your Pocket PC must be turned on. The cradle/cable for your mobile device must be connected to your desktop/laptop computer through either the USB or Serial port. In order to successfully transfer data from your desktop to your Pocket PC, you must have Microsoft ActiveSync 3.1 (or later) installed. This software is necessary to connect the two machines and is provided by your Pocket PC manufacturer.
Uninstalling a Previous Version To Install CoPilot Live: If you have been using an earlier version of Pocket CoPilot it will be necessary for you to uninstall the application and its data before installing CoPilot Live. 1. Insert the CoPilot Live Install Disk in your CD-ROM drive. Have your Product Key Code ready (you can find it on your printed Quick Start). When prompted to choose a language, select one from the pick list then click OK.
the pre-recorded option saves space on your Pocket PC, but will give you less detailed driving instructions. Click Next to continue. 5. Next, you will be prompted to choose an installation location on the Pocket PC. The default location is the Pocket PC main memory (click Yes). To install to a storage card, click No, then choose Storage card from the dropdown pick list (recommended). 6. The installation to your Pocket PC will take a few minutes.
Data Download to Your Pocket PC To use CoPilot Live on your Pocket PC, you first need to download map data from your desktop or laptop computer to your Pocket device. You select the data to download from one or more regions (“data areas”) that you specify in the CoPilot Live application on your desktop. It’s a simple 4-step process.
Data Download Map Area - This method of selecting data allows you to choose an area of data by drawing a box on the Data Download Wizard's map screen. Step 2: Choose a Data Selection Method In the Wizard, you enter a city name near which you would like to select data, then click Next. The map will zoom to that location. Then you create a box around the desired area by clicking and dragging your mouse across the map. The street-level data within that box will be selected.
Data Download Step 3: Select Your Data Use any of the three methods covered on the following pages (City Radius, Map Area, or Trip) to select one or more regions and then download your data. 4. Name the selection. Click Next. City Radius 1. Click the City Radius icon. 2. Enter a City, Country or Postal Code, and a radius around the area that you would like to download. Click Next to verify that the area is correct. 5.
Map Area 1. Click the Map Area icon. 4. Name the selection. Click Next. 5. You will return to the Data Selection Menu where you can select another data area if you like, using any method. When you are finished selecting data areas, click the Download icon to go to the final screen where you can build your download. 2. Enter a City, Country or Postal Code (address is optional) within the area that you would like to download. Click Next. 3.
Trip 3a. Highlight a selection, click Select, then Add Stop. When all your stops have been entered, click Select Data. 1. Click the Trip icon. 2. You now have three options for entering stops on your trip. If you choose the Cities and Addresses tab you will need to enter a City, Country or Postal Code, press , and click the Add Stop button. You may enter one or multiple destinations.
Data Download POI Download Options Step 4: Download the Data When you download a data region, you’ll get all roads within that region (but not roads outside the region). Also included with each download are regional points of interest (POI) such as gas stations, hotels, restaurants, visitor attractions, etc. When you’re ready to execute a download, the Wizard will display a list of Available Area(s) for download on the left side of the window.
Importing Custom Places Editing Custom Places in the Database CoPilot Live’s Custom Place Import Wizard enables you to import addresses from your Outlook Contacts database, an Excel file, or text file. (If you are using another type of database or contact manager, you can export your contacts/ locations to an Excel or text file before importing them into CoPilot Live.) These points are added to CoPilot’s POI database under the Custom category.
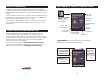
Software Activation and Startup If you are unable to synchronize your Pocket PC with your desktop/laptop but have internet access, you can Activate Manually as follows: NOTE: CoPilot Live won’t open on your Pocket PC unless map data has been previously downloaded from the CoPilot desktop application. 1) On your Pocket PC, check Activate Manually and tap Next. To launch CoPilot Live, first turn on your Pocket PC and make sure the GPS receiver is attached.
Map Region Selection In-vehicle Hardware Setup If you purchased CoPilot with a single region license, you will be asked to select a region the first time you launch the software on your Pocket PC. Carefully choose a region, as it cannot be changed once selected. WARNING: Never leave your GPS receiver in a closed vehicle that might exceed 60o C., it could be damaged by the heat. If you select Italy, for example, you will be able to use CoPilot's Italian street maps on your Pocket PC.
Using Your Pocket PC for Guidance 3. CoPilot will then provide you with a number of different ways to enter an address. You can: a) Program your Home address. b) Program your Work address. c) Enter a new Address. d) Select a destination from your Favorite List, or e) Search for a Point of Interest In CoPilot Live's Guidance Mode you will receive turn-by-turn route guidance information as you travel. For your safety the Driver Safety screen will hide maps when they are not necessary to avoid distractions.
Once you enter a destination, CoPilot will display the Edit Trip screen. At this point you can enter additional stops using the tool bar or begin receiving guidance to the destination you entered by tapping the View Route button (see below). To add additional stops, tap one of the trip entry buttons on the tool bar at the top of the screen. Each option is described on the following pages.
Entering a Work Address Favorites Tap the Work button. The first time you use this button, you’ll be prompted to enter your Work Address. Tap the Favorites button. A drop-down list will appear, providing quick access to the last 50 destinations that you entered. Enter the City or Postal Code, Address, and (optionally) Name of your workplace. Tap OK to save it. In later uses tapping the Work button will enter your workplace as a stop. To change your work address in the future, see Favorites p. 32.
Changing Views: 3. Guidance Map/Itinerary/Guidance Toggle NOTE: It is not safe to attempt to alter settings on your Pocket PC while you are driving. Either have a passenger make changes, or pull over to a safe area. Tap the View Route button to go to the Guidance screen. 1. Map Tap the View Map button to switch from any screen to see a map of your current location. Driver Safety Screen Passenger Screen In Guidance Mode you will receive turn-by-turn driving instructions.
Trip Editing and Waypoints Picking Stops From the Map To get to the Edit Trip screen from the Guidance screens at any time, tap the screen anywhere except on the map to display the tool bar, then tap the Edit Trip button. From here you can edit the current trip or add additional stops. CoPilot Live enables you to pick a stop off the map when you don’t know the exact address of your destination. You must be in Planning mode to pick a stop and name it (choose Planning from the Mode menu).
Detour Feature Selective Routing CoPilot Live’s Detour Feature allows you to preview an alternate route before deciding whether or not to take it. Perfect for situations in which traffic has suddenly slowed ahead of you, the Detour Feature will generate an alternate route and tell you exactly how much distance the new route will add to your trip. You can then make an informed decision about whether you’re better off driving through the delay or taking the new route.
Tools Menu Options Contact Integration CoPilot Live allows you to link directly to Pocket Outlook to retrieve address information. With just a couple of quick taps of the stylus, you can enter a contact’s home and/or work address as your destination. 1. From the Edit Trip screen, tap the Address button. 2. To pull a contact’s address directly from Pocket Outlook, tap the Contacts button.
Modes CoPilot Live has four modes of operation on the Pocket PC. Tap the pop-up Mode menu at the bottom of the screen to select Guidance, Navigating,Walking, or Planning Mode. Guidance Mode Tap the Map Tab to choose between Miles and Kilometers, and a map display that always tracks your position moving upward or maintains north at the top. You can also choose Drag Map mode that lets you use the stylus to drag the map in any direction to a desired location (versus drawing a box around an area).
The GPS Menu Open and Play GPS Tracks Status To view your GPS satellite activity at any time, select Status from the GPS menu. Here you will receive information on Speed, Lat/ Long position, Heading, and Time and Date. Tap on the Sats tab for more GPS satellite information. Receiving signals-ON Select Receiving from the pop-up GPS menu to activate or deactivate GPS satellite reception. Receiving is active if you see a check mark.
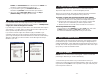
Reference: CoPilot Live Screens What's What on Your Pocket PC The following is a guide to the various features and shortcuts available from the screens you will see on your Pocket PC as you operate CoPilot Live. Edit Trip Screen 4a. Playback can be viewed in any window. To control the speed, select Options from the Tools menu, tap the GPS tab, and use the sliding bar. Shortcuts to: Home, Work, Favorites, Address Input, Points of Interest, and the View Route button. 5.
Guidance (Driver Safety Screen) Map Screen Map will only be shown as you approach turn. Toolbar for easy access to Trip window, Itinerary, and Zoom In/Out or More/Less Detail. If toolbar is not visible tap anywhere on the screen. Next turn instruction. Next turn arrow and distance to next turn. Direction which your map is facing. Customizable display, tap to cycle between current road, crossroad, speed, current time, elevation, and nearest town.
Trip Planning on Your Pocket PC Address Input Screen You can use Pocket CoPilot on your Pocket PC for trip planning whether or not the GPS receiver is connected and receiving data. Planning mode allows you to run a trip on your Pocket PC even when you're not in your car. You'll get driving directions and maps that you can use for reference before your trip begins. Tap the Contacts button to select an address from Pocket Outlook.
Trip Planning on Your Desktop On the following pages you will find brief descriptions of the trip planning capabilities of the CoPilot Live desktop application. You can use CoPilot's desktop functions to map out routes and print maps and driving directions before getting on the road. This is an additional feature of CoPilot Live that is in no way connected to using your Pocket PC for route guidance.
2. Save Trip 4. New Trip New Trip button or New Trip from the File menu. Save Trip button or Save Trip.../ Save Trip As... from the File menu. Takes you into a standard Windows folder where you can name trips to be saved after running them in the Trip Planner. Takes you to the Trip Planner window where you can create a new trip, arrange the order of stops on your route, add or edit Favorites, and search for Points of Interest. Click Run to receive driving directions and a map. 3. Edit Trip 5.
6. Print 8. Data Download Wizard Print button or Print... from the File menu. Data Download Wizard button or Data Download Wizard from the File menu. Takes you to the standard Windows Print menu to print the active window that contains your map or driving directions. Activate one or the other window by selecting from the dropdown Window menu. Select Print TravPak... from the File menu to print driving directions, an overview map, and a zoomed map of each stop.
11. Less Detail 12. More Detail 15. Pick Stops Click the Pick Stops button to turn on Pick Stop mode and enter a stop by picking it with the mouse from the map. More/Less Detail buttons or Detail from the Map menu. Clicking on these buttons once will change the level of detail you see on the map by one increment 13. Zoom to Region The Zoom to Europe button or Zoom Region from the Map menu. This function allows you to zoom your map view to a specific region.
Reference: Desktop Trip Planning 17. Landmark Reporting What's What on Your Desktop CoPilot Live on your desktop includes many options, special features and shortcuts.The following is a guide to the main screens you will see as you use your desktop/laptop computer for trip planning. Map Window Menus and toolbar buttons to access all of CoPilot's desktop features. Select Landmark Reporting from the drop-down Trip menu.
Trip Planner Window (Points of Interest) Trip Planner Window (Contacts) Enter a person’s first or last name and hit . CoPilot will search your Contacts database for matches. Select Tab for Points of Interest. Enter a city or postal code in which you would like to search, a radius within which to search, choose a category and type from the drop-down menu, and click the binoculars to search. You can also enter a name to narrow down the search in the POIs that start with box.
Routing Options Click the Options button in the Trip Planner window to access CoPilot routing options. Auto Quickest is the default setting, and provides the quickest routing for automobiles based on practical considerations such as road quality, terrain, and urban/ rural classifications. RV routing favors major roads and avoids sharp turns and U-turns where possible. Click Advanced to set general road preferences. Drag the sliding bars to the left or right to avoid or favor each road type.
CoPilot Live Communications Pocket PC Setup CoPilot Live now allows you to maintain two-way communication with drivers who are using CoPilot and to actually see where they are currently located using your home or office PC. Using this CoPilot Live functionality requires the following: 1) CoPilot Live open on your home or office PC. Your PC must be connected to the internet. 2) CoPilot Live running in the vehicle. Your Pocket PC must have a wireless internet connection. (Visit our website at www.alk.
Send/Receive Messages - Desktop To send a message to the driver, click the Send Message button on the toolbar. When the driver responds to your message, the response is displayed in the Message Center: Standard Response Buttons Text to Send Customizable Response Buttons Send Button Changes Number of Customizable Response Buttons Message and Driver’s Response Click your cursor in the space just below the Standard Response Buttons, and begin typing.
Receive/Respond To Messages - Pocket PC Send Trip Itinerary Updates - Desktop To send a Trip Itinerary Update to the driver, click the New Trip button on the toolbar and create a trip itinerary in the Trip Planner window just as you would in Planning Mode (see p. 60). Then click the Send button: Trip Planner Window When you are the driver and a message is sent to you, CoPilot Live displays it on top of all other windows.
Receive Trip Itinerary Updates - Pocket PC When the driver responds to your trip intinerary update, the resonse is displayed in the Message Center: When you are the driver and a Trip Itinerary Update is sent to you, CoPilot Live displays it on top of all other windows. If you have CoPilot Live's text-to-speech engine installed, you will hear the itinerary updates spoken out loud. The four Standard Response Buttons appear (see p. 68 for more details on these buttons).
Helpful Hints Installation Your Product Key Code can be found on the cover of your printed Quick Start. four satellites, GPS is able to give you the latitude, longitude and elevation of your present location, and also your road speed and direction of travel on a route. Given the right conditions, a GPS sensor can identify your geographic position anywhere in the world within a matter of a few meters.
Trouble-shooting Using Help Files Why can't I get a satellite reading the first time I use CoPilot Live? CoPilot Live provides extensive Help Files, available on your desktop/laptop and your Pocket PC, to guide you through the program as you use it. The first time the GPS receiver is used it may take approximately 5 minutes to acquire a signal (but may take as long as 15 minutes).