
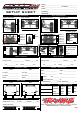
User Manual


2
•
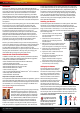
TRAXXAS
SLASH 4X4 PLATINUM EDITION
Introduction
Thank you for choosing the Traxxas Slash 4X4 Platinum Edition.
We believe you have purchased the most technologically advanced,
track-ready R/C short-course truck available. Slash 4X4 proudly
demonstrates Traxxas’ passionate commitment to innovation,
ultimate performance, and unmatched engineering. Slash 4X4’s
advanced design takes short-course performance to a higher level.
Already engineered to win, Slash 4X4 Platinum Edition pushes the
performance envelope even further with accessories developed for
competition.
We know you’re excited about getting your new Slash 4X4 Platinum
on the track, but it’s very important that you take some time
to download and read the Slash 4X4 Ultimate Owner’s Manual,
available at
Traxxas.com/manuals
, in addition to this supplement.
The manual contains all the necessary set-up, tuning, and
maintenance procedures that allow you to unlock the incredible
performance and adjustment potential that Traxxas engineers
designed into the Slash 4X4 Platinum Edition. Even if you are an
experienced R/C enthusiast, it’s important to read and follow the
procedures in this manual. Slash 4X4 Platinum Edition utilizes
proprietary technology that you may not be familiar with.
We want you to feel confident that you own the best performing
truck on the market and that it is backed by a team of professionals
who aim to provide the highest level of factory support possible.
The Slash 4X4 Platinum Edition is about experiencing total
performance and satisfaction, not just with your truck, but with the
company that stands behind it. We truly want you to enjoy your
new model! Thank you again for going with Traxxas.
Included with Slash 4X4 Platinum Edition
In addition to Slash 4X4’s many standard performance features,
your model includes the following Platinum Edition upgrades:
• Sealed, silicone-filled center differential
• Hard-Anodized PTFE-Coated Aluminum GTR Shocks
• Titanium nitride shock shafts
• Blue-anodized aluminum front axle carriers
• Blue-anodized aluminum rear axle carriers
• Blue-anodized aluminum C-Hubs
• Front and rear sway bars
• Soft, S1-compound BFGoodrich
®
Mud-Terrain
™
T/A
®
licensed tires
• Clear body with window masks
• Platinum Edition decal sheet
Required to Complete Your Model
To complete the Slash 4X4 Platinum Edition for operation, you will
need: polycarbonate-compatible paint; a two-channel transmitter
with mini receiver; a battery with Traxxas High-Current Connector
(6-7 cell NiMH, 2- or 3-cell LiPo); and a charger. You MUST use a
LiPo-specific charger with LiPo batteries.
Traxxas Support
Traxxas support is with you every step of the way.
Read below to find out how to contact us and
what your support options are. If you have any
questions about your Slash 4X4 or its operation,
call the Traxxas Technical Support Line toll-free
at: 1-888-TRAXXAS (1-888-872-9927).* Technical
support is available Monday through Friday from 8:30am to
9:00pm central time. Technical assistance is also available at
Traxxas.com/support. You may also e-mail customer support
with your question at support@Traxxas.com. Join hundreds of
Traxxas R/C enthusiasts in our online community at Traxxas.com.
Traxxas offers a full-service, on-site repair facility to handle any of
your Traxxas service needs. Maintenance, replacement parts, and
accessories may be purchased directly from Traxxas by phone
or online. You can save time, along with shipping and handling
costs, by purchasing replacement parts from your local dealer.
Do not hesitate to contact us with any of your product support
needs. We want you to be thoroughly satisfied with your new
Slash 4X4
Platinum Edition
!
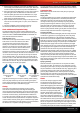
Installing your Receiver
This model requires the installation of a radio system. Slash 4X4’s
watertight, o-ring sealed receiver box is designed to accept
“mini“ and “micro” receivers with maximum dimensions of 42mm
long x 31mm wide x 17mm tall (1.9” x 1.2” x 0.6”). Follow the
steps below to install your receiver and maintain the receiver
box’s watertight seal.
1. Install the receiver into the box. Make
sure the LED light pipe is aligned with
the receiver LED.
2. Install the servo wires and antenna
through the cover and plug the wires
into the receiver.
3. Make sure the O-ring is properly seated into
the groove in the receiver box so that the
cover will not pinch it or damage it in any way.
4. Install the cover and tighten the two 3x12mm
button-head cap screws securely.
5. Inspect the cover to make sure that the
O-ring seal is not visible.
6. Arrange the wires neatly using the wire
guides in the receiver box.
7. Apply a small bead of silicone grease
(Traxxas part #1647) to the wire clamp.
8. Install the wire clamp and tighten the two
2.5x12mm cap screws securely.
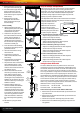
Setting Up the Antenna
The receiver antenna has been set
up and installed from the factory.
The antenna is secured by a 3x4mm
set screw. To remove the antenna
tube, simply remove the set screw
with the included 1.5mm wrench.
When reinstalling the antenna,
first slide the antenna wire into the
bottom of the antenna tube until
the white tip of the antenna is at
the top of the tube under the black cap. Next, insert the antenna
tube into the mount while making sure that the antenna wire is
in the slot in the antenna mount, then install the set screw next
to the antenna tube. Use the supplied 1.5mm wrench to tighten
the screw just until the antenna tube is securely in place. Do not
over-tighten. Do not bend or kink the antenna wire! Do not
shorten the antenna tube.
Antenna
Tip
Antenna
Tube
Antenna
Mount
To prevent loss of radio
range do not kink or cut
the black wire, do not bend or
cut the metal tip, and do not
bend or cut the white wire at
the end of the metal tip.
Correct NoNo No
BFGoodrich® Tires Trademarks are used under license from Michelin Group Companies.