
User Manual


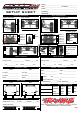


SLASH 4X4 PLATINUM EDITION
TRAXXAS
•
3
Programming the VXL-3s Speed Control
The Slash 4X4 is equipped with the high-performance Velineon
brushless power system. Before operating your model, you will
need to calibrate the speed control to your transmitter, as described
below. The Velineon VXL-3s speed control also features three driving
profiles and Low-Voltage Detection for use with lithium polymer
(LiPo) batteries. Note that the speed control has been adjusted at
the factory specifically for the Platinum Edition, using the following
settings:
Driving Profile 1: Sport Mode - This profile enables full reverse
throttle control for maximum versatility and fun with your Slash 4X4.
If you plan to race your Slash 4X4, be aware that most tracks do not
allow the use of reverse in competition. If your track does not allow
reverse, follow the steps in the Slash 4X4 Platinum Quick Start Guide
included with the model to select Profile 2, Race Mode. Race Mode
eliminates reverse, but still gives fully proportional braking control.
Low-Voltage Detection: ACTIVATED - This is the required setting
for use with LiPo batteries. When switched on, the speed control’s
LED will glow green, indicating Low-Voltage Detection has been
enabled. The Low-Voltage Detection circuitry constantly monitors
the battery voltage. When the battery voltage begins to reach the
minimum recommended discharge voltage threshold for LiPo
battery packs, the VXL-3s will limit the power output to 50% throttle.
When the battery voltage attempts to fall below the minimum
threshold, the VXL-3s will shut down all motor output. The LED on
the speed control will slowly blink red, indicating a low voltage
shutdown. The VXL-3s will stay in this mode until a fully charged
battery is connected.
If you wish to operate your model using a NiMH battery,
Low-Voltage Detection may be disabled to achieve maximum run
time. The Slash 4X4 Platinum Quick Start Guide included with the
model explains how to disable Low-Voltage Detection. When the
speed control is turned on, its LED will glow red, indicating Low-
Voltage Detection is disabled. Never use LiPo batteries while
Low-Voltage Detection is disabled.
VXL-3s Setup Programming
(Calibrating your ESC and transmitter)
Read through all of the programming steps before you begin. If
you get lost during programming or receive unexpected results,
simply unplug the battery, wait a few seconds, plug the battery
back in, and start over.
1. Connect a fully charged battery pack to the VXL-3s.
2. Turn on the transmitter (with the throttle at neutral).
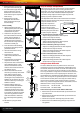
3. Press and hold the EZ-Set button (A). The LED
will first turn green and then red. Release the
EZ-Set button.
4. When the LED blinks RED ONCE,
pull the throttle trigger to the full
throttle position and hold it there (B).
5. When the LED blinks RED TWICE,
push the throttle trigger to the full
reverse and hold it there (C).
6. When the LED blinks GREEN ONCE,
programming is complete. The LED
will then shine green or red (depending on
low-voltage detection setting), indicating the
VXL-3s is on and at neutral (D).
Tuning and Maintaining the Shocks
Slash 4X4 features high-performance GTR shocks that utilize
friction-reducing titanium nitride shafts and hard-anodized
bodies with PTFE-coated bores to provide the ultimate in precise
damping control. The shocks are filled with 30W silicone fluid.
You may wish to install lower-viscosity (“thinner”) or higher-
viscosity (“thicker”) fluid to alter damping performance to suit
your track, terrain, or driving style. Damping can also be altered
by changing the pistons inside the shocks. The front piston is a
2-hole with 1.5mm diameter holes. The rear piston is a 2-hole
with 1.6 diameter holes.
Shock Oil
The 4 oil-filled aluminum shocks (dampers) effectively control
the suspension movement by preventing the wheels and
tires from continuing to “bounce” after rebounding from a
bump. Changing the oil in the shocks can vary the suspension
damping effect. Changing the oil to a higher viscosity oil will
increase damping. Lowering the viscosity of the oil will cause
the suspension damping to be reduced. Damping should be
increased (with higher viscosity oil) if the model is bottoming
easily over jumps. Damping should be decreased (with thinner
viscosity oil) if the model is hopping over small bumps and feels
unstable. The viscosity of shock oil is affected by extremes in
operating temperature — an oil of certain viscosity will become
less viscous at higher temperatures and more viscous at lower
temperatures. Operating in regions with cold temperatures may
require lower viscosity oil. From the factory, the shocks are filled
with SAE-30W silicone oil. Only use 100% silicone oil in the shock.
Replacing Shock Oil
For easier service, the shocks should be removed from the
vehicle and disassembled to change the oil.
1. Remove the lower spring retainer and shock spring.
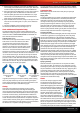
2. Remove the upper shock cap using the shock wrench and
suspension multi-tool (A).
3. Empty the used shock oil from the shock body.
4. Fill the shock with new silicone shock oil up to the top of the
shock body.
5. Slowly move the piston up
and down (always keeping it
submerged in oil) to release the
air bubbles. Let the shock sit
for a few minutes to allow any
remaining air bubbles to surface.
6. Slowly thread the upper cap
with the installed shock bladder
onto the shock body with the
suspension multi-tool. The excess oil will bleed out of the
small hole in the shock cap.
7. Tighten the shock cap until snug. Use the included steel shock
wrench to hold onto the shock body while tightening (A).
Shock disassembly
The shocks must be removed from the vehicle and disassembled
to change the pistons. Use the shock exploded views included
with the model to aid in the assembly process.
1. Remove the spring and lower spring retainer from the shock.
2. Remove the shock cap and empty the shock body of
shock oil (A).
Green then Red
A
Once Red
B
Twice Red
C
Once Green
D
A. Tighten/Loosen Upper Cap