OWNER’S MANUAL MODEL 76054-5
INTRODUCTION CONTENTS 2 BEFORE YOU PROCEED 3 SAFETY PRECAUTIONS 4 SUPPLIED EQUIPMENT 5 MODEL OVERVIEW 6 GETTING STARTED 7 THE 2.4GHz RADIO SYSTEM 12 ADJUSTING THE ELECTRONIC SPEED CONTROL 14 DRIVING YOUR MODEL 16 MAINTAINING YOUR MODEL Thank you for purchasing a LaTrax 1/18-scale model. Your LaTrax model is a new 4X4 adventure vehicle designed to generate a high level of driving fun and exciting off-road performance.
INTRODUCTION Technical support is available Monday through Friday from 8:30am to 9:00pm central time. Technical assistance is also available at LaTrax.com. You may also e-mail customer support with your question at support@LaTrax. com. Join thousands of registered members in our online community at LaTrax.com. LaTrax offers a full-service, on-site repair facility to handle any of your service needs. Maintenance and replacement parts may be purchased directly from LaTrax by phone or online at LaTrax.com.
INTRODUCTION WARNING! CAUTION! DANGER! FIRE HAZARD! Your model is able to use LiPo batteries. Charging and discharging batteries has the potential for fire, explosion, serious injury, and property damage if not performed per the instructions. Before use, read and follow all manufacturer’s instructions, warnings, and precautions.
INTRODUCTION (continued from previous page) • DO NOT charge batteries inside of an automobile. DO NOT charge batteries while driving in an automobile. This charger is equipped with a long cord intended to allow the battery to be charged outside of an automobile when using the automobile’s auxiliary power socket. If the cord will not reach outside of the automobile, find another power source. • NEVER charge batteries on wood, cloth, carpet, or on any other flammable material.
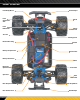
MODEL OVERVIEW Front Body Mount Front Suspension Arm Front Differential Front Bumper Shock Front Camber Link Toe Link Steering Servo Receiver Box Plug Battery Compartment Chassis Receiver Box Battery Hold-Down Motor Electronic Speed Control Spur Gear Rear Suspension Arm Rear Camber Link 6 Pinion Gear Rear Differential Rear Body Mount Rear Bumper
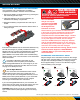
GETTING STARTED INSTALLING TRANSMITTER BATTERIES WARNING: Your transmitter uses 4 AA batteries. The battery compartment is located in the base of the transmitter. 1. Remove the battery compartment door by pressing the tab and sliding the door open. 2. Install the batteries in the correct orientation, as indicated in the battery compartment. 3. Reinstall the battery compartment door and snap it closed. 4. Turn on the transmitter and check the status LED for a solid green light.
GETTING STARTED INSTALLING THE BATTERY PACK Your model includes a 7.2V 6-cell NiMH battery pack. Follow these steps to install the battery: 1. Remove the body clip from the battery holddown, and then remove the battery hold-down. 2. Install the battery pack into the battery compartment with the battery wires facing the front of the model. 3. Reinstall the battery hold-down, making sure not to pinch the battery wires. Secure the battery hold-down with the body clip.
THE 2.4GHz RADIO SYSTEM THE 2.4GHz RADIO SYSTEM Your model includes a 2.4GHz transmitter. When powered on, the transmitter will automatically locate and lock onto an available frequency, allowing multiple models to be raced together without frequency conflicts. The included radio system has been programmed for your model at the factory and does not require adjustment, but it does have settings you may need to access to maintain proper operation of your model.
THE 2.4GHz RADIO SYSTEM RADIO SYSTEM RULES • The 2.4GHz transmitter has a directional antenna. For maximum range, hold the transmitter upright and pointed in the direction of the model. Pointing the transmitter away from the model will reduce radio range. TRANSMITTER Set Button Steering Wheel Red/Green Status LED Steering Trim • Always turn your transmitter on first and off last.
THE 2.4GHz RADIO SYSTEM RADIO SYSTEM CONTROLS servo. Also, check that the steering mechanism is not loose or binding. If the steering operates slowly, check for weak batteries. TURN R T IGH TURN LE 6. When looking down at the model, the front wheels should be pointing straight ahead. If the wheels are turned slightly to the left or right, slowly adjust the steering trim control on the transmitter until they are pointing straight ahead. FT 7.
THE 2.4GHz RADIO SYSTEM RADIO SYSTEM BASIC ADJUSTMENTS Steering Trim The steering trim knob located on the face of the transmitter adjusts the neutral (center) point of the steering channel. If your model pulls to the right or left when the steering wheel is centered, turn the knob until the model drives straight when the steering wheel is centered. Channel Reversing The 2.4GHz transmitter has been programmed with the correct servo direction settings for your model and should not require adjustment.
THE 2.4GHz RADIO SYSTEM TRANSMITTER LED CODES LED Color / Pattern Name Notes Solid green Normal Driving Mode See page 11 for information on how to use the transmitter controls. Slow red (0.5 sec on / 0.5 sec off) Binding See page 12 for more information on binding. Flashing medium red (0.25 sec on / 0.25 sec off) Low Battery Alarm Put new batteries in the transmitter. See page 7 for more information. Flashing fast red (0.125 sec on / 0.
ADJUSTING THE ELECTRONIC SPEED CONTROL PROFILE SELECTION The speed control is factory set to Sport Mode (100% forward, brakes, and reverse). You can program the speed control to disable reverse (Race Mode) or to allow 50% power (patent-pending Training Mode) using the following mode selection procedures. Please note that the speed control should be connected to the receiver and the transmitter adjusted as described previously. The profiles are selected by entering the programming mode. 2.
ADJUSTING THE ELECTRONIC SPEED CONTROL 5. Move the throttle trigger forward again to engage reverse (Profile #1). The LED will turn off. Once full reverse power is reached, the LED will shine RED. 6. To stop, return the throttle trigger to neutral. Note that there is no programmed delay when changing from reverse to forward. Use caution to avoid slamming the speed control from reverse to forward. On high-traction surfaces, this could result in transmission or driveline damage. 7.
DRIVING YOUR MODEL Now it’s time to have some fun! This section contains instructions on driving and making adjustments to your model. Before you go on, here are some important precautions to keep in mind. • Allow the model to cool for a few minutes between runs. This is particularly important when using high-capacity battery packs that allow extended periods of running. Monitoring temperatures will extend the lives of the battery and motor.
DRIVING YOUR MODEL SHOCK POSITIONS Upper Position 1 Upper Position 2 Upper Position 3 Lower Position 1 Lower Position 2 RUNNING IN WET CONDITIONS Your model is designed with water-resistant features to protect the electronics in the model (receiver, servos, electronic speed control). This gives you the freedom to have fun driving your model through puddles and other wet conditions. Though highly water resistant, the model should not be treated as though it is submersible or 100% waterproof.
DRIVING YOUR MODEL • Stub axle housing bearings: Remove, clean, and re-oil the bearings as needed. • Chassis: Keep the chassis clean of accumulated dirt and grime. Periodically inspect the chassis for damage. • Front and rear differential: Remove, disassemble, clean, and regrease all the gears in the differential (internal gears, ring, and pinion). Refer to your exploded view diagrams for help with disassembly and reassembly. • Shocks: Keep the oil level in the shocks full.
OWNER’S MANUAL MODEL 76054-5 LaTrax, 6250 Traxxas Way, McKinney, Texas 75070 Phone: 972-549-3000 Toll-free 1-888-872-9927 LaTrax.