2 0 0 8 1100 Klein Road, Plano Texas 75074 1-888-TRAXXAS 080312 P l a t i n u m E d i t i o n MODEL 5304 KC1126 5304 Manual Work.
INTRODUCTION CONTENTS INTRODUCTION................................................................ 2 SAFETY PRECAUTIONS................................................... 3 TOOLS, SUPPLIES AND REQUIRED EQUIPMENT......... 3 RADIO INSTALLATION AND BATTERY CARE................. 4 TIRE GLUING AND BODY DETAILING............................. 5 THE TRX 3.3 RACING ENGINE........................................ 6 TUNING ADJUSTMENTS................................................11 INDEX.............................
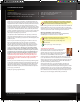
INTRODUCTION SAFETY PRECAUTIONS All of us at Traxxas want you to safely enjoy your new Revo. Operate your Revo sensibly and with care, and it will be exciting, safe, and fun for you and those around you. Failure to operate your Revo in a safe and responsible manner may result in property damage and serious injury. The precautions outlined in this manual should be strictly followed to help ensure safe operation. You alone must see that the instructions are followed and the precautions are adhered to.
RADIO INSTALLATION AND BATTERY CARE This model requires the installation of a radio system. The receiver box is designed to fit most standard size “mini” or “micro” receivers (actual dimensions of box are 32mm wide x 45mm long x 26mm tall [1.26" x 1.77" x 1.02"]). A rechargeable 5-cell nickel metal hydride (NiMH) battery pack is include to power your radio system. 1. Remove the lid from the radio box. 2.
TIRE GLUING AND BODY DETAILING TIRE GLUING The tires on your Revo are pre-glued and ready for the track. Revo rims are equipped with a special bead design that helps retain the tires and reduces the stress places on the glue joint. Following are instructions for how to glue your wheels and tires in future. You can glue the tires without removing the wheels from the truck. For clarity, these instructions show the process with the wheels removed.
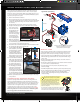
THE TRX 3.3 RACING ENGINE INTRODUCTION The TRX® 3.3 Racing Engine is the next generation of TRX nitro power. The large displacement and advanced porting generate class-leading horsepower while still maintaining the TRX Racing Engine characteristics of broad, linear power delivery and ease of tuning. Focused engineering and rigorous testing have yielded unprecedented power and uncompromising performance. The TRX 3.3 Racing Engine takes a total-system approach.
THE TRX 3.3 RACING ENGINE If 33% improves power, then it seems that the highest nitro content available (beyond 33%) should always be used in the engine. In reality, there are practical limitations. Engines are designed to run best within a range of nitro percentages. How the engine is ported, the size of the combustion chamber and other factors determine how much nitro can be efficiently used in the engine. The TRX 3.
THE TRX 3.3 RACING ENGINE 3. Connect the glow igniter to the engine. 4. Place the model on a starter box and engage the starter. Watch for fuel moving through the fuel line up to the carburetor. Watch closely! The fuel moves very fast. If the fuel doesn’t move through the line within 5 seconds, prime the engine by briefly (one or two seconds) covering the exhaust outlet with your finger until the fuel is just visible in the carburetor fuel line.
THE TRX 3.3 RACING ENGINE Winter Break-in Tips During the break-in process, the piston and sleeve wear into each other to form a precise fit. The engine needs to heat up to a temperature around 200 to 215 degrees to allow the piston and sleeve to achieve this fit properly. A precise fit between these two components is critical for proper compression, and optimum performance.
THE TRX 3.3 RACING ENGINE Richen the fuel mixture to the optimum setting by richening the highspeed needle at least 1/8 turn counterclockwise and retest. This setting will extend engine component life. Low-Speed Fuel Mixture Adjustment The low-speed mixture is always set after the high-speed needle is correctly adjusted. The low-speed mixture is set using the pinch test. 1. Once the engine is warm, do several high-speed runs to confirm that the high-speed needle is set correctly. 2.
TUNING ADJUSTMENTS SUSPENSION AND ALIGNMENT SETTINGS Roll Center There are two holes on the bulkheads Upper Control Arm to mount each upper suspension arm. Upper Mounting Holes The roll center of the vehicle can be raised by mounting the upper control arm in the lower of the two holes. This will effectively increase the roll stiffness Upper Control Arm of the vehicle (similar to installing Lower Mounting Holes swaybars).
TUNING ADJUSTMENTS Rocker Arm Total Travel Progressive Rate Progressive 1 90mm (60mm up / 30mm down) Low Progressive 2 90mm (60mm up / 30mm down) Medium Progressive 3 90mm (60mm up / 30mm down) High Long Travel 120mm (80mm up / 40mm down) Low The optional Long Travel rocker arms are designed to be used only with the standard non-adjustable push rods installed in the hole labeled “LT” (the middle hole of the lower suspension arm’s push rod mount).
TUNING ADJUSTMENTS your static camber, insert the supplied 2.5 mm hex wrench through the slit in the dust plug and engage the end of the pivot ball (compressing the suspension until the arms are parallel to the ground will allow for easier hex wrench engagement). The upper pivot ball is normally screwed all the way in. Negative camber is achieved by screwing the pivot ball of the lower control arm out. Note: When camber is changed, the toe angle of the wheel has to be reset.
TUNING ADJUSTMENTS To further alter the characteristics of the variable rate, the diameter of the bypass holes may be fine tuned by enlarging them - speeding even further the rebound rate. Optional pistons with bypass holes that are larger or smaller (1, 2, or 3) than the factory installed stock pistons can be used to decrease or increase damping respectively. From the factory, the shocks are filled with SAE-50W silicone oil. Only use 100% silicone oil in the shock.
TUNING ADJUSTMENTS Adjusting the Two-Speed Transmission Revo comes equipped with an adjustable two-speed transmission. When the shift point on the transmission is adjusted correctly, it will maximize acceleration and improve driveability. Use a 2mm hex wrench to adjust the shift point. To make the adjustment, the engine must be off (not running). 1. Remove the rubber access plug from the top of the transmission housing. 2.
TUNING ADJUSTMENTS Tuning The Sealed Gear Differentials Revo’s front and rear gear differentials allow the left and right wheels to spin at different speeds while turning so that the tires do not scuff or skid. This decreases the turning radius and increases steering performance. The performance of the front and rear differentials can be tuned for different driving conditions and performance requirements.
TUNING ADJUSTMENTS Brake Set-up Tips WING ADJUSTMENT • All four wheels should lock at the same time. This is the base setting for the brake system. If the brakes do not engage simultaneously, then thread the adjustment wheels in toward the brake levers until they actuate the brakes when pushing the transmitter trigger forward. • Front brake bias - Setting the front brakes to engage before the rear brakes will create a slight push while entering a corner.
INDEX Address 3 Air filter 6 Alignment; See Suspension and Alignment maximum limits 13 Antenna crimp nut 4 Antenna tube 4 Brake 16 linkage adjustment 16 pads 17 set-up 17 shoulder screw adjustment 16 Charging jack 4 Clutch bell 15 Decals 5 Differentials 16–17 Engine (TRX 3.
NOTES REVO PLATINUM EDITION • 19 5304 Manual Work.
2 0 0 8 1100 Klein Road, Plano Texas 75074 1-888-TRAXXAS 080312 P l a t i n u m E d i t i o n MODEL 5304 KC1126 5304 Manual Work.