963 Web User Guide Issue 4
Author: Technical Publications Issue: 4 Date: 15/01/2009 Part Number: TC200685 Copyright: © 2009 Honeywell Technologies Sàrl, ECC Division. All rights reserved. This manual contains proprietary information that is protected by copyright. No part of this manual may be reproduced, transcribed, stored in a retrieval system, translated into any language or computer language, or transmitted in any form whatsoever without the prior consent of the publisher.
Table of Contents TABLE OF CONTENTS 1 1.1 1.2 2 3 3.1 3.2 3.3 3.4 3.5 3.6 3.7 3.8 4 4.1 4.2 4.3 4.4 4.5 4.6 4.7 4.8 4.9 4.10 4.11 4.12 4.13 4.14 ABOUT THIS MANUAL................................................................................................................................. 5 Conventions Used in this Manual ................................................................................................................ 5 Contacting Trend.................................................
Table of Contents 5 ERROR MESSAGES ..................................................................................................................................... 45 INDEX .......................................................................................................................................................................
About This Manual 1 ABOUT THIS MANUAL This manual applies to 963 version 3.10. It provides a description of how to use the 963 when accessing the 963 Server from a web browser. It is intended for a reader with no knowledge of the 963 who operates it on a daily basis. It is assumed that the system has already been set up and engineered to suit user requirements, the user is familiar with basic computer use, and has knowledge of BMS. It is divided into several sections.
About This Manual 1.2 Contacting Trend Head Office Trend Control Systems Ltd PO Box 34 Horsham Sussex RH12 2YF England Tel: +44 (0) 1403 211888 Fax: +44 (0) 1403 241608 Details of regional offices can be found on our Web site. Internet Our company web site (www.trend-controls.com) provides information about our products and us, or our support web site (http://pnet.trend-controls.com). Technical Support Our support department provides technical support during normal office hours.
About 963 2 ABOUT 963 Once engineered the 963 Supervisor provides the user with a system wide control panel with the facility to monitor and change the Building Management System (BMS) ensuring that the HVAC equipment operates safely and efficiently. The use of colour graphics specially designed for the system displays this information in a simple and effective way. Graphs and pages of text information can be used to supplement monitored information.
About 963 This page is intentionally left blank.
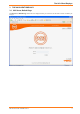
The 963 Client Displays 3 3.1 THE 963 CLIENT DISPLAYS 963 Server Default Page The 963 Servers Default Page shown below is displayed when you connect to the 963 from a client. It enables you to log in.
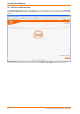
The 963 Client Displays 3.2 963 Server Start up Page The 963 Start up Page shown below is displayed once you have logged in. It provides access to the Schematic Page Client Display, Device Viewer, Diary Display and if you are authorised to view alarms contains the Alarm Viewer. Note that for users that only have access to schematics the Schematics Page Display will be shown instead.
The 963 Client Displays 3.3 Alarm Viewer The Alarm Viewer is only available when accessed from a web browser that supports the 963’s graphic mode. It is displayed on the 963 Servers Start up Page providing you have authority to view alarms. It displays the alarms that have been received. These alarms can be filtered to reduce the amount of data displayed. The Alarm Viewer has two tabs: Alarm History Incoming alarms Colours are used to indicate whether the alarm is a set alarm or a cleared alarm.
The 963 Client Displays Alarm History tab The Alarm History stores all the alarms after they have been processed. This list stores the all the alarms in the database that have been processed whether or not they have been actioned by the user. The alarms can be viewed in chronological order or a summary view. Summary View - This gives a count for each alarm type for each point. Chronological View - a systematic alarm history sorted by time order.
The 963 Client Displays 3.5 Device Viewer The Device Viewer is only available when accessed from a web browser that supports the 963’s graphic mode. It enables inputs, outputs, adjustments, time zones, and critical alarms from the selected part of the system to be displayed, and for values to be adjusted, or graphed. E.g. if the internetwork is selected, all values from the internetwork are displayed. If a particular Lan is selected only values from that Lan are displayed.
The 963 Client Displays Column Icon Description Contains an icon that indicates the module type. Sensor Modules Digital Input Modules Virtual Sensor Modules Critical Alarm Modules Knob Modules Switch Modules Time zone Modules Analogue Driver Modules Digital Driver Modules Plot Modules These icons may also overlayed with icons indicating the modules alarm state, and whether it can be adjusted. Module in alarm but alarm has been acknowledged Module in alarm Module value can be adjusted.
The 963 Client Displays The display also contains a number of buttons that enable the types of modules displayed to be selected. Icon What is Displayed Sensors Digital Inputs Virtual sensors (calculated MKT values) Critical Alarms Knobs Switches Time Zones Analogue Driver Digital Driver Plots Refreshes the values. This causes 963 to only display items of the selected item types whose label matches the search string.
The 963 Client Displays Icon Description Supervisors BACnet Device CNC FNC ID200 INC IQ100 Controller IQ111 Controller IQ131 Controller IQ151 Controller IQ2 Controller IQ3 Controller IQ70 Controller IQ90 Controller IQ EYE Collector IQL Controller Novar Logic 1 Controller Non IQ system device PNC TONIC TOPS XNC Site Structure BACnet Lan Local site Novar Logic 1 Lan Remote Site 16 963 Web User Guide TC200685 Issue 4 15/01/2009
The 963 Client Displays Icon Description Supervisors Trend Lan Unknown Lan General Unknown Device 3.6 Diary Display The Diary Client Display, shown below, allows the occupation times of the controller to be viewed, and adjusted. Exceptions to the normal working times can be setup, and edited as required.
The 963 Client Displays 3.7 Schematic Page Client Display The Schematic Page Client Display, shown below, enables a schematic page to be displayed. When accessed from a web browser that supports the 963’s graphic mode it displays the pages virtually the same as they appear on the server machine. The display allows you to view the information, clicking the different objects will enable you to perform different tasks. The page display should make is clear what can be done.
The 963 Client Displays 3.8 Server Status Page The Server Status Page shown below provides information about the 963 Server's status. The information is split into several tables containing different types of information described below.
The 963 Client Displays This page is intentionally left blank.
Using 963 From a Client 4 USING 963 FROM A CLIENT Information from 963 can easily be accessed using a web browser, over any TCP/IP network (e.g. the company Intranets, or the Internet). All that is required is the URL of the 963 Server and a valid user name and password.
Using 963 From a Client 4. Once you have selected the required display you will be able to view the information such as schematic pages, alarms, the Device Viewer, and server status depending on your level of authority. Clicking the different objects will enable you to perform different tasks, the display should make it clear what can be done. The table below lists the common tasks; you should see the corresponding section of this manual for more details.
Using 963 From a Client 3. When you enter a valid user name and password a page of information should be displayed. If there is a problem connecting to the 963, an error message will be displayed; these messages are explained in the ‘Error Messages’ section of this manual. Note that for security reasons it is only possible to access a 963 Secure Server in graphic mode. 4.1.2 Log In Before 963 can be used, it is necessary to log in so that 963 knows what information and facilities you are able to access.
Using 963 From a Client 4.3 Adjust Values 4.3.1 Adjust a Knob in a Trend Device The value of knobs in Trend devices can be adjusted from a schematic page or from the Device Viewer. To adjust a knob in a Trend device: 1. Display the page containing the knob that is to be adjusted as described in the ‘Display a Schematic Page’ section of this manual, and click the button or picture that enables the knob to be changed.
Using 963 From a Client To adjust knob (analogue value) in a BACnet device in text mode: 1. Display the page containing the value that is to be adjusted as described in the ‘Display a Schematic Page’ section of this manual. 2. In the box next to the value enter the new value. to send the data to the controller. 3. Click 4.3.3 Adjust a Switch in a Trend Device Digital values in BACnet devices are represented in 963 as switches; these can be adjusted from a schematic page or from the Device Viewer.
Using 963 From a Client 4.3.5 Adjust a Module Parameter It is possible to adjust certain parameters of the configuration modules within IQ controllers directly from a schematic page or the Device Viewer. To adjust a module parameter: 1. Display the page containing a value from the controller whose configuration parameters are to be adjusted as described in the ‘Display a Schematic Page’ section of this manual.
Using 963 From a Client 4.3.6 Relinquish Control of a BACnet Value When 963 adjusts a value in a BACnet device it writes the value into the value's priority array. The value will remain in the array, and be used when it is the highest. If required the 963's adjustment can be removed from the array by relinquishing control. To relinquish control of a BACnet value: 1.
Using 963 From a Client 4.4.1.1 View Incoming Alarms Alarms are shown as they arrive on the Incoming Alarms tab of the Alarm Viewer. This list stores the last 100 alarms. To view incoming alarms: 1. Access the 963 Server as described in the ‘Connect to the 963 Server’ section of this manual. 2. Display the 963’s start up page as described in the ‘Display the 963’s Start up Page’ section of this manual. 3. Click the Incoming Alarms tab.
Using 963 From a Client 4.4.1.3 Specify What Columns are Displayed It is possible to determine which columns are displayed in the Alarm History, and the Incoming Alarms list. To specify which columns are displayed 1. View either the Incoming Alarms, or the Alarm History as described in the ‘View Incoming Alarms’, or ‘View Alarm History’ sections of this manual. 2. Click Set up table. A dialogue box is displayed. 3. 4.
Using 963 From a Client 4.4.2.2 Action Alarms from an Alarm Panel Alarms can be actioned from an alarm panel. To action alarms: 1. 2. 3. 4. 5. in the alarm panel. The alarm history will be displayed showing the alarms that require Click acknowledgement associated with the alarm panel. Click the alarm(s) that are to be actioned (to select more than one alarm hold down the CTRL key and click the required alarms).
Using 963 From a Client 4.5 4.5.1 Display Graphs Display a Compact Graph from a Schematic Page Compact graphs of data logged in IQ controllers can be displayed. When a compact log is requested the controller transmits the highest and lowest values in the log and every other value as a percentage of the range. This allows for rapid transmission of data and for very large numbers, but has an error of 1% of the range of values in the logging channel.
Using 963 From a Client 2. Right-click the value that is to be graphed and click Collect full precision log graph. If the value is being logged by more than one plotting channel Collect full precision log graph will be replaced by Collect full precision log graph point to Collect full precision log graph and click the required plotting channel. The graph is displayed. You can zoom in and out of the graph to make it easier to see the data.
Using 963 From a Client 4.5.7 Display the Graph Data The data used to draw the graph can be displayed as a list of points. To display the graph data: 1. Display either a compact graph, or a precision graph for the value that is to be for which the co-ordinates are to be displayed as described in the appropriate section of this manual. 2. Click the List tab. The graph data is displayed. 3.
Using 963 From a Client 4.6 Occupation Times 4.6.1 4.6.1.1 View Occupation Times View Normal Occupation Times To view the normal occupation times for a diary group: 1. Access the 963 Server as described in the ‘Connect to the 963 Server’ section of this manual. 2. Display the page containing the button that provides access to the diary group, and click the button. Or Click Diary. A separate window is opened containing the diary groups, or folders containing diary groups.
Using 963 From a Client 4.6.1.2 View Exceptions To view the exceptions for a particular diary group: 1. Access the 963 Server as described in the ‘Connect to the 963 Server’ section of this manual. 2. Display the page containing the button that provides access to the diary group, as described in the ‘Display a Schematic Page’ section of this manual, and click the button. Or Click Diary. A separate window is opened containing the diary groups, or folders containing diary groups.
Using 963 From a Client 4. 5. 6. 7. 8. 9. In the boxes opposite Start date click the required date, month, and year to specify the first date the exception times are to be used. In the boxes opposite End date click the required date, month, and year to specify the last date the exception times are to be used. If the exception is to be repeated each year select the Same each year check box. In the Time scheme box click the template that is to supply the times.
Using 963 From a Client 4.6.2.3 Adjust a Timezone The occupation times of the controllers on the IQ system (i.e. when they are in occupancy, current week) are set by the times defined in the diary group they belong to. It is possible to override those times. Adjusting the time in this way overrides the times specified by the 963’s diary by directly modifying the times stored in the controller. To adjust a time zone: 1.
Using 963 From a Client 4.8 Display the IQ System If you are accessing the 963 Server in graphics mode the Device Viewer enables inputs, outputs, adjustments, time zones, and critical alarms from the selected part of the system to be displayed. E.g. if the internetwork is selected, all values from the internetwork are displayed. If a particular Lan is selected, only values from that Lan are displayed.
Using 963 From a Client 4.10 Display the 963's Startup Page When you log in the 963’s start up page is displayed, however when you display schematic pages or the Device Viewer it may become hidden. To display the 963’s start up page: 1. Hold down the ALT key and press the TAB key until the start up page is selected. 2. Release both keys. The 963’s start up page will be displayed. 4.
Using 963 From a Client 4.13.1 Add a Week Set Template Week set templates can be added to provide a template of occupation times for a weekly pattern. To add a week set template: 1. Access the 963 Server as described in the ‘Connect to the 963 Server’ section of this manual. 2. Display the page containing the button that provides access to the diary group, and click the button. Or Click Diary. A separate window is opened containing the diary groups, or folders containing diary groups.
Using 963 From a Client 4.13.2 Add a Special Day Template Day templates can be added to provide a template of occupation times for single day. To add a special day template: 1. Access the 963 Server as described in the ‘Connect to the 963 Server’ section of this manual. 2. Display the page containing the button that provides access to the diary group, and click the button. Or Click Diary. A separate window is opened containing the diary groups, or folders containing diary groups.
Using 963 From a Client 4.13.3 Delete a Template Unused templates can be deleted. To delete a template: 1. Access the 963 Server as described in the ‘Connect to the 963 Server’ section of this manual. 2. Display the page containing the button that provides access to the diary group, and click the button. Or Click Diary. A separate window is opened containing the diary groups, or folders containing diary groups. Select the required diary group by clicking it.
Using 963 From a Client 4.14 View Server Status If required information about the server’s status can be displayed. This is useful to the engineer if problems are encountered. To view server status: 1. Access the 963 Server as described in the ‘Connect to the 963 Server’ section of this manual. 2. Log In as described in the 'Log In' section of this manual. 3. Click Server Status. The Server Status Page is displayed.
Using 963 From a Client This page is intentionally left blank.
Error Messages 5 ERROR MESSAGES If there is a problem finding the 963 on the TCP/IP network when attempting to access the 963 Server from a client standard error messages are displayed by the web browser. These messages are determined by the browser itself, and may be of the type the user is familiar with from normal Web browsing. If a connection is made to the 963 Server, but for some reason access is denied to all or part of the 963 Server, the following error messages are provided by the 963 Server.
Error Messages This page is intentionally left blank.
Index INDEX 963.................................................................................................... 7 Access ....................................................................................... 23 Using ......................................................................................... 23 963 Server 963 Schematic Page Display .................................................... 18 963 Server Default Page .............................................................
Index Precision..............................................................................31, 32 Zoom In.....................................................................................33 Zoom Out ..................................................................................33 Grid On a Graph ................................................................................33 Hide Alarm Panels .............................................................................29 Incoming Alarms Clear ....
Index 963 Web User Guide TC200685 Issue 4 49
Trend Control Systems Limited P.O. Box 34, Horsham, West Sussex, RH12 2YF, UK. Tel:+44 (0)1403 211888 Fax:+44 (0)1403 241608 www.trend-controls.com Trend Control Systems USA 6670 185 th Avenue NE, Redmond, Washington 98052, USA. Tel: (425)897-3900, Fax: (425)869-8445 www.trend-controls.