
Installation Guide


Installation Guide
www.trendingaccessibility.com info@trendingaccessibility.com
6
for fusion shower pan on wood joists
Step 9 > > > > > > > >
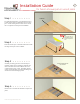
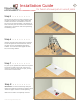
To prep for permanent installation, remove the Fusion
Pan from the surface. Apply a generous amount of
construction adhesive to the joists and the plywood
floor surface.
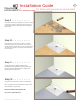
Step 10 > > > > > > > >
Carefully set the Fusion Pan into place. Drill and
countersink holes in the Fusion Pan. Using the 2 ½”
screws provided, attach the pan. Do not aggressively
screw and over tighten, as you may force the Fusion
Pan out of level.
Step 11 > > > > > > > >
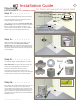
On top of existing subfloor install cement
backerboard in preparation for tiling. Make sure
that the top of the backerboard is roughly 1/8”
higher than the Fusion Pan.
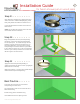
Step 12 > > > > > > > >
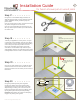
Check that the Fusion Pan is level on all four sides.
Fill in any gaps around the perimeter of the pan over
1/8” with latex or acrylic caulk.
Recommended: DAP Dynaflex 230
Do not use 100% silicone.