
Installation Guide

Installation Guide
www.trendingaccessibility.com info@trendingaccessibility.com
5
for fusion shower pan on wood joists
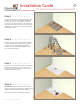
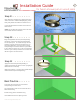
Step 5 > > > > > > > >
Set the pan into place so it does not interfere with
the joists. If needed, the pan maybe rotated 180
to make sure there is no interference. Once the
pan is set to the desired location, note location of
drain and make your connections to the wasteline.
Install drain in accordance with current plumbing
and building codes.
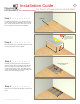
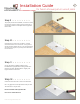
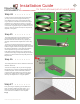
Step 6 > > > > > > > >
Install 2x stock to match existing joists, and block
around the perimeter of the Fusion Pan, around
the drain, and any unsupported edges of the
subfloor. This will ensure full support of Fusion
Pan, and existing subfloor.
2x Blocking
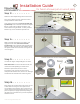
Step 7 > > > > > > > >
For your dry run, position the Fusion Pan into place
and check to make sure the pan is level. If you
notice any rocking or flexing in the pan, you may
need to shim or shave areas.
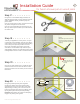
Step 8 > > > > > > > >
IMPORTANT: You must sand the top of the pan
lightly with a palm or belt sander to roughen up the
surface for proper adhesion of waterproofing.
Make sure the sticker is completely removed.