
Installation Guide


Installation Guide
www.trendingaccessibility.com info@trendingaccessibility.com
11
for adjustable fusion shower pan on wood joists
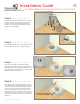
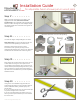
Step 29 > > > > > > >
The metal grate frame can be rotated to match the
direction of the tile.
You are now ready to tile. If you are using large
format tiles, they must be cut diagonally and laid
to follow the pitch in the Fusion Pan (From the
corners of the grate frame to the corners of the
Fusion Pan). Use Tiling Guide below.
Apply the tile adhesive (modified thinset), and lay
the tiles in a regular pattern.
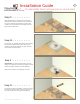
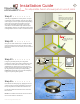
Step 30 > > > > > > >
Once your tiling is complete, grout the floors and
walls. Finalize by adding the drain grate. It is a
friction fit and must be pressed all of the way in.
Your Fusion Pan installation is now complete.
Enjoy!
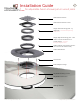
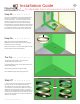
Tiling Guide
Standard drainage position
Drainage position less than 90° to the right
Drainage position 90° to the right Drainage position 90° to the left
If you cannot rotate the drainage point a full 90°,
left or right, it is best to use smaller tiles
(maximum size 2.75” square) or mosaic tiles.
Standard drainage position
Drainage position less than 90° to the right
Drainage position 90° to the right Drainage position 90° to the left
If you
cannot rotate the drainage point a full 90°,
left o
r right, it is best to use smaller tiles
(maxi
mum size 2.75” square) or mosaic tiles.
If you cannot rotate
the drainage point
a full 90ଂ, left or
right, it is best to
use smaller tiles
(maximum size
2.75” square) or
mosaic tiles.
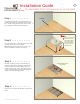
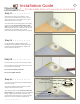
Step 28 > > > > > > >
The height adjustment ring and floor drain bowl
must now be fixed together using solvent cement.
Because solvent cements sets very rapidly we
strongly recommend the adjustment is done “dry”
first.
To set the permanent height of the grate frame,
place a floor tile beside the frame. Rotate the frame
until the height is about 1/16” higher (this accounts
for adhesive thickness). Now mark the position
of the adjustment ring. This mark shows the
final height position. Remove ring, apply solvent
cement, and re-align components to your marked
position. It is best to hold securely until pieces are
fully bonded.