
Installation Guide

Installation Guide
www.trendingaccessibility.com info@trendingaccessibility.com
6
for adjustable fusion shower pan on wood joists
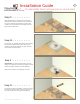
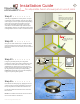
Step 10 > > > > > > > >
For your dry run, position the Fusion Pan into place
and check to make sure the pan is level. If you
notice any rocking or flexing in the pan, you may
need to shim or shave areas.
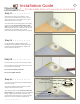
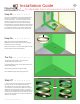
Step 11 > > > > > > > >
IMPORTANT: You must sand the top of you pan
lightly with a palm or belt sander to roughen up the
surface for proper adhesion of waterproofing.
Make sure the sticker is completely removed.
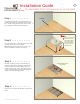
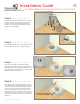
Step 9 > > > > > > > >
While the plumbing is exposed and accessible,
make all necessary connections to the waste line.
Use your measurements from the previous step
to make sure to position the waste pipe so that it
aligns with the drain hole.
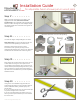
Step 12 > > > > > > > >
To prep for permanent installation, remove the Fusion
Pan from the surface. Apply a generous amount of
construction adhesive to the joists and blocking.