
Installation Guide
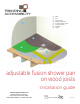

Installation Guide
www.trendingaccessibility.com info@trendingaccessibility.com
9
for adjustable fusion shower pan on wood joists
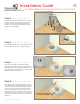
Step 21 > > > > > > > >
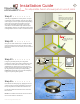
Just like you applied the corner pieces, use your
cut strips of Crack Insulation Tape to cover all the
seams. Again, trowel or paint liquid waterproofing
onto seam, press tape into position and coat
the top to seal. Make sure to fully cover both
sides of the crack isolation tape with the liquid
waterproofing product. To make this process more
manageable, it is best to work in two foot sections.
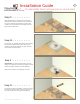
Step 22 > > > > > > >
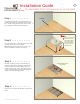
Using the 5” crack isolation tape. Overlap all seams
of cement board used on either the floors or walls.
Overlap the seam where the Fusion pan and cement
board meet.
Make sure the tape
overlaps the seams
equally.
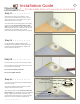
Step 23> > > > > > > >
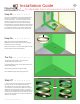
Using the provided precut piece of gasket
membrane, slather area where gasket piece will
be adhered to the drain area. Place over drain
adapter flange, making sure to cover all screw
holes, and securely press down into flange. Coat
top of gasket piece with liquid waterproofing.
Important: Remember to remove the clamping
ring prior to placing drain gasket.
NOTE:
Illustration just shows tape use.
Please apply liquid waterproof-
ing to the wall and tape before
applying.
Extend the tape
2 feet past the
shower pan
2 feet
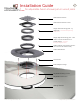
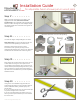
Step 24> > > > > > > >
Now attach the clamping ring. Apply primer and
solvent cement to inside of clamping ring. Press
firmly into position and allow the solvent to set.
It may take about 60 seconds for the cement to
form a bond.
NOTE: Do not allow the solvent cement to come
into contact with the membrane
Gasket Clamp
Drain Adapter Flange
Gasket Membrane
Gasket Clamp
Drain Adapter Flange
Gasket
Membrane