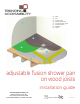
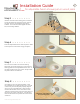
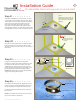
a) b) c) d) e) f) g) h) a Wall Tile Shower Pan Liquid Membrane Crack Isolation Tape Cement Board Subfloor Joists b d c f g h e adjustable fusion shower pan on wood joists installation guide www.TrendingAccessibility.
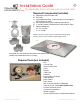
Installation Guide 2 for adjustable fusion shower pan on wood joists Required Components (included) b) c) f) a) Adjustable Fusion Shower Pan b) Tile Drain c) Liquid Waterproofing - 2 gallon bucket (covers approx.
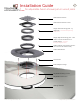
Installation Guide 3 for adjustable fusion shower pan on wood joists Stainless Steel Grate Stainless Steel Drain Frame Height Extension Ring (5/8” - 1”) (Optional) - This must be fixed in place using solvent cement. Height Adjustment Ring (1/4” - 5/8” rotate counter-clockwise to increase height - This must be fixed in place using solvent cement.
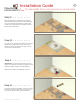
Installation Guide 4 for adjustable fusion shower pan on wood joists Step 1 > > > > > > > > > subfloor For optimal performance, it is imperative there is a level surface prior to installation of new Fusion pan. Check existing floor to make sure it is level. If it is not, please correct prior to installation. Step 2 > > > > > > > > > Place the Fusion pan in desired location and mark the edge of the pan on the subfloor.
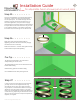
Installation Guide 5 for adjustable fusion shower pan on wood joists 2x Blocking Step 5 > > > > > > > > > Install 2x stock to match existing joists, and block around the perimeter of the Fusion Pan, around the drain, and any unsupported edges of the subfloor. This will ensure full support of Fusion Pan, and existing subfloor. Step 6 > > > > > > > > > Place the Adjustable Shower Pan into place. Make sure that pan is level and fits snugly into place.
Installation Guide 6 for adjustable fusion shower pan on wood joists Step 9 > > > > > > > > While the plumbing is exposed and accessible, make all necessary connections to the waste line. Use your measurements from the previous step to make sure to position the waste pipe so that it aligns with the drain hole. Step 10 > > > > > > > > For your dry run, position the Fusion Pan into place and check to make sure the pan is level.
Installation Guide 7 for adjustable fusion shower pan on wood joists Step 13 > > > > > > > > Carefully set the Fusion Pan into place. Using the 2 ½” screws provided, attach the pan. Do not aggressively screw and over tighten, as you may force the Fusion Pan out of level. Pre-drill the holes for the rotating plate. Then apply a bead of caulk (Recommended: DAP Dynaflex 230) to the rotating plate receptor. Now attach the rotating plate using the ¾” screws provided.
Installation Guide 8 for adjustable fusion shower pan on wood joists Step 17 > > > > > > > > Make your final connections to the drain. First apply a bead of caulk (Recommended: DAP Dynaflex 230) to the underside of the strainer body. Pass the strainer through the drain adapter flange, and tighten. Make sure connection is snug but do not over tighten. Step 18 > > > > > > > > Materials needed for wet room waterproofing. You will now begin waterproofing the wet room.
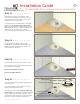
Installation Guide 9 for adjustable fusion shower pan on wood joists Step 21 > > > > > > > > Just like you applied the corner pieces, use your cut strips of Crack Insulation Tape to cover all the seams. Again, trowel or paint liquid waterproofing onto seam, press tape into position and coat the top to seal. Make sure to fully cover both sides of the crack isolation tape with the liquid waterproofing product. To make this process more manageable, it is best to work in two foot sections.
Installation Guide 10 for adjustable fusion shower pan on wood joists Step 25 > > > > > > > > Continue the application of the liquid waterproofing membrane. Paint a layer of liquid waterproofing over all taped joints. It is easiest to begin with the walls first and then proceed to the floor area. For consistant application, use a paint roller to apply waterproofing to all surfaces. Allow the waterproofing to dry for about 4 hours. After first coat is dry, re-coat in the opposite direction.
Installation Guide 11 for adjustable fusion shower pan on wood joists Step 28 > > > > > > > > The height adjustment ring and floor drain bowl must now be fixed together using solvent cement. Because solvent cements sets very rapidly we strongly recommend the adjustment is done “dry” first. To set the permanent height of the grate frame, place a floor tile beside the frame. Rotate the frame until the height is about 1/16” higher (this accounts for adhesive thickness).
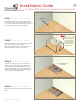
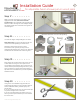
Installation Guide 12 for adjustable fusion shower pan on wood joists Adjustable Fusion Shower Pan - Cutting and Drilling guideline Cutting and Drilling Guidlines Do not cut into central solid oval section Maxim um cut Maxim um cut Maxim um cut Maxim um cut Fig.1 Cut using an old or disposable handsaw. Additional timber F ig . 2 Cu t t o l e n g t h . Additional timber Additional timber F ig . 3 C u t t o a c c o m m o d a t e d ia g o n a l w a ll . Fig.