
Installation Guide

Installation Guide
www.trendingaccessibility.com info@trendingaccessibility.com
7
for adjustable fusion shower pan on wood joists
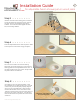
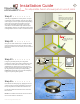
Step 13 > > > > > > > >
Carefully set the Fusion Pan into place. Using
the 2 ½” screws provided, attach the pan. Do not
aggressively screw and over tighten, as you may
force the Fusion Pan out of level.
Pre-drill the holes for the rotating plate.
Then apply
a bead of caulk (
Recommended: DAP Dynaflex
230)
to the rotating plate receptor.
Now attach the
rotating plate using the ¾” screws provided. Be sure
to match up your tick marks done in step 8.
Refer to the Cutting and Drilling guidline on page 12
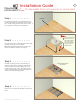
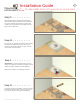
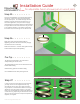
Step 14 > > > > > > > >
On top of existing subfloor install cement
backerboard in preparation for tiling. Make sure
that the top of the backerboard is roughly 1/8”
higher than the Fusion Pan.
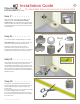
Step 16 > > > > > > > >
You now want to attach the Drain adapter flange
to the Fusion Pan.
First, set the adapter in place, mark the 4 holes,
and pre-drill them with a 1/8” bit.
Then apply a bead of caulk (
Recommended: DAP
Dynaflex 230)
to the underside of the drain adapter
flange. Lightly push the flange into place, and
screw it down using the four ¾” screws provided.
Remove any excess caulk that squeezes out.
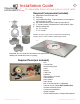
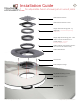
membrane clamp
height adjustment ring
Remove the tile height adjustment ring and membrane clamp and
place to one side; these will be required later in the installation.
Gasket Clamp
Adapter Drain Flange
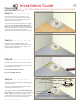
Step 15 > > > > > > > >
Check that the Fusion Pan is level on all four sides.
Fill in any gaps around the perimeter of the pan over
1/8” with latex or acrylic caulk.
Recommended: DAP Dynaflex 230
Do not use 100% silicone.