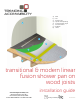
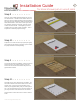
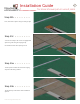
a) b) c) d) e) f) g) h) a Wall Tile Shower Pan Liquid waterproofing Crack Isolation Tape Cement Board Subfloor Joists b c d f g h e transitional & modern linear fusion shower pan on wood joists www.TrendingAccessibility.
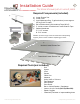
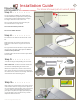
Installation Guide 2 for linear shower pan on wood joists Required Components (included) b) c) f) d) a) Linear Shower Pan b) Linear Drain c) Liquid Waterproofing - 2 gallon bucket (covers approx.
Installation Guide 3 for linear shower pan on wood joists Step 1 > > > > > > > > > For optimal performance, it is imperative there is a level surface prior to installation of new Linear Shower Pan. Check existing floor to make sure it is level. If it is not, please correct prior to installation. Place the Linear Shower pan in desired location and check to make sure it is level.
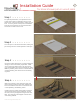
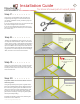
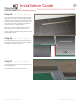
Installation Guide 4 for linear shower pan on wood joists Step 5 > > > > > > > > > A plywood platform must be provided to fully support the underside of the Linear Shower Pan. This is done by first installing furring strips to the inside of the joists. Measure down 5/8” (or thickness of the plywood being used) and draw a level line. Attach the furring strips, using construction adhesive and wood screws. It is important to make sure these strips are level, and secure.
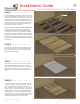
Installation Guide 5 for linear shower pan on wood joists Step 9 > > > > > > > > > Now you have a fully supported base for your Linear Shower Pan. Set the Linear Shower Pan into place. If you have been checking your level along the way, your pan should be level on all sides and flush with the floor. If for some reason you notice any rocking or flexing in the pan, you may need to shim or shave areas. At this point you want to make sure your pan is level and solid.
Installation Guide 6 for linear shower pan on wood joists Step 13 > > > > > > > > On top of existing subfloor and walls install cement backerboard in preparation for tiling. Make sure that the top of the backerboard is roughly 1/8” higher than the Linear Fusion Pan. Backerboard Use 1/4” backerboard Fill in any gaps around the perimeter of the pan over 1/8” with latex or acrylic caulk. Recommended: DAP Dynaflex 230 Do not use 100% silicone.
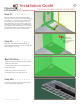
Installation Guide 7 for linear shower pan on wood joists Step 17 > > > > > > > > Using the 5” crack isolation tape provided, cut strips of tape to length, to cover all seams (Corner seams, wall/floor seams, pan/floor joint). Put pieces aside. If you are creating full wet room, you will need to tape any seams throughout the entire room. If you are only waterproofing the shower zone, you will only need to tape the seams up to 2 feet outside the shower area.
Installation Guide 8 for linear shower pan on wood joists Step 21 > > > > > > > > Begin the application of the liquid waterproofing membrane. Paint a layer of liquid waterproofing over all taped joints. It is easiest to begin with the walls first and then proceed to the floor area. For consistant application, use a paint roller to apply waterproofing to all surfaces. Allow the waterproofing to dry for about 4 hours. After first coat is dry, re-coat in the opposite direction.
Installation Guide 9 for linear shower pan on wood joists Step 23b > > > > > > > Then, lock them in place using the orange clips. Step 23c > > > > > > > You are now ready to tile. Leave an appropriate space for grout along the edging strips. Use modified thinset when placing the tile. Step 24a > > > > > > > The tile spacers should be used if the edging strips are NOT being utilized. Step 24b > > > > > > > Tile the floor up to the faces of the installation spacers. www.
Installation Guide 10 for linear shower pan on wood joists Step 25 > > > > > > > > If you are using large format tiles with the 4 pitch plane pan, they must be cut diagonally and laid to follow the pitch in the Linear Fusion Pan (From the corners of the grate frame to the corners of the Linear Fusion Pan). Apply the tile adhesive, and lay the tiles in a regular pattern. After tiling, screw the height adjusters onto the drain so that the cover is level with the tiles.