
Installation Guide

Installation Guide
www.trendingaccessibility.com info@trendingaccessibility.com
3
for linear shower pan on wood joists
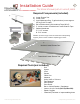
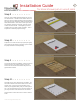
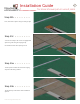
Step 1 > > > > > > > >
For optimal performance, it is imperative there is
a level surface prior to installation of new Linear
Shower Pan. Check existing floor to make sure it is
level. If it is not, please correct prior to installation.
Place the Linear Shower pan in desired location
and check to make sure it is level.
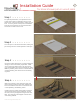
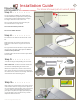
Step 2 > > > > > > > >
Once the pan is in the desired location, holding the
pan steady, trace the outside perimeter of the pan.
Step 3 > > > > > > > >
Using the marked plywood as a guide carefully cut
along your line as accurately as possible. Make
sure to adjust the depth of your saw to the thick-
ness of the subfloor as to not cut through the joists.
Note: If possible, please check or mark location of
existing plumbing and electrical to avoid damag-
ing them.
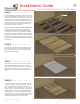
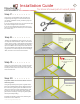
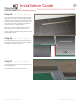
Step 4 > > > > > > > >
Make sure that Pan is level and fits snuggly into
place. Note the location of the drain. Remove the
Pan and install the waste line in accordance with
current plumbing and building codes.
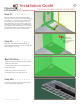
Install 2x stock to match existing joists, and block
around the perimeter of the Fusion Pan, around
the drain, and any unsupported edges of the sub-
floor. This will ensure full support of Fusion Pan,
and existing subfloor.
Some floor boards removed for illustration purposes
2x Blocking