
Installation Guide

Installation Guide
www.trendingaccessibility.com info@trendingaccessibility.com
4
for linear shower pan on wood joists
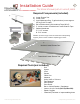
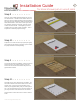
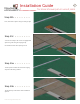
Step 5 > > > > > > > >
A plywood platform must be provided to fully sup-
port the underside of the Linear Shower Pan. This
is done by first installing furring strips to the inside
of the joists. Measure down 5/8” (or thickness of
the plywood being used) and draw a level line. At-
tach the furring strips, using construction adhesive
and wood screws. It is important to make sure
these strips are level, and secure.
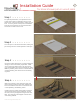
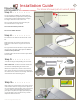
Sister Joists for TJI Joists and Open Web Joists
Use matching 2x stock and sister the framing
member to the side of the existing joist, making
sure to fasten to both the top and bottom flange.
The framing member should be ¾” below the top
flange to allow space for the underboard. With TJI
joists there is the option to add more attachment
points by adding a filler block between the TJI and
the 2x stock.
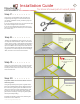
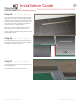
Step 6 > > > > > > > >
Cut sections of plywood that will fit between the
joists. Once cut place the plywood panels back
into place. Check to make sure panels are level.
Note: Do not secure yet
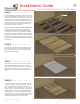
Step 7 > > > > > > > >
Place the Linear Shower Pan on top of the plat-
form. Holding the Pan steady, trace the inner
perimeter of the linear drain cutout. This will mark
the location of the linear drain on the plywood
base below, making it easier to cut out in the next
step.
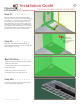
Step 8 > > > > > > > >
Using the marked plywood as a guide, carefully
cut out the section. For ease of cutting, remove
the panel from the floor location and use a jig
saw. If the lines cross the joists, you may need to
notch the joists. Please check your current local
building codes for maximum allowable depth of
notching joists. You do not want to weaken the
existing structure. Place the plywood panels back
into place, and attach to the nailing strips using
construction adhesive and wood screws.
furring
strips