
Installation Guide
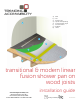

Installation Guide
www.trendingaccessibility.com info@trendingaccessibility.com
5
for linear shower pan on wood joists
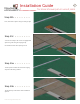
Step 9 > > > > > > > >
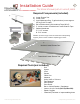
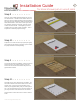
Now you have a fully supported base for your Lin-
ear Shower Pan. Set the Linear Shower Pan into
place. If you have been checking your level along
the way, your pan should be level on all sides and
flush with the floor. If for some reason you notice
any rocking or flexing in the pan, you may need
to shim or shave areas. At this point you want
to make sure your pan is level and solid. This is
important to achieve proper drainage.
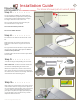
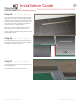
Step 11 > > > > > > > >
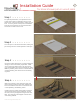
To prep for permanant installation, remove the linear
shower pan from the surface. Apply a generous
amount of construction adhesive to the joists and
plywood floor surface.
Step 10 > > > > > > > >
Important: You must sand the top of your pan lightly
with a palm or belt sander to roughen up the surface
for proper adhesion of waterproofing.
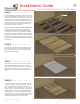
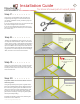
Step 12 > > > > > > > >
Carefully set the Linear Shower Pan into place. You
will need to drill and countersink holes in the Linear
Shower Pan. Using the screws provided, screw
down the pan approximately every 6” around perim-
eter. Do not aggressively screw and over tighten, as
you may force the Linear Shower Pan out of level.
Check that the
Linear
Fusion Pan is level on all four
sides.