
Installation Guide

Installation Guide
www.trendingaccessibility.com info@trendingaccessibility.com
6
for linear shower pan on wood joists
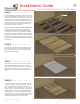
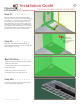
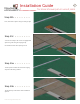
Step 16> > > > > > > >
Begin taping the wetroom floor at the interior corners
of the
Linear
Fusion Pan using the corner pieces of
the crack isolation tape provided. Using a paint brush
or trowel, slather liquid waterproofing into corner,
press piece into place, then apply liquid waterproof-
ing on top. Make sure to smooth out any creases.
Repeat for additional corners.
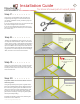
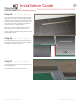
Step 15 > > > > > > > >
You will now begin waterproofing the wet room.
BEST PRACTICE: To achieve the best results, we
recommend waterproofing the whole room.
Minimum requirements, shown in these instruc-
tions, show you that you only have to waterproof
the shower zone, which is 6 ½ feet high and about
2 feet outside of the showering area.
Materials needed for wet room waterproofing.
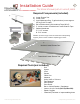
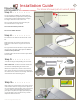
Step 14 > > > > > > > >
Pre-drill the screw holes for the drain with a 1/8”
bit.
Make your final connections to the waste line.
Make sure connection is snug but do not over
tighten.
Put a generous amount of latex or acrylic caulk on
the pan where the drain will be placed.
Recom-
mended: DAP Dynaflex 230
Carefully tighten the screws and then wipe off the
excess caulk.
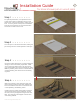
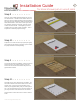
Step 13 > > > > > > > >
On top of existing subfloor and walls install ce-
ment backerboard in preparation for tiling. Make
sure that the top of the backerboard is roughly
1/8” higher than the Linear Fusion Pan.
Fill in any gaps around the perimeter of the pan
over 1/8” with latex or acrylic caulk.
Recommended: DAP Dynaflex 230
Do not use 100% silicone.
Use 1/4” backerboard
Backerboard