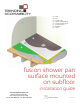
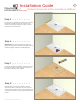
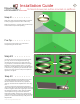
a) b) c) d) e) f) g) h) a Wall Tile Shower Pan Liquid waterproofing Crack Isolation Tape Cement Board Subfloor Joists b c d f g e h fusion shower pan surface mounted on subfloor installation guide www.TrendingAccessibility.
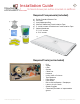
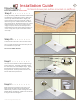
Installation Guide 2 for fusion shower pan surface mounted on subfloors Required Components (included) b) c) f) e) d) a) b) c) d) e) f) Fusion Standard Shower Pan Tile Drain Liquid Waterproofing One Roll Rubberized Crack Isolation Tape 2 - Inside corners of Rubberized Crack Isolation Tape Gasket Membrane 15 - 2 1/2” screws 4 - 3/4” screws a) Required Tools (not included) • • • • • • • • • • • • • • www.trendingaccessibility.
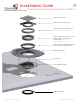
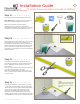
Installation Guide 3 for fusion shower pan surface mounted on subfloors Stainless Steel Grate Stainless Steel Grate Frame Height Extension Ring (5/8” - 1”) This must be fixed in place using solvent cement. Height Adjustment Ring (1/4” - 5/8” rotate counter-clockwise to increase height - This must be fixed in place using solvent cement. Gasket Clamp (use solvent cement on inner face to achieve seal) Gasket Membrane 3/4” Screws Drain Adapter Flange Fusion Pan Sealing Washers www.
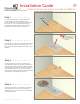
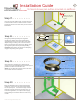
Installation Guide 4 for fusion shower pan surface mounted on subfloors Step 1 > > > > > > > > > For optimal performance, it is imperative there is a level surface prior to installation of new Fusion Shower Pan. Check existing floor to make sure it is level. If it is not, please correct prior to installation. Place the Fusion pan in desired location and check to make sure it is level.
Installation Guide 5 for fusion shower pan surface mounted on subfloors Step 5 > > > > > > > > > For your dry run, position the Fusion pan into place and check to make sure the pan is level. If you notice any rocking or flexing in the pan, you may need to shim or shave areas. Step 6 > > > > > > > > > IMPORTANT: You must sand the top of the pan lightly with a palm or belt sander to roughen up the surface for proper adhesion of waterproofing.
Installation Guide 6 for fusion shower pan surface mounted on subfloors Step 9 > > > > > > > > > On top of existing subfloor and walls install cement backerboard in preparation for tiling. Make sure that the top of the backerboard is roughly 1/8” higher than the Fusion pan. Start with a bed of thinset using a 1/4” notched trowel. Next, attach the first layer of 1/2” backerboard with 1 1/4” cement board screws 8” on center.
Installation Guide 7 for fusion shower pan surface mounted on subfloors Step 13 > > > > > > > > Materials needed for wet room waterproofing. You will now begin waterproofing the wet room. BEST PRACTICE: To achieve the best results, we recommend waterproofing the whole room. Minimum requirements, shown in these instructions, show you that you only have to waterproof the shower zone, which is 6 ½ feet high and about 2 feet outside of the showering area.
Installation Guide 8 for fusion shower pan surface mounted on subfloors Make sure the tape overlaps the seams equally. Step 17 > > > > > > > > Using the 5” crack isolation tape. Overlap all seams of cement board used on either the floors or walls. Overlap the seam where the Fusion pan and cement board meet. Step 18 > > > > > > > > Using the provided precut piece of gasket membrane, slather area where gasket piece will adhered to the drain area.
Installation Guide 9 for fusion shower pan surface mounted on subfloors Step 21 > > > > > > > > Apply two coats of liquid waterproofing to achieve 2 mils. (roughly the thickness of a credit card) Make sure that the “V” section of the gasket clamp is filled with the liquid waterproofing. Pro-Tip > > > > > > > > To achive the best results, we recommend waterproofing the whole room.
Installation Guide 10 for fusion shower pan surface mounted on subfloors Step 24 > > > > > > > > You are now ready to tile. If you are using large format tiles, they must be cut diagonally and laid to follow the pitch in the Fusion Pan (From the corners of the grate frame to the corners of the Fusion Pan). Apply the tile adhesive, and lay the tiles in a regular pattern. Step 25 > > > > > > > > Once your tiling is complete, grout the floors and walls. Finalize by adding the drain grate.