
Owner's manual


Installation Guide
www.trendingaccessibility.com info@trendingaccessibility.com
8
for fusion shower pan surface mounted on suboors
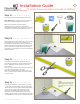
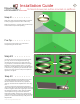
Step 19 > > > > > > > >
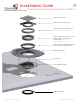
Now attach the clamping ring. Apply solvent
cement to inside of clamping ring. Press firmly into
position and allow the solvent to set.
NOTE: Do not allow the solvent cement to come
into contact with the membrane
Gasket Clamp
Drain Adapter Flange
Gasket Membrane
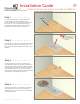
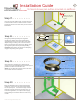
Step 20 > > > > > > >
Begin the application of the liquid waterproofing
membrane. Paint a layer of liquid waterproofing
over all taped joints. It is easiest to begin with the
walls first and then proceed to the floor area. For
consistant application, use a paint roller to apply
waterproofing to all surfaces. After first coat is dry,
re-coat.
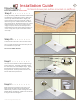
Step 18 > > > > > > > >
Using the provided precut piece of gasket
membrane, slather area where gasket piece
will adhered to the drain area. Place over drain
adapter flange, making sure to cover all screw
holes, and securely press down into flange. Coat
top of gasket piece with liquid waterproofing.
Important: Remember to remove the clamping
ring prior to placing drain gasket.
Gasket Clamp
Drain Adapter Flange
Gasket
Membrane
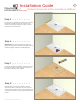
Step 17 > > > > > > > >
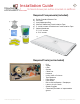
Using the 5” crack isolation tape. Overlap all seams
of cement board used on either the floors or walls.
Overlap the seam where the Fusion pan and cement
board meet.
Make sure the tape
overlaps the seams
equally.