
Owner's manual


Installation Guide
www.trendingaccessibility.com info@trendingaccessibility.com
9
for fusion shower pan surface mounted on suboors
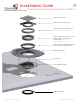
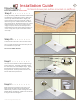
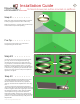
Step 22 > > > > > > >
In order to set the correct height of the grate frame,
you may need to use the height extension ring
(see diagram to the right). If the height extension
ring is required, it will need to be fixed to the height
adjustment ring using solvent cement. The grate
frame can now be attached to the height adjustment
or extension ring, depending on tile thickness. This is
done by using firm pressure to clip the components
together; it is a tight fit.
“click”
1/4” to 5/8” Tile Height
5/8” - 1” Tile Height
extention ring
adjusting ring
grate frame
grate frame
adjusting ring
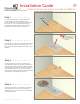
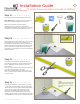
Step 23 > > > > > > >
The height adjustment ring and floor drain must
now be fixed together using solvent cement.
Because solvent cements sets very rapidly we
strongly recommend the adjustment is done “dry”
first.
To set the permanent height of the grate frame,
place a floor tile beside the frame. Rotate the frame
until the height is about 1/16” higher (this accounts
for adhesive thickness). Now mark the position
of the adjustment ring. This mark shows the
final height position. Remove ring, apply solvent
cement, and re-align components to your marked
position. It is best to hold securely until pieces are
fully bonded.
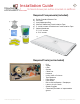
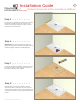
Step 21 > > > > > > > >
Apply two coats of liquid waterproofing to achieve
2 mils. (roughly the thickness of a credit card)
Make sure that the “V” section of the gasket clamp
is filled with the liquid waterproofing.
Pro-Tip > > > > > > > >
To achive the best results, we recommend
waterproofing the whole room.