TEW-410APBplus 54Mbps 802.11g Wireless Access Point + Bridge Quick Installation Guide Guide d'installation rapide pour le Point d'Accès Sans Fil 54Mbps 802.11g + fonction "bridge" Schnell Anleitung 54Mbit/s 802.11g Wireless Access Point + Bridge Guía de Instalación Rápida del Base Transmisora Wireless + Bridge 802.11g de 54Mbps Version 05.26.04 TRENDnet TRENDware, USA What's Next in Networking Copyright ©2004. All Rights Reserved. TRENDware International, Inc.
Table of Contents English ...................................................................................................... 1. Prepare for Installation ...................................................................... 2. Install Hardware ................................................................................ 3. Configure the computer’s TCP/IP Settings ....................................... 4.Configure the Access Point ................................................................
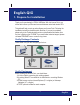
English QIG 1. Prepare for Installation Thank you for purchasing the TEW-410APBplus. With this Access Point, you will be able to share your files and resources between wired and wireless PCs. This guide will help you set-up and configure your Access Point. Following the installation instructions should be quick and easy. If you run into problems, please refer to the Troubleshooting section or more detailed information from the User’s Guide on the CD-ROM.
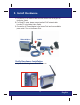
2. Install Hardware 1. Connect the RJ-45 network cable from the Access Point to any port on the Hub or Switch. 2. For Wired PC setup, please connect another RJ-45 network cable from the PC to the same Hub or Switch. 3. Connect the AC Power Adapter to the Access Point and to an available power outlet. Turn on the Access Point. TEW-410APBplus POWER 3 1 2 Verify Hardware Installation Verify that the following Access Point LEDs are on.
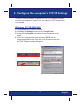
3. Configure the computer’s TCP/IP Settings The Access Point has a default IP address 192.168.1.250, therefore to be able to access and configure the Access Point, the computer's TCP/IP settings need to be changed. Windows 95/98/98SE/ME 1. Find the Start button located on Desktop. 2. Click Start; click Settings and then click on Control Panel. 3. Double-Click the Network Icon and the Network Properties box will appear. 4.
5. Under the IP Address tab, select Specify an IP address and enter “192.168.1.50” for the IP address and “255.255.255.0” for the Subnet Mask. Then, click OK. 6. Click OK. 7. At this point, the installation may require files from your Windows CD-ROM. If this happens insert Windows CD-ROM into your CD-ROM drive and select the CD-ROM drive to load the necessary files. 8. After the files load, the System Settings Change prompt will appear; click Yes to restart your computer.
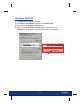
Windows 2000/XP 1. Find Start button located on Desktop. 2. Click Start; click Settings and then click on Control Panel. 3. Double-Click the Network Connection Icon. 4. Right-Click on the Local Area Connection icon and then click on Properties. The Local Area Connection Properties box will appear.
5. Under the General tab, locate and select Internet Protocol TCP/IP and then click Properties. The Internet Protocol (TCP/IP) Properties box will appear. 6. Click on Use the following IP address; then enter 192.168.1.50 for IP Address and 255.255.255.0 for Subnet, then click OK. 7. Click OK on the Local Area Connection Properties box to close it. 8. Your computer is now ready to access and configure the Access Point.
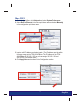
Mac OS X 1. Go to the Apple Menu, click Network and select System Preferences. 2. Select Built in Ethernet in the Show pull-down menu and select Manually in the configuration pull-down menu. 3. Input a valid IP address and subnet mask. (The IP address must be within the same range as the TEW-410APBplus. The IP Address of the TEW410APBplus is 192.168.1.250 so you can assign 192.168.1.50 and 255.255.255.0 as subnet mask) 4. Click Apply Now and continue to the Configuration section.
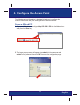
4. Configure the Access Point The following set-up information is designed to help you to configure the Access Point to work with your existing Wired or Wireless network. From a Wired PC 1. Open your Web browser and type http://192.168.1.250 into the Address box and press the Enter key. 2. The logon pop-up screen will appear, type admin for the username and admin for the password then click OK to access the configuration page.
3. The configuration page will appear, then you can make changes on the Access Point to match your existing network’s settings such as IP address and Subnet Mask. 4. Scroll down the page to the Wireless section. If you already have a wireless network, change the SSID/Channel and Encryption settings to match your wireless network's settings. 5. After you've made the changes, click the Apply button to save the settings. The Access Point is now configured and ready to use with your network.
From a Wireless PC 1. Open up the Utility Program for your wireless card. 2. Configure the wirelesss card to have the SSID as ap11g and Channel as 6 and click on Connect to connect to the Access Point. (Example uses TRENDnet's TEW-421PC 802.11g Wireless PC Card). 3. Open your Web browser, type http://192.168.1.250 in the Address bar, and press the Enter key.
4. The logon pop-up screen will appear, type admin for the username and admin for the password then click OK to access the configuration page. 5. The configuration page will appear. Make changes to your Access Point's settings so that it matches your existing network settings. This may entail changing the IP Address and Subnet Mask. Please refer to the User's Guide on the CD-ROM if you encounter problems.
6. Scroll down the page to the Wireless section. If you already have a wireless network, change the SSID/Channel or Encryption to match your wireless network's settings. 7. After you've made the changes, click the Apply button to save the settings. The Access Point is now configured and ready to use with your network. NOTE: If you cannot access the configuration page, please check your TCP/IP settings again.
Troubleshooting For help with advanced features, refer to the User's Guide located on the included CDROM. Q1. The Access Point will not turn on. None of the LEDs light up. A1. Connect the power adapter to the power outlet and check the LEDs again. Also, verify that you are using the power adapter shipped with this product; using the wrong power adapter might physically damage the unit. Q2. I cannot get to the configuration page of the TEW-410APBplus. A2.
TRENDnet TRENDware, USA What's Next in Networking @ Product Warranty Registration Please take a moment to register your product online. Go to TRENDware’s website at http://www.TRENDNET.com TRENDware International, Inc. 3135 Kashiwa Street Torrance, CA 90505 http://www.TRENDNET.com Copyright ©2004. All Rights Reserved. TRENDware International, Inc.