Quick Installation Guide TK-401R TK-801R TK-1601R
Table of Contents English 1. Before You Start 2. How to Install 3. Operation 1 1 2 4 Technical Specifications Troubleshooting 7 8 Version 08.14.
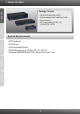
1. Before You Start ENGLISH Package Contents ? TK-401R/TK-801R/TK-1601R ? Multi-Language Quick Installation Guide ? Rack mount kit ? AC Power Adapter (9V DC, 1A) FRANÇAIS (TK-801R/TK-1601R) System Requirements DEUTSCH ? PS/2 Keyboard ? PS/2 Mouse ? VGA Compatible Monitor ? PS/2 KVM cables (e.g.
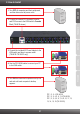
2. How to Install ENGLISH 1. Turn OFF all computers and their peripherals, and then disconnect all power cords. DEUTSCH FRANÇAIS 2. Connect the shared PS/2 keyboard, monitor, and PS/2 mouse to the KVM switch's Console Port. (TK-801R shown) ESPAÑOL 3. Connect the included AC Power Adapter to the KVM switch and then to a power outlet (TK-801R /TK-1601R only). ÐÓÑÑÊÈÉ 4. Use the PS/2 KVM cables to connect your PC to the KVM switch. 5.
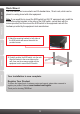
The KVM Switch can be mounted in an EIA standard-size, 19-inch rack, which can be placed in a wiring closet with other equipment. Note: If you would like to mount the KVM switch to a EIA 19” equipment rack, install the included mounting brackets to the sides of the KVM switch, secure them with the screws provided, and then mount the KVM switch to the equipment rack with the hardware provided by the equipment rack manufacturer. ÐÓÑÑÊÈÉ ESPAÑOL DEUTSCH FRANÇAIS ENGLISH Rack Mount 1.
Note: To switch between computers, you can use the front-panel push buttons or the Hot Key commands. LED Indicators ENGLISH 3. Operation FRANÇAIS Red LED light: KVM cable is connected and PC is powering the KVM switch. Green LED light: Indicates the selected PC port is active, whether the computer is turned on or off. ESPAÑOL DEUTSCH Green LED flash: The selected PC port is in scan mode or is not powered by the PC ÐÓÑÑÊÈÉ Push Buttons Press the push buttons to switch between computers.
ENGLISH FRANÇAIS Hot Key Commands A keyboard hot key command consists of three keystrokes: Hot Key command = Scroll Lock + Scroll Lock + Command key(s) After pressing the Scroll Lock key, you have 2 seconds to press the Scroll Lock key again. You then have another 2 seconds to press a command key. A beep confirms that the KVM switch is in "Hot Key" mode. If you do not press a key within 2 seconds, the switch will exit hot key mode.
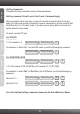
Front-Panel Buttons Hot Keys Command Description TK-401R ENGLISH Quick Reference Sheet for TK-401R/801R/1601R Scroll Lock + Scroll Lock + Y Select the active PC channel Scroll Lock + Scroll Lock + Y + Z (YZ)= 2-digit port number (01-16) Next lower channel Scroll Lock + Scroll Lock + --- Select the next lower PC channel Next higher channel Scroll Lock + Scroll Lock + --- Select the next higher PC channel Autoscan Beep Sound On/Off Scroll Lock + Scroll Lock + B --- Toggle On/Off beep soun
Technical Specifications Management TK-401R: 4 computers TK-801R: 8 computers TK-1601R: 16 computers Console Port Connectors (all famale) 1 x PS/2 keyboard 6-pin mini din 1 x PS/2 mouse 6-pin mini din 1 x VGA HDB15 15-pin PC Port Connectors (all female) 4/8/16 x PS/2 keyboard 6-pin mini din 4/8/16 x PS/2 mouse 6-pin mini din 4/8/16 x VGA HDB15 15-pin VGA Resolution 1920 x 1440 Port Selection Push Button and Hot Key Commands LED Link (Green), Active (Red) Keyboard State Save and restore Auto-S
Troubleshooting Do I need to use the included external AC adapter? It is recommended that you use the included external AC adapter with the TK-801R/ TK-1601R KVM switch. I have the KVM switch connected properly, but my keyboard and mouse don't work. Please make sure your PS/2 ports are working properly by testing it with another mouse or keyboard. Once you confirm that the PS/2 ports are functional, please reboot your computers, and try to use the KVM switch again.
Limited Warranty TRENDnet warrants its products against defects in material and workmanship, under normal use and service, for the following lengths of time from the date of purchase.
WARRANTIES EXCLUSIVE: IF THE TRENDNET PRODUCT DOES NOT OPERATE AS WARRANTED ABOVE, THE CUSTOMER'S SOLE REMEDY SHALL BE, AT TRENDNET'S OPTION, REPAIR OR REPLACE. THE FOREGOING WARRANTIES AND REMEDIES ARE EXCLUSIVE AND ARE IN LIEU OF ALL OTHER WARRANTIES, EXPRESSED OR IMPLIED, EITHER IN FACT OR BY OPERATION OF LAW, STATUTORY OR OTHERWISE, INCLUDING WARRANTIES OF MERCHANTABILITY AND FITNESS FOR A PARTICULAR PURPOSE.
Certifications This equipment has been tested and found to comply with FCC and CE Rules. Operation is subject to the following two conditions: (1) This device may not cause harmful interference. (2) This device must accept any interference received. Including interference that may cause undesired operation. Waste electrical and electronic products must not be disposed of with household waste. Please recycle where facilities exist. Check with you Local Authority or Retailer for recycling advice.
Product Warranty Registration Please take a moment to register your product online. Go to TRENDnet’s website at http://www.trendnet.com/register Copyright ©2009. All Rights Reserved. TRENDnet.