Quick Installation Guide TPL-202E TPL-202E2K H/W: V1.
Table of Contents Table of Contents English ..................................................................................................... 1. Before You Start ................................................................................ 2. How to Install .................................................................................... 1 1 2 Troubleshooting ........................................................................................ 6 Version 02.22.
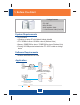
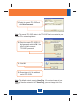
1. Before You Start Package Contents ? TPL-202E ? Utility CD-ROM ? Quick Installation Guide ? 1 x Cat.5 Ethernet Cable (1.8m/5.
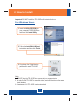
2. How to Install Important! DO NOT install the TPL-202E until instructed to do so For Windows Users 1. Insert the Utility CD-ROM into your computer's CD-ROM Drive and then click Install Utility. 2. Follow the InstallShield Wizard instructions and then click Finish. 3. Copy down the 12 digit device password for each TPL-202E. Note: 1. DO NOT plug the TPL-202E into a power strip or surge protector. 2. In order for the TPL-202E to see each other, each unit must be on the same circuit breaker. 3.
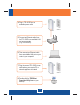
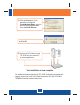
4. Plug a TPL-202E into an available power outlet. Outlet 5. Connect an Ethernet cable from the TPL-202E to an available LAN port on your router (e.g. TEW-633GR). 6. Then connect an Ethernet cable from an available LAN port on your router to your computer. 7. Plug the second TPL-202E into an outlet where your remote PC or network appliance is located. Outlet 8. Double-click the TRENDnet Powerline Utility Icon on your desktop.
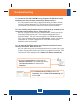
9. Select the remote TPL-202E and click Enter Password. Note: The remote TPL-202E refers to the TPL-202E that is connected to your remote PC or network appliance. 10. Enter the remote TPL-202E's 12digit password and click OK. See step 3 to find the remote TPL-202E's password. 11. Click OK. 12. Repeat steps 8-10 for additional remote TPL-202E's. Note: The default network name is HomePlug. If the network name of your existing Powerline network is NOT HomePlug, you must change this in the utility.
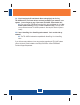
13. Click the Privacy tab. If you would like to change the Private Network Name, enter the desired Private Network Name, then click Set All Devices. 14. Click OK. 15. Connect a CAT 5 cable from the TPL-202E into your remote PC, or network applicance. Outlet Your installation is now complete. For detailed information regarding the TPL-202E configuration and advanced settings, please refer to the User's Guide included on the Utility CD-ROM or TRENDnet's website at www.trendnet.
Troubleshooting Q1: I inserted the TPL-202E CD-ROM into my computer's CD-ROM Drive and the installation menu does not appear automatically. What should I do? A1: If the installation menu does not appear automatically, click Start, click Run, and type D:\Autorun.exe where "D" in "D:\Autorun.exe" is the letter assigned to your computer's CD-ROM Drive. And then click OK to start the installation.
Q4: I tried changing the Private Network Name and applying it to all of my TPL-202E devices, but “Some devices could not be added to your network” error appears. I can no longer see any of the remote TPL-202Es. What should I do? A4: First, open up the TRENDnet Powerline Utility, click the Privacy tab, click Use Default (Public Network) and then click Set Local Device Only. Second, make sure to add each remote TPL-202E's password. See step 9 in Section 2 (How to Install). Q5: I have a HomePlug 1.
Limited Warranty TRENDnet warrants its products against defects in material and workmanship, under normal use and service, for the following lengths of time from the date of purchase. TPL-202E - 3-Year Warranty If a product does not operate as warranted above during the applicable warranty period, TRENDnet shall, at its option and expense, repair the defective product or deliver to customer an equivalent product to replace the defective item.
WARRANTIES EXCLUSIVE: IF THE TRENDNET PRODUCT DOES NOT OPERATE AS WARRANTED ABOVE, THE CUSTOMER’S SOLE REMEDY SHALL BE, AT TRENDNET’S OPTION, REPAIR OR REPLACEMENT. THE FOREGOING WARRANTIES AND REMEDIES ARE EXCLUSIVE AND ARE IN LIEU OF ALL OTHER WARRANTIES, EXPRESSED OR IMPLIED, EITHER IN FACT OR BY OPERATION OF LAW, STATUTORY OR OTHERWISE, INCLUDING WARRANTIES OF MERCHANTABILITY AND FITNESS FOR A PARTICULAR PURPOSE.
Certifications This equipment has been tested and found to comply with FCC and CE Rules. Operation is subject to the following two conditions: (1) This device may not cause harmful interference. (2) This device must accept any interference received. Including interference that may cause undesired operation. Waste electrical and electronic products must not be disposed of with household waste. Please recycle where facilities exist. Check with you Local Authority or Retailer for recycling advice.
Customer Support Visit www.trendnet.com/support Email: support@trendnet.com Europe (Germany . France . Italy . Spain . Switzerland . UK) Toll Free Telephone: +00800 60 76 76 67 English/Espanol - 24/7 Worldwide Telephone: +(31) (0) 20 504 05 35 English/Espanol - 24/7 Product Warranty Registration Please take a moment to register your product online. Go to TRENDnet’s website at http://www.trendnet.com/register 20675 Manhattan Place Torrance, CA 90501 USA Copyright ©2008. All Rights Reserved. TRENDnet.