Federal Communication Commission Interference Statement This equipment has been tested and found to comply with the limits for a Class B digital device, pursuant to Part 15 of the FCC Rules. These limits are designed to provide reasonable protection against harmful interference in a residential installation. This equipment generates, uses and can radiate radio frequency energy and, if not installed and used in accordance with the instructions, may cause harmful interference to radio communications.
Europe – EU Declaration of Conformity This device complies with the essential requirements of the R&TTE Directive 1999/5/EC. The following test methods have been applied in order to prove presumption of conformity with the essential requirements of the R&TTE Directive 1999/5/EC: EN60950-1: 2006 Safety of Information Technology Equipment EN 62311: 2008 Assessment of electronic and electrical equipment related to human exposure restrictions for electromagnetic fields (0 Hz – 300GHz) EN 300 328 V1.7.
direktiivi 1999/5/EÜ põhinõuetele ja nimetatud direktiivist tulenevatele teistele asjakohastele sätetele. English Hereby, TRENDnet, declares that this TEW-649UB is in compliance with the essential requirements and other relevant provisions of Directive 1999/5/EC. Español [Spanish] Por medio de la presente TRENDnet declara que el TEW-649UB cumple con los requisitos esenciales y cualesquiera otras disposiciones aplicables o exigibles de la Directiva 1999/5/CE.
TABLE OF CONTENT Introduction .............................................................................................................. 5 Unpacking and Setup ................................................................................................ 6 Unpacking ............................................................................................................... 6 System Requirements .............................................................................................
INTRODUCTION Congratulations on your purchase of this Wireless N USB Adapter. This manual contains detailed instructions regarding the operation of this product. Please keep this manual for future reference. With the Wireless N USB Adapter, a desktop or laptop computer can communicate with another computer wirelessly. An easy‐to‐use utility is bundled with the Wireless USB Adapter for configuration, monitoring, and diagnostic purposes.
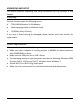
UNPACKING AND SETUP This section provides unpacking and setup information for the Wireless N USB Adapter. Unpacking The box should contain the following items: TEW‐649UB Wireless N USB Adapter Multi‐Language Quick Installation Guide CD‐ROM (Utility & Driver) If any item is found missing or damaged, please contact your local reseller for replacement.
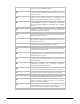
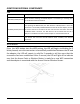
IDENTIFYING EXTERNAL COMPONENTS LED LED Status Description Slow Blink (1 blink/second) When the LED is blinking, the WLAN Adapter is transmitting or receiving data on the Wireless Ethernet network. After pressing the WPS button, the LED will flash 3 blinks/second. Once the connection is successfully established between the AP and the adapter, the LED Fast Blink (3 blinks/second) will remain solid for 5 seconds to tell the users that the connection has been established.
WIRELESS PERFORMANCE CONSIDERATIONS There are a number of factors that can impact the range of wireless devices. 1. Adjust your wireless devices so that the signal is traveling in a straight path, rather than at an angle. The more material the signal has to pass through the more signal you will lose. 2. Keep the number of obstructions to a minimum. Each obstruction can reduce the range of a wireless device. Position the wireless devices in a manner that will minimize the amount of obstructions between them.
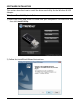
SOFTWARE INSTALLATION This section describes how to install the driver and utility for the Wireless N USB Adapter. Windows Based Utility Installation 1) Insert the Utility and Driver CD‐ROM into your computer’s CD‐ROM drive and then click Install Utility.
3) Click Finish. 4) Plug the Wireless N USB Adapter into an available USB slot on your computer. Driver Installation Windows Vista 1) Drivers will install automatically. Windows XP 1) The Found New Hardware Wizard appears Select No, not this time and then click Next.
2) Select Install this software automatically (recommended and then click Next.
3) Click Continue Anyway. 4) Click Finish.
Windows 2000 1) Click Yes.
WIRELESS UTILITY SETTING The user can configure the wireless settings using the Wireless Adapter Configuration Utility. Double‐click the utility icon that appears in the taskbar. The Wireless Adapter Configuration Utility is divided into six sections: Link Info, Configuration, Site Survey, Profile, WPS and About. Link Information This is the default screen after launching the Utility program.
Channel: Shows the current channel for communication. Link Quality: Shows the link quality of the Wireless N USB Adapter with the Access Point when operating under Infrastructure mode. Signal Strength: Shows the wireless signal strength of the connection between the Wireless N USB Adapter with the Access Point. Data Rate: Shows the statistics of data transfer, and the calculation is based on the number of packets transmitted and received.
● Infrastructure – to establish wireless communication with the LAN and other wireless clients through the use of Access Points or Wireless Router. This is most common type of connection. ● Ad‐Hoc – to establish point‐to‐point wireless communication directly with other wireless client devices. Authentication: The following options are available: Open System, Shared Key, WPA‐PSK, WPA2‐PSK, WPA EAP‐TLS, WPA2 EPA‐TLS . Select Open System, Shared Key for WEP data encryption feature.
WPA‐PSK / WPA2‐PSK If using the WPA‐PSK/WPA2‐PSK authentication method, please select the Encryption type for TKIP or AES then enter the Passphrase key. The minimum length is 8 characters.
WPA EAP‐TLS If using the WPA/WPA2 EAP‐TLS authentication method, please select the Encryption type for TKIP or AES then select the WPA/WPA2 Certificate from drop down list.
Site Survey This screen allows the user to scan for available wireless network. It also allows the user to establish wireless communications with an target device. Available Network – displays the wireless networks (wireless clients, access points or routers) that are within range. Select any one of the wireless networks by double‐clicking on it or select the SSID then click the “Connect” button. Click the “Refresh” button to scan for available networks.
Profile Profile – The user can create and manage the created profiles for home, work or public areas. By double‐clicking on one of the created profile, the setting will adjust to the specific setting such as SSID, channel, and encryption as saved by that particular profile. Add: Adds a profile. The following screen will appear. The user can enter the necessary information required for accessing the particular Access Point or Wireless Router. Remove: Deletes the selected profile Edit: Edit an exist profile.
Connect: Selected a profile from list then click the Connect to connecting to the wireless network with the profile setting.
WPS Wi‐Fi Protected Setup (WPS) is an optional certification program from the Wi‐Fi Alliance that is designed to ease the task of setting up and configuring security on a wireless network. There are two methods used in the WPS as below instruction. Push the button on my access point Using the WPS configuration with the “Push the button on my access point” method, the configuration steps as below: 1) Selected the “Push the button on my access point”.
4) If the WPS configuration was successful, the follow window will show on. 5) If the WPS configuration was failed, the follow window will show on.
Enter a PIN into my access point Using the WPS configuration with the “Enter a PIN into my access point” method, the configuration steps as below: 1) Selected the “Enter a PIN into my access point”, the PIN will be show on the button of the windows. 2) Enter the PIN code into the WPS “Clint PIN number” of you wireless access point or router then click the Start PIN button, the wireless access point or router will start the WPS configuration process.
25
4) If the WPS configuration was successful, the follow window will show on. 5) If the WPS configuration was failed, the follow window will show on.
About This screen displays information about the Wireless N USB Adapter, such as the Driver and Utility version. When a new version of the utility becomes available for upgrade, users will be able to identify by version numbers.
TECHNICAL SPECIFICATIONS Hardware Interface USB 2.0 Standards IEEE 802.11b, IEEE 802.11g and IEEE 802.11n LED Indicator Activity, WPS WPS Button Enables WPS connection Power Consumption Receive mode: 290mA (max) ; Transmit mode : 320mA (max) Supported OS Windows 2000, XP(32/64‐bit)/Vista (32/64‐bit) Dimensions (LxWxH) 33.9 x 17 x 7mm (1.3 x 0.7 x 0.3in) Weight 3g (0.
Limited Warranty TRENDnet warrants its products against defects in material and workmanship, under normal use and service, for the following lengths of time from the date of purchase. TEW‐649UB – 3 Years Warranty AC/DC Power Adapter, Cooling Fan, and Power Supply carry 1 year warranty.
LIMITATION OF LIABILITY: TO THE FULL EXTENT ALLOWED BY LAW TRENDNET ALSO EXCLUDES FOR ITSELF AND ITS SUPPLIERS ANY LIABILITY, WHETHER BASED IN CONTRACT OR TORT (INCLUDING NEGLIGENCE), FOR INCIDENTAL, CONSEQUENTIAL, INDIRECT, SPECIAL, OR PUNITIVE DAMAGES OF ANY KIND, OR FOR LOSS OF REVENUE OR PROFITS, LOSS OF BUSINESS, LOSS OF INFORMATION OR DATE, OR OTHER FINANCIAL LOSS ARISING OUT OF OR IN CONNECTION WITH THE SALE, INSTALLATION, MAINTENANCE, USE, PERFORMANCE, FAILURE, OR INTERRUPTION OF THE POSSIBILITY OF
31