Guía de instalación rápida TEW-650AP 1.
Table of Contents Español 1. Antes de iniciar 2. Instalación del Hardware 1 1 2 Troubleshooting 8 Version 08.04.
1. Antes de iniciar Contenidos del paquete ŸTEW-650AP ŸGuía de instalación rápida multilingüe ŸCD-ROM (herramienta y guía del usuario) ŸAdaptador de alimentación (12V DC, 0.5A) ŸCable ethernet Cat. 5 (0.
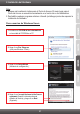
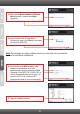
2. Instalación del Hardware Nota: 1. Busque una localización óptima para el Punto de Acceso. El mejor lugar para el Punto de Acceso se encuentra normalmente en el centro de su red inalámbrica. 2. Deshabilite cualquier programa antivirus o firewall (cortafuegos) antes de empezar la instalación de hardware. Para usuarios de Windows Users 1. Introduzca el CD-ROM del de la herramienta en la unidad de CD-ROM de su PC. 2. Haga clic en Run Setup.exe (sólo para Windows 7/Vista ). 3.
. Conecte el cable RJ45 suministrado desde el puerto LAN de su enrutador a un puerto LAN del TEW-650AP. Luego, haga clic en Next (Siguiente). 6. Conecte un cable RJ-45 desde el puerto LAN de su enrutador al puerto Ethernet de su PC. 7. Conecte el adaptador de alimentación eléctrica CA al punto de acceso y después a enchufe, y haga clic en Next (siguiente) 8. Seleccione el TEW-650AP de la lista y, a continuación, haga clic en Configure (configurar). 9.
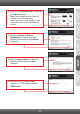
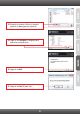
10. Seleccione un Punto de acceso y luego haga clic en Next (Siguiente) Nota: Para la configuración de Cliente AP, consulte la Guía del usuario para instrucciones paso a paso. Puede encontrar la Guía del usuario en el CD-ROM de este producto. 11. Seleccione Dynamic IP Address Configuration (Configurar dirección IP dinámica) y luego haga clic en Configure (Configurar). 12. Seleccione Manual Setup (Configuración manual) y después haga clic en Next (siguiente). 13.
14. Seleccione el Modo inalámbrico (Wireless Mode) deseado y después pulse Next (Siguiente). 15. Seleccione un modo de seguridad y, a continuación, haga clic en Next (en el ejemplo se muestra el WPA-PSK). Nota: Para proteger su red de cualquier acceso no autorizado se le recomienda habilitar la encriptación inalámbrica 16. Seleccione el modo WPA deseado, luego introduzca los caracteres de la clave precompartida y después haga clic en Next (Siguiente).
18. Asígnele un nombre al fichero y, después, haga clic en Save (guardar) (opcional) 19. Haga clic en Configure (Configurar) para aplicar las configuraciones. 20. Haga clic en Exit. 21. Haga clic en Yes (Sí) para salir.
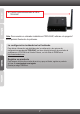
22. Conecte la antena desmontable de 2dBi al TEW-650AP. Nota: Para conectar un ordenador inalámbrico al TEW-650AP, refiérase a la pregunta 1 en el apartado Resolución de problemas. La configuración inalámbrica ha finalizado Para obtener información más detallada sobre la configuración y las opciones de configuración avanzadas del TEW-650AP, por favor consulte la sección de resolución de problemas en el CD-ROM de la Guía del Usuario, o el sitio Web de TRENDnet en http://www.trendnet.com.
Troubleshooting 1. All the settings are correct, but I can not make a wireless connection to the Access Point. 1. Double check that the wireless LED on the Access Point is lit. 2. Power cycle the Access Point. Unplug the power to the Access Point. Wait 15 seconds, then plug the power back in. 3. Contact the manufacturer of your wireless network adapter. Make sure the wireless network adapter is configured with the proper SSID. The default SSID of the Access Point is TRENDnet650AP.
5. I do not have a DHCP server or DHCP is disabled on my network and I am unable to configure the TEW-650AP. What should I do? 1. Go to the TCP/IP settings on your computer’s network’s adapter. Assign a static IP address of 192.168.10.7 with a subnet mask of 255.255.255.0. Since the default IP address of the TEW-650AP is 192.168.10.100, do not assign a static IP address of 192.168.10.100 on your computer’s network adapter. 2. Open Internet Explorer or web browser and enter http://192.168.10.
Wireless Tips The following are some general wireless tips to help minimize the impact of interference within an environment. Assign your network a unique SSID Do not use anything that would be identifying like “Smith Family Network”. Choose something that you would easily identify when searching for available wireless networks. Do not turn off the SSID broadcast The SSID broadcast is intended to be on and turning it off can cause connectivity issues.
2. Keep the number of obstructions to a minimum. Each obstruction can reduce the range of a wireless device. Position the wireless devices in a manner that will minimize the amount of obstructions between them. 3. Building materials can have a large impact on your wireless signal. In an indoor environment, try to position the wireless devices so that the signal passes through less dense material such as dry wall.
GPL/LGPL General Information This TRENDnet product includes free software written by third party developers. These codes are subject to the GNU General Public License ("GPL") or GNU Lesser General Public License ("LGPL"). These codes are distributed WITHOUT WARRANTY and are subject to the copyrights of the developers. TRENDnet does not provide technical support for these codes. The details of the GNU GPL and LGPL are included in the product CD-ROM. Please also go to (http://www.gnu.org/licenses/gpl.
GPL/LGPL informações Gerais Este produto TRENDnet inclui software gratuito desenvolvido por terceiros. Estes códigos estão sujeitos ao GPL (GNU General Public License) ou ao LGPL (GNU Lesser General Public License). Estes códigos são distribuídos SEM GARANTIA e estão sujeitos aos direitos autorais dos desenvolvedores. TRENDnet não presta suporte técnico a estes códigos. Os detalhes do GNU GPL e do LGPL estão no CD-ROM do produto. Favor acessar http://www.gnu.org/licenses/gpl.txt ou http://www.gnu.
Copyright © 2010. All Rights Reserved. TRENDnet.