TEW-310APB TEW-310APBX 2.4 GHz Wireless Access Point + Bridge User's Guide Rev.
CONTENTS 1.Package Contents 3 2.Introduction 4 3.Wireless Basics 7 4.Getting Started 10 5.Using the Configuration Utility 12 6.Troubleshooting 20 7.Networking Basics 25 8.Technical Specifications 44 9.
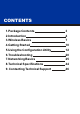
NOTE Note: TEW-310APBX functions just like TEW-310APB and the configuration procedures are the same as the TEW-310APB. The only difference between the two models is the TEW-310APBX comes with 2 detachable antennas. Below is the antenna installation instruction. 2 Locate antenna connectors 1 Locate the two antennas on the unit. inside the box. Connectors 3 Screw in antenna by turning 4 The antenna should fit the knob clockwise. securely in place.
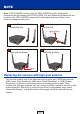
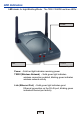
1. Package Contents Fig. 1.1 TEW-310APB Fig. 1.2 TEW-310APBX Contents TEW-310APB/TEW-310APBX Enhanced 2.4GHz Wireless Access Point 2 Detachable Antennas (TEW-310APBX only) Power Supply 5V DC, 2.0A Manual on CD Quick Installation Guide Ethernet Cable Note: Using a power supply with a different voltage rating than the one included with the TEW-310APB will cause damage and void the warranty for If any of the above items are missing, please contact your reseller.
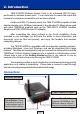
2. Introduction TEW-310APB Wireless Access Point is an enhanced 802.11b highperformance, wireless access point. It is an ideal way to extend the reach and number of computers connected to your wireless network. Unlike most 802.11b access points, the TEW-310APB is capable of data transfer speeds up to 22 Mbps (compared to the standard 11 Mbps) when used with other TRENDnet products such as the TEW-301PC PCMCIA CardBus Adapter and TEW-303PI Wireless PCI Adapter.
Features and Benefits Up to 2X Faster than regular 802.11b Products - high-speed wireless data transfer rates up to 22Mbps. With twice the data rate and capacity, the TEW-310APB delivers media rich content such as digital images, videos, and MP3 files much faster than standard 802.11b networks Fully 802.11b Compatible Fully compatible with the IEEE 802.11b standard and interoperable with all existing 802.11b compliant devices Improved Performance Up to 20% faster data transfer rates on standard 802.
LED Indicators LED stands for Light-Emitting-Diode. The TEW-310APB has three LEDs: Power Link TX/RX Fig. 2.
3. Wireless Basics TRENDware wireless products are based on industry standards to provide easy-to-use and compatible high-speed wireless connectivity within your home, business or wherever a wireless network is available. Strictly adhering to the IEEE standard, the TRENDware wireless family of products will allow you to access the data you want, when and where you want it. No longer will you be limited to one location or forced to run new wiring through your home or office.
Network Expansion - Wireless technology allows the network to go where wires cannot go. Reduced Cost-of-Ownership - While the initial investment required for Wireless LAN hardware might be higher than the cost of wired LAN hardware, overall installation expenses and life-cycle costs will be significantly lower. Long-term cost benefits are greatest in dynamic environments requiring frequent moves, adds, and changes.
objects that the wireless signal must pass thru may limit range. Typical ranges vary depending on the types of materials and any background RF (radio frequency) noise in your home or business. The key to maximizing range is to follow these basic guidelines: 1. Keep the number of walls and ceilings between the wireless Access Point and your receiving device to a minimum - Each wall or ceiling can reduce your TRENDnet Wireless product's range from 3-90 feet (1-30 meters.
4. Getting Started Right out of the box, with its default settings, the TEW-310APB will automatically connect with other TRENDnet products. For the price of a single IP Address from your Broadband Internet Service provider you can share the Internet with all the computers on your local network, without sacrificing speed or security, using TRENDware networking products.
Setting Up an Infrastructure Network Please remember that TRENDware wireless devices are pre-configured to connect together, right out of the box, with the default settings. 1 You will need a broadband Internet access (Cable/DSL) subscription. 2 3 Consult with your Cable/DSL provider for proper installation of the modem. 4 Configure TEW-310APB. Refer to the Quick Installation Guide for setting up the Access Point. Note: If you already have a DHCP server (e.g.
5. Using the Configuration Menu The Configuration Menu for the TEW-310APB is web-based. When using the configuration program, please consider the following: You will need a JavaScript-enabled web-browser such as the Internet Explorer 4.0 or higher, or the Netscape Navigator 4.0 or higher. The computer that you are using for initial configuration must setup to receive IP address from DHCP server (or have an IP Address within the same range as the IP Address of the TEW-310APB).
· Open the web browser · Type in the IP Address of the Access Point (default http://192.168.1.1) Fig. 5.1 (The IP Address shown in the example above is the default setting. Use this IP address when connecting to a network consisting of other TRENDnet devices set to their default settings.
Basic Settings you can make changes to the following items: AP name SSID Channel WEP Key Mode Fig. 5.4 AP Name: You may choose to rename your Access Point, especially if you have more than one Access Point on your network. SSID: (Service Set Identifier) “default” is the factory setting. The SSID is a unique name that identifies a network. All devices on a network must share the same SSID name in order to communicate on the network.
Click Apply if you have made any changes or additions. Click Cancel to discard the changes. IP Settings Click on this tab to change device's IP Addresses. The default IP Address is 192.168.1.1 LAN IP: If you have a DHCP Server, such as an Internet Router, on the network, click Obtain IP Automatically. Or you can manually enter the IP address, Subnet Mask, and Gateway by clicking Fixed IP. Fig. 5.
Advanced Settings AP Mode There are 4 modes available. AP: Access Point mode. Bridge wireless clients to wired Ethernet network. AP Client: Acts as a wireless client and connects to a remote Access Point. This is used to convert an Ethernet device to Wireless Client. Fig. 5.6 You must enter the remote AP's MAC address in the Remote AP BSS ID. It is best to use another TEW-310APB as the Remote AP, please find AP's LAN MAC address in the Status page and enter it here.
RTS Threshold: This value should remain at its default setting of 2,432. If you encounter inconsistent data flow, only minor modifications to the value range between 256 and 2,432 are recommended. Fragmentation: This value should remain at its default setting of 2,346. If you experience a high packet error rate, you may slightly increase your Fragmentation Threshold within the value range of 256 to 2,346. Setting the Fragmentation Threshold too low may result in poor performance.
Security Password: Change the login User Name and Password in this screen. Administrator ID: This is the login User Name for the browser configuration. Default is admin, you can enter a name with up to 15 characters. AP Password New: Enter the new password (up to 15 characters). Fig. 5.7 Confirm: Enter the new password again. Click Apply to save the new User Name and Password. Click Cancel to discard the changes. MAC Filter: Use MAC Filters to allow or deny wireless connection to the TEW-310APB.
Tools Backup Settings: The current device settings can be saved as a file onto the local hard drive by clicking Backup and then follow the instructions on the screen to save the configuration file to desired Fig. 5.8 Restore Settings: The saved settings can be loaded back on the TEW310APB by entering the correct path or clicking Browse and locate the correct saved file location. When you have selected the settings file, click Restore to load the settings.
6. Troubleshooting Based on Windows XP Operating System This chapter provides solutions to problems that can occur during the installation and operation of the TEW-310APB Wireless Access Point. We cover various aspects of the network setup, including the network adapters. Please read the following if you are having problems. Note: It is recommended that you use an Ethernet connection to configure the TEW-310APB Access Point. 1.
2. The wireless client cannot access the Internet in the Infrastructure mode. · Make sure the wireless client is associated and joined with the correct Access Point. To check this connection: Right-click on the Local Area Connection icon in the taskbar> select View Available Wireless Networks. The Connect to Wireless Network screen will appear. Please make sure you have selected the correct available network, as shown in the illustrations below. Fig. 6.
3. Check that the drivers for the network adapters are installed properly. You may be using different network adapters than those illustrated here, but this procedure will remain the same, regardless of the type of network adapters you are using. · Go to Start · Right-click on My Computer · Click Properties (If the “My computer” icon is on your desktop, you can simply right click on it and click on “Properties”) Fig. 6.3 · Select the Hardware Tab · Click Device Manager Fig. 6.
· Double-click on Network Adapters · Right-click on 22M Wireless Cardbus Adapter · Select Properties to check that the drivers are installed properly. Fig. 6.5 · Look under Device Status and check that the device is working properly. · Click OK to close this window. Fig. 6.
4. Resetting the TEW-310APB to Factory Default Settings After you have tried other methods for troubleshooting your network, you may choose to Reset the TEW-310APB to the factory default settings. Remember that TRENDnet wireless products network together, out of the box, at the factory default settings. To hard-reset the TRENDnet TEW-310APB to Factory Default Settings, please do the following: · Locate the Reset button on the back of the TEW-310APB (next to the Ethernet port).
7. Networking Basics Using the Network Setup Wizard in Windows XP In this section you will learn how to establish a network at home or work, using Microsoft Windows XP. Go to Start > Control Panel > Network Connections Select Set up a home or small office network Fig. 7.1 When this screen appears, click Next.
Please follow all the instructions in this window: Fig. 7.2 Click Next In the following window, select the best description of your computer. If your computer connects to the Internet through a gateway/router, select the second option as shown. Fig. 7.
Enter a Computer description and a Computer name. Fig. 7.4 Click Next (Note: Each computer should have a unique Computer name) Enter a Workgroup name. All computers on your network should have the same Workgroup name. Fig. 7.
Please wait while the wizard applies the changes. Fig. 7.6 When the changes are complete, click Next. Please wait while the wizard configures the computer. This may take a few minutes. Fig. 7.
In the window below, select the best option. In this example, Create a Network Setup Disk has been selected. You will run this disk on each of the computers on your network. Click Next. Fig. 7.8 Insert a disk into the Floppy Disk Drive, in this case drive A: Fig. 7.9 Format the disk if you wish, and click Next.
Please wait while the wizard copies the files. Fig. 7.10 Please read the information under Here's how in the screen below. After you complete the Network Setup Wizard you will use the Network Setup Disk to run the Network Setup Wizard once on each of the computers on your network. To continue, click Next Fig. 7.
Please read the information on this screen, then click Finish to complete the Network Setup Wizard. Fig. 7.12 The new settings will take effect when you restart the computer. Click Yes to restart the computer. Fig. 7.13 You have completed configuring this computer. Next, you will need to run the Network Setup Disk on all the other computers on your network. After running the Network Setup Disk on all your computers, your new wireless network will be ready to use.
Naming your Computer To name your computer, please follow these directions: In Windows XP: · Click Start (in the lower left corner of the screen) · Right-click on My Computer · Click Properties (If the “My computer” icon is on your desktop, you can simply right click on it and click on “Properties”) Fig. 7.14 ·Select the Computer Name Tab in the System Properties window. You may enter a Computer description if you wish; this field is optional. To rename the computer or join a domain, · Click Change Fig.
· In this window, enter the Computer name. · Select Workgroup and enter the name of the Workgroup. · All computers on your network must have the same Workgroup name. · Click OK Fig. 7.16 Checking the IP Address in Windows XP/2000 Go to Start > All Programs > Accessories > Command Prompt Fig. 7.
Type Command and click OK Fig. 7.18 Type ipconfig /all and hit Enter at the prompt. All the configuration settings are displayed as shown below. Fig. 7.19 Type ipconfig /renew at the prompt to get a new IP Address, shown below. Fig. 7.20 (Windows 98/ME users: go to Start > Run. Type Command. Type winipcfg at the prompt. Click Release and Renew to obtain a new IP Address.
Assigning a Static IP Address Note: Residential Gateways/Internet Routers will automatically assign IP Addresses to the computers on the network, using DHCP (Dynamic Host Configuration Protocol) technology. If you are using a DHCP-capable Gateway/Router you will not need to assign Static IP Addresses, however, you need to set the TCP/IP protocol to automatically obtain IP.
· Right-click on Local Area Connections. · Click Properties Fig. 7.23 · Highlight Internet Protocol (TCP/IP) · Click Properties Fig. 7.
· Select Use the following IP address in the Internet Protocol (TCP/IP) Properties window, · Input your IP address and subnet mask. (The IP Addresses on your network must be within the same range. For example, if one computer has an IP Address of 192.168.0.2, the other computers should have IP Addresses that are between 192.168.0.3 and 192.168.0.254. No two computes can have the same IP Address. The subnet mask must be the same for all the computers on the network.
Connecting to a Wireless Network in Windows XP To be able to connect to a wireless network, make sure the proper network settings are configured for TEW-303PI. · Go to Start > right-click on My Network Places > · Select Properties > doubleclick on the Wireless Network Connection associated with the 22M wireless Adapter > · Select Properties > select Internet Protocol (TCP/IP) > click Properties Fig. 7.
Connecting to a Wireless Network with a Wireless Router or an Access Point using a static IP address in Windows XP. Select Use the following IP address - if the Wireless Router or Access Point does not have a DHCP server enabled. · Input a static IP address within the same range as the Wireless Router or Access Point. · IP address: 192.168.0.51 · Subnet mask: 255.255.255.0 · Default Gateway: Enter the LAN IP address of the Wireless Router · Select Use the following DNS server address.
Connecting to a Wireless Network with a Wireless Router or an Access Point using a DHCP server in Windows 2000. · Select Obtain an IP address automatically. · Select Obtain DNS server address automatically. · Click OK Fig. 7.30 Connecting to a Wireless Network with a Wireless Router or an Access Point using static IP address in Windows 2000. · Select Use the following IP address · Input a static IP Address within the same IP Address range as the wireless router or the access point. · IP address: 192.168.
Connecting to a Wireless Network in Windows Me and 98 · Go to Start > Settings > Control Panel > Double-click on the Network associated with the 22M Wireless Adapter > click Properties > select Internet Protocol (TCP/IP) > click Properties Fig. 7.32 Connecting to a Wireless Network with a Wireless Router or an Access Point using a DHCP server in Windows Me and 98. · Select the IP Address tab. Then, select Obtain an IP address automatically. · Select Detect connection to network media. · Click OK Fig. 7.
Connecting to a Wireless Network with a Wireless Router or Access Point using a static IP address in Windows Me or Windows 98. · Select Specify an IP address. · Input a static IP address within the same IP Address range as the wireless router or access point. · IP address: 192.168.0.51 · Subnet mask: 255.255.255.0 · Default Gateway: Enter the LAN IP address of the Wireless Router · Select Detect connection to network media. Fig. 7.
For Windows Me and 98: · Go to Start > Run > type command. A window similar to Fig. 7.36 will appear. Type ping xxx.xxx.xxx.xxx, where xxx is the IP address of the Wireless Router or Access Point. A good wireless connection will show four replies from the wireless router or access point, as shown. Fig. 7.
8. Technical Specifications Standards · IEEE 802.11b · IEEE 802.3 · IEEE 802.3u Ports · (1) 10/100Base-T Ethernet, RJ-45 (UTP) · (1) Power 5V DC, 2.0A Network Management · Web-Based browser with JavaScript Frequency Range · 2.4 ~ 2.4835 GHz, Direct Sequence Spread Spectrum (DSSS) Data Rates (Mbps : Channel) · 22 : PBCC · 11 : PBCC/CCK · 5.
Dimensions · 140 x 113 x 38 mm (5.51 x 4.45 x 1.50 inches) (antenna folded) · 140 x 113 x 108 mm (5.51 x 4.45 x 4.25 inches) (antenna fully erected) Weight · 213 grams (7.5 Oz.
9. Contacting Technical Support You can find the most recent software and user documentation on the TRENDware website www.trendware.com. TRENDware provides free technical support for customers within the United States for the duration of the warranty period on this product. U.S. customers can contact TRENDware technical support through our web site, by e-mail, or by phone.