
User Guide


7
SOFTWARE INSTALLATION
This section will lead you to install the driver and utility of the
Wireless PCI Adapter.
Windows 98(SE)/ME/2000/XP Utility and Driver Installation
1. Insert the Wireless PCI Adapter Driver & Utility CD-ROM into
computer’s CD-ROM Drive and it will automatically run a setup
menu and install the driver and the utility. In some specific
setting on Windows system, you may need to proceed the
software manually, go to your Windows Start menu and choose
Run, type “D:\Autorun.exe” in the dialog box (D:\ will depend
on where your CD-ROM drive is located) and click OK.
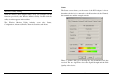
2. The InstallShield Wizard screen will appear. Click Install
Utility button to continue.
3. The installation program will help you to install the Wireless
Cardbus utility.
8
Be noted that the Windows XP have its own Wireless Utility;
you can either use the utility of Windows XP or the provided
utility.
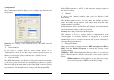
4. After finish the installation, plugged in the Wireless PCI
Adapter, the operating system will detect the “New Hardware”
and driver installation window will appear automatically.
Follow the installation steps and direct Windows to search the
driver in the CD-ROM directory path D:\Driver\ to install the
driver (assuming D: is the drive letter of the CD-ROM drive).
Directory paths:
Windows 98(SE): D:\Driver\Windows 98
Windows ME: D:\Driver\Windows ME
Windows 2000: D:\Driver\Windows 2000
Windows XP: D:\Driver\Windows XP
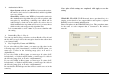
Note: for Win 98(SE)/ME, the “found new hardware wizard” window
appears. Select “automatic search the driver…”, “specify a location”
and choose the driver path as shown above, click “Next”, click
“Finish”, and “Yes” to restart the computer.
5. After finish the driver installation, you will see the icon on the
Windows task bar.
When the icon in the toolbar represent in green color, it is
properly connected to the network and if it represent in red
color, then it is not connected to the network.