Quick Installation Guide TEW-740APBO
Table of Content 1 English 1. Before You Start 2. Hardware Configuration 3.
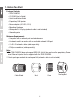
1. Before You Start Package Contents Ÿ TEW-740APBO Ÿ CD-ROM (User's Guide) Ÿ Quick Installation Guide Ÿ Proprietary PoE injector Ÿ Power adapter (48 V DC, 0.5 A) Ÿ Mounting Hardware Ÿ Waterproof RJ-45 plug (network cable is not included) Ÿ Grounding wire Minimum Requirements Ÿ Computer with a network port and web browser Ÿ A network switch or router with an available network LAN port Ÿ 2 x RJ-45 network cables (sold separately) Ÿ Phillips screwdriver (sold separately) Note: 1.
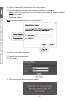
2. Hardware Installation Note: The default IP address of the TEW-740APBO is 192.168.10.100. To configure the TEW-740APBO, your network adapter must have an IP address within the 192.168.10.x subnet (e.g. 192.168.10.50). Please refer to the Appendix in the User's Guide for more information. Phase 1: Overview 1.Write the MAC address (MAC1) of the two TEW-740APBOs. The MAC address (MAC1) can be found on the side of the unit.
WDS Setup Note: 1. The initial configuration should be completed in a testing environment with two TEW-740APBO's approximately 15 ft. (5 meters) apart from one another. 2. Configure and connect the devices before mounting. Included PoE injector 1. Connect one end of a network cable into TEW-740APBO #1. 2. Connect the opposite end of the network cable to the P+DATA OUT port on the Power over Ethernet Injector. 3.
7. Open your web browser, type the IP address of the access point in the address bar, and then press Enter. The default IP address is 192.168.10.100 8. Power on the outdoor access point. 9. Login to the browser configuration page. 10. Change the administrator password. 11. Assign a valid IP address to the access point within the subnet defined by the router. Avoid using an IP address within the DHCP pool of your router. In this example, we will assume the following: Router IP Address: 192.168.10.
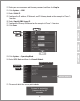
16. Confirm connectivity between the two access points. 17. Enter the default username and password, and then click Log In. Note: For first time installation, you are required to change the admin password. User Name: admin Password: admin Note: Username and password are case sensitive. 18. Enter a new admin password. 19. Confirm the new password. 20. Click Save. 21. Please wait while the access point reboots.
22. Enter your new username and the new password, and then click Log In. 23. Click System → LAN. 24. Select Static IP. 25. Configure the IP address, IP Netmask, and IP Gateway based on the example in Phase 1: Overview. 26. Select Specify DNS Server IP. 27. Configure the Primary DNS based on the example in Phase 1: Overview. 28. Click Save. 29. Click System → Operating Mode. 30. Select WDS Mode and then click Save & Reboot. Operating Mode System LAN Save & Reboot 31.
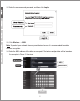
32. Enter the username and password, and then click Log In. 33. Click Wireless → WDS. Note: To protect your network from any unauthorized access it is recommended to enable wireless encryption. 34. Enter the MAC address of the other access point. The below configuration will be based on the example in Phase 1: Overview.
35. Click Reboot. Reboot 36. Click Reboot. Reboot 37. Repeat steps 2-27 for TEW-740APBO #2. Phase 3: Confirm Connectivity 1. Leave TEW-740APBO #2 connected to your computer. 2. Connect TEW-740APBO #1 to a LAN port of a router on your network. 3. To verify connectivity, run your computer's command prompt and ping TEW-740APBO #1's assigned IP address from your computer. 4. A successful ping reply determines that both TEW-740APBOs are configured properly and connected.
3. Hardware Installation Waterproof kit installation 1. Unscrew the sealing nut from the main body. 2. Separate the rubber seal from the claw. 3. Verify that you have the following parts: Cable Gland, Seal, Claw, Sealing Nut Cable Gland Seal Claw 4. Insert one end of an Ethernet cable into the sealing nut. 5. Insert the Ethernet cable into the seal.
6. Insert the seal into the claw. 7. Insert the seal/rubber claw into the Cable Gland. 8. Connect the Ethernet cable to the PoE port on the bottom of the TEW-740APBO.
9. Fasten the plug to the housing of the TEW-740APBO. 10. Fasten the cap to the weatherproof plug.
Point-to-Point (WDS Bridge) Installation 12
Internet Modem Router Building 1 Building 2 13
1. Refer to the above diagram. 2. Mount the TEW-740APBOs in your desired location. (See pole mounting the TEW-740APBO for mounting instructions). 3. Connect the TEW-740APBOs to their respective network. 4. Confirm that the TEW-740APBOs are facing each other. 5. Verify that the status LED indicators on both TEW-740APBOs are fully functional: PWR [Power] (Green / Solid), Wireless Signal Strength (Blinking / Green).
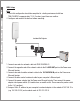
Connecting the Grounding Wire 1. Identify the grounding hole on the outdoor access point. You will see a symbol next to the hole. 2. Align one end of the grounding wire over the hole. Then secure grounding wire with the provided screw and washer. 3. Connect the green grounding wire to a grounding object. e.g. Earth Driven rod, Grounded Electrical System, Building Frame.
Pole mounting the TEW-740APBO Note: The pole mounting clamp supports poles with a maximum diameter of 101 mm (3.98 inches). 1. Align the mounting bracket with the hole on the unit and secure it with the M6x8 screw and washer provided. 2. Slide the two provided pole mounting clamps around the pole. Place the mounting bracket at the desired height and position. 3. Secure the TEW-740APBO to the pole mounting bracket using the mounting clamp screws. 4. Adjust the orientation of the access point as necessary.
Manufacturer’s Name and Address TRENDnet, Inc. 20675 Manhattan Place Torrance, CA 90501 USA Product Information: Model Number: TEW-740APBO 10dBi Wireless N300 Outdoor PoE Access Point Product Name: TRENDnet Trade Name: TRENDnet hereby declare that the product is in compliance with the essential requirements and other relevant provisions under our sole responsibility. Safety EMC EN 60950-1: 2006 + A11: 2009 + A1: 2010 + A12: 2011 + A2: 2013 EN 301 489-1 V1.9.2: 09-2011 EN 301 489-17 V2.2.
Limited Warranty TRENDnet warrants its products against defects in material and workmanship, under normal use and service. Specific warranty periods are listed on each of the respective product pages on the TRENDnet website. Garantie Limitée TRENDnet garantit ses produits contre les problèmes de matériel ou de fabrication, dans des conditions normales d'utilisation et de service. Les périodes de garanties précises sont mentionnées sur chacun des pages produits du site web de TRENDnet.
Safety notes Before using your TRENDnet device for the first time, it is essential to read and understand all safety and operating instructions. Keep instructions in a safe place for future reference. Some TRENDnet products are rated for outdoor applications and can sustain certain weather conditions. Please refer to the product's Ingress Protection (IP) rating and the operating humanity and temperature range. DANGER due to electricity Warning: Never open TRENDnet devices.
Certifications This device complies with Part 15 of the FCC Rules. Operation is subject to the following two conditions: (1) This device may not cause harmful interference. (2) This device must accept any interference received. Including interference that may cause undesired operation. Waste electrical an electronic products must not be disposed of with household waste. Please recycle where facilities exist. Check with your Local Authority or Retailer for recycling advice.