Quick Installation Guide TEW-740APBO2K
Table of Content 1 English 1. Before You Start 2. Hardware Setup and Configuration 3.
РORTUGUÊS ESPAÑOL DEUTSCH FRANÇAIS ENGLISH 1.
2. Hardware Setup and Configuration Note: By default, the TEW-740APBO access points are preconfigured to establish a point-topoint WDS bridge between each other using a unique predefined AES encryption key. For convenience, a unique predefined admin password has already been assigned to both access points. You can find the preconfigured access point settings on the wireless sticker or on the device label beneath the cover where the Ethernet ports and LEDs are located.
Aside from the preconfigured WDS bridge settings, the TEW-740APBO access points will also be configured with the following default settings: TEW-740APBO #1 Mode: WDS Mode IP Address: 192.168.10.50 Netmask (Subnet Mask): 255.255.255.0 IP Gateway (Default Gateway): 192.168.10.1 Primary DNS: 192.168.10.1 TEW-740APBO #2 Mode: WDS Mode IP Address: 192.168.10.51 Netmask (Subnet Mask): 255.255.255.0 IP Gateway (Default Gateway): 192.168.10.1 Primary DNS: 192.168.10.1 1.
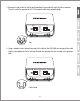
2. Remove the tab on the far left by gently bending it back and forth until the tab is removed. This will create the opening for a RJ-45 network cable to be routed through. Tab 3. Using a network cable, connect one end of the cable to the LAN (PoE) port and push the cable into the cable guide on the far left, then through the opening that was created in the previous step.
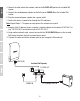
ENGLISH FRANÇAIS Note: Repeat Steps 1-7 to power on and connect the second access point. 8. Assign a static IP address to your computer's network adapter in the subnet of 192.168.10.x (e.g. 192.168.10.10) and subnet mask of 255.255.255.0. 9. Using another network cable, connect one end to the 10/100 DATA IN port on the included PoE injector for either the first or second access point. 10. Connect the other end of the network cable to your computer's Ethernet port. РORTUGUÊS ESPAÑOL DEUTSCH 4.
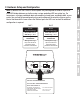
11. Make sure both access points are powered on approximately 15 ft. (5 m) apart from one another with front of access points directly facing each other. TEW-740APBO #1 TEW-740APBO #2 15 ft. (5m) LAN1 (PoE) LAN1 (PoE) P+DATA OUT POWER IN P+DATA OUT POWER IN 10/100Mbps DATA IN 12. To verify connectivity on your computer, open a command prompt or terminal application window and type in the following commands.
A successful connectivity test will appear similar to the result below for each access point. Ping replies and 0% packet loss will indicate a successful point to point bridge connection between the two access points. Note: If the connectivity test fails, wait for about a minute and try again. Make sure there are no obstacles between the two access points when running the connectivity test and make sure the two access points are not too close together.
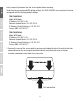
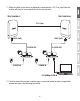
3. Ground Wire and Pole Mount Installation 1. Locate the grounding point located in the bottom section of the enclosure. Using a Phillps screwdriver, remove the grounding point screw (counter clockwise) and attach the included grounding wire to the grounding point screw. Then reattach the ground screw (clockwise) along with the grounding wire. After installing the grounding wire, remove another tab on the enclosure by gently bending back and forth until the tab is removed.
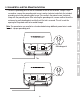
3. Insert the included fasteners through the holes located at the back of the access point. ENGLISH РORTUGUÊS ESPAÑOL DEUTSCH FRANÇAIS 2. Reinstall the cover by lining up the guides into the notches as shown and push the cover down until the cover clips in and is secured. 4. Wrap the fasteners around the pole where the access points will be installed. On the fasteners, insert the open end into the locking mechanism and pull tight until the access point is secured. 5.
Quick Installation Reference Internet Modem Router Building 1 Building 2 10
Manufacturer’s Name and Address TRENDnet, Inc. 20675 Manhattan Place Torrance, CA 90501 USA Zwolsestraat 156 2587 WB The Hague The Netherlands Product Information: TEW-740APBO / TEW-740APBO2K Model Number: 10 dBi Wireless N300 Outdoor PoE Access Point / Product Name: 10 dBi Wireless N300 Outdoor PoE Preconfigured Point-to-Point Bridge Kit TRENDnet Trade Name: TRENDnet hereby declare that the product is in compliance with the essential requirements and other relevant provisions under our sole responsibility.
Certifications This device complies with Part 15 of the FCC Rules. Operation is subject to the following two conditions: (1) This device may not cause harmful interference. (2) This device must accept any interference received. Including interference that may cause undesired operation. Waste electrical an electronic products must not be disposed of with household waste. Please recycle where facilities exist. Check with your Local Authority or Retailer for recycling advice.