Quick Installation Guide TEW-755AP2KAC (V1) / TEW-821DAP2KAC (V1)
Table of Content 1 English 1. Before You Start 2. Hardware Installation and Configuration 3.
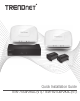
РORTUGUÊS ESPAÑOL DEUTSCH FRANÇAIS ENGLISH 1. Before You Start Package Contents Ÿ 1 x TEW-WLC100 wireless LAN controller Ÿ 2 x TEW-755AP N300 PoE access points or TEW-821DAP AC1200 dual band PoE access points Ÿ 2 x TPE-113GI 802.3af Gigabit PoE injectors Ÿ 2 x Network cables (1.5 m / 5 ft.
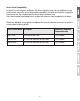
Access Point Compatibility By default, the access points included in this kit are controller ready. For any additional access points, please refer to the access point model compatibility list below and controller compatible firmware version. You can download the access point's firmware from http://www.trendnet.com/support which include instructions on how to upgrade the firmware.
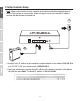
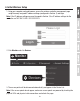
Note: Before connecting the wireless controller to the network and connecting other devices such as PoE injectors or access points, follow the steps to set up your controller IP address settings and administrator password first. 1 FRANÇAIS ENGLISH 2. Initial Controller Setup 2 РORTUGUÊS ESPAÑOL DEUTSCH Power 3. Assign a Static IP address to your computer's network adapter in the subnet of 192.168.10.x (e.g. 192.168.10.25) and a subnet mask of 255.255.255.0. 4.
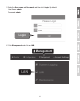
5. Enter the User name and Password, and then click Login. By default: User Name: admin Password: admin Login 6. Click Management and click on LAN.
ENGLISH 7. Configure the wireless controller IP address settings to match the requirements of your network and click Apply. LAN Settings TEW-WLC100 Network Settings FRANÇAIS IP Address 192.168.10.200 Netmask 255.255.255.0 Gateway 192.168.10.1 DNS1 192.168.10.1 DNS2 8. To change the controller administrator password, click Account Settings and click Edit.
9. In the New Password and Confirm Password fields, enter the new administrator password and click OK to save the new password settings. You will be prompted immediately afterwards to login to the controller management page with the new password. New Password Confirm Password OK 10. Using an Ethernet cable, connect one of the five Gigabit Ethernet ports located on the back of the wireless controller to your network (e.g. router, switch, etc.
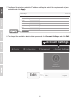
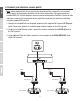
Note: Before mounting the access points to the desired locations, connect the access point locally directly to the wireless controller first for initial configuration. The access points are standard IEEE 802.3af PoE compliant and may also be connected to a PoE/PoE+ switch for data and power, however, for the purposes of this installation guide we will reference installation using the supplied PoE injectors. 1. Connect the included PoE injector power adapters to the supplied PoE injectors DC IN power ports.
4. Initial Wireless Setup 1. Using your computer and web browser, access the wireless controller management page using the newly assigned IP address settings (configured in Section 2) and login. Note: If the IP address settings were not changed in Section 2, the IP address settings for the controller are 192.168.10.200 / 255.255.255.0. Login 2. Click Monitor and click Devices. Monitor Devices 3. The access points will be discovered automatically and appear in the Device List.
ENGLISH FRANÇAIS DEUTSCH 4. After the access points are discovered and appear in the Device List, under the Action column, click Accept on each access point to add them to the wireless controller. Device Name Mac Address Address D8:EB:97:31:5A:31 192.168.10.21 NEW Accept 00:18:E7:95:92:45 192.168.10.22 NEW Accept Wifi Group Status Client DOWN History Channel Type Action 5. Once the access points have been added to the wireless controller, the Status will change from NEW to RUN.
7. In the list below, click Create to create a new wireless profile. 8. In the Edit Wireless Group window, enter the wireless network name/SSID for the wireless network. (e.g. TRENDnet-WiFi) Note: The SSID is the wireless network name used to broadcast and be discovered by your wireless client devices to connect to your wireless network. SSID TRENDnet-WiFi 9. For Roaming options, select 802.
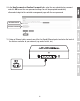
ENGLISH FRANÇAIS 12. To mount the access points, install the mounting plates first to the desired wall or ceiling using the included drywall anchors and screws. Install the mounting plates with the clips facing away from the wall. If wall mounting, install the mounting plates with the correct orientation. After the mounting plates are properly installed, align the access point mounting holes with the mounting plate clips and slide in access point to lock into place.
Manufacturer’s Name and Address TRENDnet, Inc. 20675 Manhattan Place Torrance, CA 90501 USA Zwolsestraat 156 2587 WB The Hague The Netherlands Product Information TEW-755AP2KAC / TEW-821DAP2KAC Model Number: N300 Wireless Controller Kit / AC1200 Dual Band Wireless Controller Kit Product Name: TRENDnet Trade Name: TRENDnet hereby declare that the product is in compliance with the essential requirements and other relevant provisions under our sole responsibility.
Certifications This device complies with Part 15 of the FCC Rules. Operation is subject to the following two conditions: (1) This device may not cause harmful interference. (2) This device must accept any interference received. Including interference that may cause undesired operation. Waste electrical an electronic products must not be disposed of with household waste. Please recycle where facilities exist. Check with your Local Authority or Retailer for recycling advice.