802.
Regulatory notes and statements Wireless LAN, Health and Authorization for use Radio frequency electromagnetic energy is emitted from Wireless LAN devices. The energy levels of these emissions however are far much less than the electromagnetic energy emissions from wireless devices like for example mobile phones. Wireless LAN devices are safe for use frequency safety standards and recommendations.
The radiated output power of this Wireless LAN device is far below the FCC radio frequency exposure limits. Nevertheless, this device shall be used in such a manner that the potential for human contact during normal operation is minimized. When nearby persons has to be kept to ensure RF exposure compliance, in order to comply with RF exposure limits established in the ANSI C95.1 standards, the distance between the antennas and the user should not be less than 20 cm.
The antenna(s) used for this transmitter must be installed to provide a separation distance of at least 20 cm from all persons and must not be co-located or operating in conjunction with any other antenna or transmitter. CE Mark Warning This is a Class B product. In a domestic environment, this product may cause radio interference, in which case the user may be required to take adequate measures. Protection requirements for health and safety – Article 3.
TABLE OF CONTENT About This Guide ....................................................................................... 1 Purpose ..................................................................................................... 1 Overview of this User’s Guide................................................................. 1 Unpacking and Setup.................................................................................. 2 Unpacking .................................................................
ABOUT THIS GUIDE Congratulations on your purchase of this IEEE 802.11g Wireless LAN Access Point. This manual helps to features the innovating wireless technology that can help you build a wireless network easily! This manual contains detailed instructions in operation of this product. Please keep this manual for future reference. With a WLAN (IEEE 802.11g) Access Point, a mobile computer can share data with another mobile computer in a wireless way.
UNPACKING AND SETUP This chapter provides unpacking and setup information for the Access Point. Unpacking Open the box of the Access Point and carefully unpack it. The box should contain the following items: One Wireless Access Point One external power adapter One CD-Rom (User’s guide) If any item is found missing or damaged, please contact your local reseller for replacement.
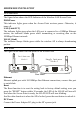
HARDWARE INSTALATION LED Indicator The figure below shows the LED Indicator of the Wireless LAN Access Point. PWR/Power This indicator lights green when the Access Point receives power. Otherwise, it turns off. LAN (Link/ACT) The indicator lights green when the LAN port is connected to a 100Mbps Ethernet station, the indicator blinks green while transmitting or receiving data on the 100Mbps Ethernet network. WLAN (Link) The indicator always blinks green while the wireless AP is always broadcasting packets.
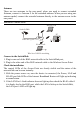
Antenna There are two antennas in the rear panel, when you need to connect extended Antenna, connect to Antenna 2 for the extended antenna. When you are using one antenna model, connect the extended antenna directly to the antenna screw in the rear panel. Hardware connections Notebook Switch/Hub PO WER SYSTEM L AN 1 2 3 4 Lin k / A CT 100M PC Ethernet port Notebook Wireless LAN Networking Connect to the Switch/Hub 1. Plug in one end of the RJ45 network cable to the Switch/Hub port, 2.
CONFIGURING THE WIRELESS LAN ACCESS POINT The Wireless Access Point has a Web GUI interface for the configuration. The AP can be configured through the Web Browser. A network manager can manage, control and monitor the AP from the local LAN. This section indicates how to configure the AP to enable its functions. Login to the Wireless AP through WLAN Before configuring the Wireless AP through WLAN, make sure that the SSID, Channel and the WEP was set properly.
When there is a screen needs to enter the Network password, it means that there is a password settle, type in the password you entered before. There is no need to enter any password when you first login the AP, the default setting is without password. Type a name or leave the username dialog box empty to login, the system will check only the password that was set in the system before.
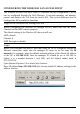
Main Screen of the Access Point The screen will show the station summary of the AP when you login to the AP. There are six main functions included in the left side of the main screen: Network, Security, Status, Clients, Tools and Configuration. Point the selections in the left side of the menu screen.
Network The Network Function can configure the LAN Setup, Wireless settings and WDS Links of the Access Point. I. LAN Setup The LAN Setup function can configure the basic LAN setting: Dynamic (DHCP Client): Click on the Dynamic for dynamic IP address allocation from the Server PCs. Static IP: Click on the Static IP to fill up the IP Address, Subnet Mask and Gateway from the Networking Manager. II. Wireless Settings The Wireless Settings contain two settings, Radio Setting and Wireless LAN Setting.
Regulatory Domain: this is the channel selection of each country regulatory domain, select the country where you are using this Wireless Device, users are responsible for ensuring that the channel set configuration is in compliance with the regulatory standards of these countries. Click on the “change region” button and a window will pop out, select the region in which you are using this AP. Wireless LAN Settings: to configure the wireless networking settings.
III. WDS Links WDS (Wireless Distribution System) uses wireless media to communicate with other APs. When you enter the screen of the WDS, there are list of other APs will appear, click enable in the left side of the screen and click apply to add the AP to your WDS Link, or click the “Add WDS Link” button to add the APs that you need to add.
Security This function is used to protect wireless communication from eavesdropping. A secondary function of encryption is to prevent unauthorized access to a wireless network, and it can be achieved by using the Encryption function. This AP provides three modes for Security Encryption, WPA, 802.1x and WEP. When there are security function enable, it will show check sign or numbers on the left side of the screen. Check sign means that the function is enable.
II. Radius Server A RADIUS server is used to authenticate the connection for clients and return authentication key parameters to the users to connect to the wireless networking. RADIUS (Remote Authentication Dial-In User Service) utilizes a RADIUS server for authentication and the use of dynamic TKIP, AES, or WEP. Re-authentication Time: type in how long the seconds that you want to reauthentication with the client. Click “Add” button to add the Radius Server IP Address, Server UDP port and Secret.
III. Wired Equivalent Privacy (WEP) WEP encryption implementation was not put in place with the 802.11 standard. This means that there are about as many methods of WEP encryption as there are providers of wireless networking products. In addition, WEP is not completely secure. One piece of information still not encrypted is the MAC address, which hackers can use to break into a network by spoofing (or faking) the MAC address.
Rekeying Time: type in the time for when the manager want clients to re-keying the password for authentication and security. Rekeying packets: type in the numbers of packets in which the manager want to control every client to re-key the password when the number of every 1000 packets was transmitted. V. Wi-Fi Protected Access (WPA) Wi-Fi Protected Access (WPA) is the newest and best available standard in Wi-Fi security. Two modes are available: Pre-Shared Key and RADIUS.
Status This function will show the statistics of the Station, Wireless Statistics and Event Reporting. I. Station This screen will show the status summary of the system. II. Wireless Statistics This screen shows the statistics of the wireless AP.
III. Event Report This screen shows the event happened on the AP, press “Reset Event Log” to clear the record of the event happened.
Clients This function shows the list of the wireless surrounded this AP. I. Wireless Clients This function shows the list of the wireless clients that connected to this AP. II. Access Points This function shows the list of the Wireless Access Point that this AP can connect with, this is the list that you can use for WDS Links, refer for the WDS Links on page 10.
Tools This function will help you to upgrade the firmware of the AP, press the “Upgrade Firmware” button in the left side of the menu screen and a window will pop out. Press “Next “. Type the firmware file that you need to upgrade inside the dialog box, or press the “Browse” button to find the firmware file location. Press “Upgrade” button to proceed the upgrade procedure.
When finish uploading the file to the AP, do not power off the AP until the “Firmware Upgrade Complete” screen appears. Press the “Reset” button on the rear panel of the AP, to set back to factory default setting.
Configuration I. Change Password This function will help you to configure the password of the AP, type in the new password inside the New password and Confirm password dialog box, press the “Change password” button to activate this function. II. Lock Access Point Lock the Access Point to deny configuration changes to it. You need to have physical access to the Access Point to unlock it, press the reset button on the rear panel of the AP to unlock.
TECHNICAL SPECIFICATIONS General Standards Standard: IEEE 802.11g IEEE 802.3u 10/100BASE-TX Fast Ethernet Signal Type: OFDM (Orthogonal Frequency Division Multiplexing) Modulation: QPSK / BPSK / CCK / OFDM LED Indicators: Power, LAN (Link/Activity), WLAN (Link) Frequency Range 2412 ~ 2484 MHz ISM band (channels 1 ~ 14) Frequency Band: 2.