WOTW Federal Communication Commission Interference Statement This equipment has been tested and found to comply with the limits for a Class B digital device, pursuant to Part 15 of the FCC Rules. These limits are designed to provide reasonable protection against harmful interference in a residential installation. This equipment generates, uses and can radiate radio frequency energy and, if not installed and used in accordance with the instructions, may cause harmful interference to radio communications.
Europe – EU Declaration of Conformity This device complies with the essential requirements of the R&TTE Directive 1999/5/EC. The following test methods have been applied in order to prove presumption of conformity with the essential requirements of the R&TTE Directive 1999/5/EC: EN60950-1: 2010 Safety of Information Technology Equipment EN 62311: 2008 Assessment of electronic and electrical equipment related to human exposure restrictions for electromagnetic fields (0 Hz – 300GHz) EN 300 328 V1.7.
requirements and other relevant provisions of Directive 1999/5/EC. Español [Spanish] Por medio de la presente TRENDnet declara que el TEW-703PI/TEW-703PIL cumple con los requisitos esenciales y cualesquiera otras disposiciones aplicables o exigibles de la Directiva 1999/5/CE. Ελληνική [Greek] ΜΕ ΤΗΝ ΠΑΡΟΥΣΑ TRENDnet ∆ΗΛΩΝΕΙ ΟΤΙ TEW-703PI/TEW-703PIL ΣΥΜΜΟΡΦΩΝΕΤΑΙ ΠΡΟΣ ΤΙΣ ΟΥΣΙΩ∆ΕΙΣ ΑΠΑΙΤΗΣΕΙΣ ΚΑΙ ΤΙΣ ΛΟΙΠΕΣ ΣΧΕΤΙΚΕΣ ∆ΙΑΤΑΞΕΙΣ ΤΗΣ Ο∆ΗΓΙΑΣ 1999/5/ΕΚ.
TABLE OF CONTENTS Introduction ...............................................................................................1 Overview of this User’s Guide ............................................................................... 1 Unpacking and Setup .................................................................................2 Unpacking ............................................................................................................. 2 Setup ........................................
INTRODUCTION Congratulations on your purchase of TEW-703PI / TEW-703PIL Wireless N PCI Adapter. This manual contains detailed instructions regarding the operation of this product. Please keep this manual for future reference. With the TEW-703PI / TEW-703PIL Wireless N PCI Adapter, a desktop or laptop computer can communicate with another computer wirelessly. An easy-to-use utility is bundled with the TEW-703PI / TEW-703PIL Wireless N PCI Adapter for configuration, monitoring, and diagnostic purposes.
UNPACKING AND SETUP This section provides unpacking and setup information for the TEW-703PI or TEW703PIL Wireless N PCI Adapter. Unpacking The box should contain the following items: TEW-703PI or TEW-703PIL Adapter CD-ROM (Utility/Driver & User's Guide) Multi-Language Quick Installation Guide If any item is found missing or damaged, please contact your local reseller for replacement.
IDENTIFYING EXTERNAL COMPONENTS LED Link A green Link LED indicator lights up when the TEW-703PI / TEW-703PIL Wireless N PCI Adapter is connected to a wireless network successfully. ACT (Activity) The ACT LED indicator blinks green when the 802.11n Wireless LAN Adapter is transmitting or receiving data. Check the Installation Make sure that the LEDs of the Wireless N PCI Adapter are clearly visible and that the status of the network link can be seen instantly: 1.
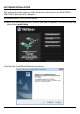
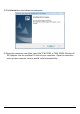
SOFTWARE INSTALLATION This section describes how to install the driver and utility for the TEW-703PI / TEW-703PIL Wireless N PCI Adapter. Windows Based Utility Installation 1) Insert the Utility and Driver CD-ROM into your computer’s CD-ROM Drive and then clicks Install Utility. 2) Follow the InstallShield Wizard Instructions.
3) Click Finish then shut down the computer. 4) Open the computer case then insert the TEW-703PI or TEW-703PIL Wireless N PCI Adapter into an available PCI slot on your computer. Close the case then start up the computer, drivers would install automatically.
WIRELESS UTILITY SETTING The user can configure the wireless settings using the Wireless Adapter Configuration Utility. Double-click the utility icon that appears in the taskbar. The Wireless Adapter Configuration Utility is divided into six sections: General, Profile, Available Networks, Status, Statistics and WPS. General This screen shows the general information of the wireless adapter. Status: Shows connection status. Speed: Shows the transmission and the reception data rate.
SSID: Shows the current SSID, which must be the same as your wireless access point or router in order to establish the connection correctly. Wireless Mode: Shows the current wireless mode used. Signal Strength: Shows the wireless signal strength of the connection between the adapter and the Access Point or router. Link Quality: Shows the statistics of data transfer, and the calculation is based on the number of packets transmitted and received.
Add: Adds a profile. The following screen will appear. The user can enter the necessary information required for accessing the particular Access Point or Wireless Router. Or you can search the desire wireless router or AP under Available Networks section and click on Add Profile button to add the Profile. Remove: Deletes the selected profile Edit: Edit an exist profile. The screen will back to profile.
Wireless Network Security: The following options are available: Open System, Shared Key, WPA-PSK, WPA2-PSK, WPA EAP-TLS, WPA2 EPA-TLS. Select Open System, Shared Key for WEP data encryption feature. Open or Shared Key Open System and Shared Key require the user to set a WEP key to exchange data with other wireless clients that have the same WEP key. WEP is considered basic level of wireless encryption, if you would like higher security connection, WPA2 encryption is recommended.
Available Networks This screen allows the user to scan for available wireless network. It also allows the user to establish wireless communications with a target device. Available Networks – displays the wireless networks (wireless clients, access points or routers) that are within range. Select any one of the wireless networks and connect to it by double-clicking. Click the “Refresh” button to rescan for available networks.
Status Display the information of the adapter including manufacturer, driver version, utility version, encryption, encryption type, region, adapter’s MAC address, current connection data rate, channel, connection status, the associated router or Access Point’s SSID, network type, associated device’s MAC address, and Up time. SSID: Service Set Identifier, which is a unique name shared among all wireless clients in a wireless network.
12
Statistics This section displays the statistics of the adapter connection. TX means transmission and RX means Reception.
WPS Wi-Fi Protected Setup (WPS) is an optional certification program from the Wi-Fi Alliance that is designed to ease the task of setting up and configuring security on a wireless network. There are two methods used in the WPS as below instruction.
1) Click on the “Push Button Config (PBC)” button. 2) Push the WPS button on your wireless access point or router. 3) Click the Next button start the WPS configuration. 4) If the WPS configuration was successful, the follow window will show on. 5) If the WPS configuration was failed, the follow window will show on.
Enter a PIN Using the WPS configuration with the PIN Input method, the configuration steps as below: 1) Click on the Pin Input Config (PIN) button, the PIN is shown on the button of the windows.
2) Enter the PIN code into the WPS “Clint PIN number” of you wireless access point or router ( in example, TRENDnet TEW-734GR 300Mbps Wireless N Gigabit Router) then click the Start PIN button, the wireless access point or router will start the WPS configuration process. 3) Choose to select the specific AP/Router or a WPS enabled device with client PIN entered.
4) Select a wireless access point or router then click the Select button start the WPS configuration.
5) If the WPS configuration was successful, the follow window will show on. 6) If the WPS configuration was failed, the follow window will show on. Try to repeat the steps again if this screen appears.
Technical Specifications Hardware Interface 32-Bit PCI 2.1 Bus Standards IEEE 802.11b, IEEE 802.11g, IEEE 802.11n LED Indicator Link/ Activity Power Consumption Receive mode: 350mA (max.) Transmit mode: 400mA (max.) Supported OS Windows 7 (32/64-bit), Vista (32/64-bit), XP (32/64-bit) Dimensions 120 x 44 mm (4.7 x 1.75 in.) Weight 55 g (1.8 oz) Temperature Operating: 0° ~ 40° C (32° ~ 104° F) Storage: -10° ~ 70° C (14° ~ 158° F) Humidity 95% max.
Limited Warranty TRENDnet warrants its products against defects in material and workmanship, under normal use and service, for the following lengths of time from the date of purchase. TEW-703PI / TEW-703PIL – 3 Years Warranty Camera’s motor, AC/DC Power Adapter, Cooling Fan, and Power Supply carry 1 year warranty.
LIMITATION OF LIABILITY: TO THE FULL EXTENT ALLOWED BY LAW TRENDNET ALSO EXCLUDES FOR ITSELF AND ITS SUPPLIERS ANY LIABILITY, WHETHER BASED IN CONTRACT OR TORT (INCLUDING NEGLIGENCE), FOR INCIDENTAL, CONSEQUENTIAL, INDIRECT, SPECIAL, OR PUNITIVE DAMAGES OF ANY KIND, OR FOR LOSS OF REVENUE OR PROFITS, LOSS OF BUSINESS, LOSS OF INFORMATION OR DATE, OR OTHER FINANCIAL LOSS ARISING OUT OF OR IN CONNECTION WITH THE SALE, INSTALLATION, MAINTENANCE, USE, PERFORMANCE, FAILURE, OR INTERRUPTION OF THE POSSIBILITY OF
23