Table of Contents Chapter 1 Introduction 1 Features......................................................................................................................... 1 Safety Instructions ........................................................................................................ 1 Package Contents .......................................................................................................... 2 Physical Details .................................................................
Chapter 1 This chapter provides an overview of your Wireless Print Server's features. 1 Introduction Features Congratulations on the purchase of your new Wireless Print Server. Your Wireless Print Server was designed to provide a simple and efficient network printing solution. It is packed with features, including: ¾ Wireless LAN Support. Wireless stations supporting the IEEE 802.11b or IEEE 802.11g standard can interoperate with the Wireless Print Server.
Regulatory Approvals FCC Statement This equipment has been tested and found to comply with the limits for a Class B digital device, pursuant to Part 15 of the FCC Rules. These limits are designed to provide reasonable protection against harmful interference in a residential installation. This equipment generates, uses and can radiate radio frequency energy and, if not installed and used in accordance with the instructions, may cause harmful interference to radio communications.
Package Contents You should find the following items packaged with your Wireless Print Server. If any items are missing, contact your dealer immediately.
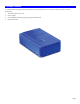
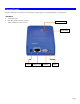
Physical Details Details of the LEDs and connections are in this Chapter. Further details are contained in Appendix A - Specifications. TEW-MP1U • 1 USB Printer Port • IEEE 802.11g/802.
LED Indicators The Wireless Print Server has LED indicators on the top. The Error LED is red. The Status indicator LED is green. The LED indicator modes are described in the following table. Status LED (Green) Error LED (Red) Status Description Off Off No power. On Off Normal operation - Idle. Flashing Off Normal operation - transmitting or receiving packets from the network. On On No printer connected. Flashing Flashing Firmware upgrade in progress.
Chapter 2 This chapter provides an overview of the configuration process. 2 Setup Overview The Wireless Print Server is designed to support many different platforms, and the configuration required would depend upon the environment in which it is installed. • The Wireless Print Server usually requires configuration, but if there's a DHCP server on your network, then the device is just plug-and-play. A Windows-based setup Wizard is also provided on the CD-ROM to simplify this task.
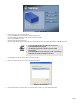
Figure 2: Main Screen 3. Click OK to follow the setup procedures: (1) Connect MFP/All-in-one machine to Wireless Print Server. (2) Connect both PC and Wireless Print Server to Router or Hub. (3) Power ON MFP/All-in-one. (4) Power ON Wireless Print Server. (5) Check the LED on the Wireless Print Server. Status LED (Green) should be ON and Error LED (Red) is OFF. • To use the LAN interface, the LAN cable needs to be inserted BEFORE powering ON.
Figure 4: Wireless Network Screen 6. If you select the Manually Setting, click Next to move to the Security Setting screen. Figure 5: Security Setting Screen 7. For the Security Setting screen: • Network Type - Select the correct value for your Wireless LAN. • SSID - All Wireless stations MUST use the same SSID to communicate with one another. • Channel -·If "Automatic" is selected, the Access Point will select the best available channel.
Figure 6: Status Screen 10. Click Next and you will see the following prompt. 11. Click Yes to install the utility and bus driver. Follow the prompts to complete the installation. 12. Click Finish. If the desired Wireless Print Server is not listed: • Check that both the Wireless Print Server and the printer are properly connected, and powered on. • Check that the proper Printer Driver has been installed.
Figure 7: Main Screen 3. Follow the prompts to complete the installation. 4. The Wireless Print Server Utility will then run.
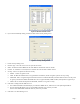
Wireless Print Server Utility Setup 1. The program will search for the Wireless Printer Servers on the network, and the Wireless Print Server Utility screen will be displayed. • The names of the attached printer servers will be displayed if possible. • If the printer is occupied by other user, the status field will display the information of the user and IP address. Otherwise the default status icon should be if the printer is available.
Figure 9: Utility Screen 3. Configuration is now complete. Note: If Wireless Print Server has been idled for 5 minutes after connected, you will see the following message. Figure 10: Idle Message The Wireless Print Server will be disconnected automatically if you don't respond to the message within 1minute.
Chapter 3 Management 3 Web-Based This chapter explains how to use your Web Browser to configure the Wireless Print Server. Overview The Wireless Print Server incorporates the HTTP server. This allows you to connect to the Wireless Print Server and configure it using your Web Browser. Most browsers should work, provided they support tables and forms. Preparation Because it supports dynamic IP Address allocation using DHCP or BOOTP, the Wireless Print Server ships with an IP Address of 0.0.0.0.
Configuration Screens The following configuration screens are available. TCP/IP Figure 11: TCP/IP Screen IP Address DHCP Client Select this if your LAN has a DHCP Server. The Wireless Print Server will then automatically obtain an IP address from the DHCP Server. Fixed IP Address Select this to assign a fixed IP address to the Wireless Print Server. If selected, you must enter the Device IP Address, Subnet Mask, and Gateway. Device IP Address IP Address assigned to the Wireless Print Server.
Wireless Configuration There are 2 options on the menu for Wireless configuration - Basic and Security. Wireless - Basic The settings on this screen must match the other Wireless stations in order for communication to occur. Figure 12: Wireless Screen Configuration Region or Domain Select your region from the drop-down list. Station name This is the same as the Device (Host) Name on the WAN screen. On your PC, some Wireless status screens may display this name as the Access Point in use.
• Disabled - no data encryption is used. • WEP - data is encrypted using the WEP standard. • WPA-PSK - data is encrypted using the WPA-PSK standard. This is a later standard than WEP, and provides much better security than WEP. Use this if possible. • WPA2-PSK - this is a further development of WPA-PSK, and offers even greater security. Wireless Security - WEP If "WEP" is selected, the screen will look like the following example.
Figure 14: WPA-PSK Screen Security System WPA-PSK Passphrase Enter the Keyword key value. Data is encrypted using a key derived from the PSK. Other Wireless Stations must use the same PSK. The PSK must be from 8 to 63 characters in length. Encryption Select the desired option. Other Wireless Stations must use the same method. Like WEP, data is encrypted before transmission. WPA is more secure than WEP, and should be used if possible.
Wireless Security - WPA2-PSK If "WPA2-PSK" is selected, the screen will look like the following example. Figure 15: WPA2-PSK Screen Security System WPA2-PSK Passphrase Enter the Keyword key value. Data is encrypted using a key derived from the PSK. Other Wireless Stations must use the same PSK. The PSK must be from 8 to 63 characters in length. Encryption Select the desired option. Other Wireless Stations must use the same method.
Other Screens Server Status This screen shows server system data and the current settings for all of the other screens. It is read-only; no data can be input on this screen. Printer Status This screen displays the current status of each port. For each port, the following data is listed: • Connected Printer- the model name of the printer connected to the port, if the printer name is known. (If the printer is not bidirectional, this information is unavailable.
A Specifications Appendix A General Specifications TEW-MP1U Power Consumption 5.5w max. External Power Adapter 5V DC LEDs 2 USB 2.0 Port 1 Ethernet Connecter 10BaseT/100BaseTx FCC / CE FCC, CE.
Page 20