Quick Installation Guide TFC-1000 TFC-210 Series TFC-2000 Series
Table ofof Contents Table Contents Français .......................................................................................... 1. Avant de commencer ............................................................ 2. Détails du produit .................................................................. 3. Installation du matériel .......................................................... 1 1 2 3 LLCF Function ................................................................................
1.
2.
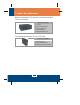
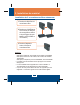
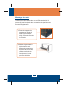
3. Installation du matériel Installation de 2 convertisseurs fibre autonomes 1. Branchez le câble fibre aux convertisseurs fibre. 2. Branchez un câble Ethernet RJ-45 ente le port Ethernet des convertisseurs de fibre et le port Ethernet de votre switch (e.g TE100-S24R ou TEG-S240TX). 3. Branchez l'adaptateur secteur à l'arrière du convertisseur fibre.
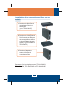
Installation d’un convertisseur fibre sur un switch 1. Branchez le câble fibre du convertisseur fibre à un switch fibre (p. ex. TE100-S810Fi) 2. Branchez un câble Ethernet RJ-45 ente le port Ethernet des convertisseurs de fibre et le port Ethernet de votre switch (e.g TE100-S24R ou TEG-S240TX). 3. Branchez l'adaptateur secteur à l'arrière du convertisseur fibre. Remarque: Ceci ne s'appliqe pas aux TFC-210S20D3, TFC-210S20D5, TFC-2000S10D3 et TFC-2000S10D5.
Installation d’un convertisseur fibre sur un PC 1. Branchez le câble fibre du convertisseur fibre à un adaptateur fibre (p. ex. TE100-PCIFX+). 2. Branchez un câble Ethernet RJ-45 entre le port Ethernet des convertisseurs de fibre et le port Ethernet de votre switch (e.g TE100-S24R ou TEG-S240TX). 3. Branchez l'adaptateur secteur à l'arrière du convertisseur fibre. Remarque: Ceci ne s'appliqe pas aux TFC-210S20D3, TFC-210S20D5, TFC-2000S10D3 et TFC-2000S10D5.
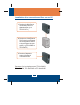
Installation d’un convertisseur fibre dans un boîtier 1. A l'aide d'un tourne vis, dévissez le couvercle de la baie désirée sur le boîtier et enlevez le couvercle. Conservez les vis et le couvercle qui vous serviront plus tard si vous devez refermer la baie. 2. Fixez le support de montage sur le côté du convertisseur fibre. 3. Insérez le convertisseur fibre dans un logement disponible. Installez le convertisseur fibre avec le port fibre près du bas du boîtier.
Montage du rack Le boîtier peut être installé dans un rack EIA standard de 19 pouces qui peut être placé dans une armoire de répartition avec les autres équipements. 1. Posez les supports de montage sur l'avant du boîtier (un de chaque côté), et fixez les avec les vis fournies. 2. Mettez soigneusemet le boîtier dnas le rack.
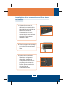
Branchement de l’alimentation 1. Branchez le cordon d'alimentation fourni à l'arrière du boîtier. 2. Branchez le cordon d'alimentation à une prise de courant. 3. Mettez le switch sur ON pour alimenter le boîtier.
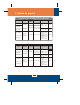
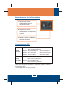
LLCF Function LLCF allows the network administrator to quickly troubleshoot the network connection based on the LEDs on the Fiber Converters. When the TX port link is down, the converter will force the fiber port link to shutdown. When the fiber port link is down, the converter will force the TX port link to shutdown.
LLCF (Link Loss Carry Forward) Function Table Media Converter 1 Media Converter 1 LLCF Enable Media Converter 2 LLCF Enable Media Converter 1 LLCF Enable Media Converter 2 LLCF Disable Media Converter 1 LLCF Disable Media Converter 2 LLCF Enable Media Converter 1 LLCF Disable Media Converter 2 LLCF Disable Media Converter 2 Copper LED Fiber LED Copper LED Fiber LED Cable 1 Link Down OFF OFF OFF OFF Cable 2 Link Down OFF OFF OFF OFF Cable 3 Link Down OFF OFF OFF OFF Cable 4 Link Down
Specifications Fiber Converters Standards: TFC-210 series: IEEE 802.3 10Base-T IEEE 802.3u 100Base-TX & 100Base-FX TFC-2000 series: 1000Base-T, 1000Base-SX/LX, IEEE 802.3ab/ 802.3z TFC-210 series: Power; 100Mbps, Full Duplex/ Collision, Link/Activity LED Indicators: TFC-2000 series: Power; 1000Mbps, Full Duplex/ Collision, Link/Activity TFC-210 series: 10Base-T – UTP/STP Cat. 3, 4, 5 100Base-TX – UTP/STP Cat 5 100Base-FX – Multi-Mode – 62.
Fiber Chassis Capacity: Ten bays for housing up to Ten media converters Material: Metal Power: AC 100~240V AC, 50/60Hz Power Consumption: 90 Watts (Max) Cooling: One Fan Dimensions: 440 mm × 266mm × 133 mm (W × D × H) Standard 19” Rack Mount Size (3U) Weight: 6.4 kg (14.2 lb.
Troubleshooting Q1: After connecting the Fiber Converter, the LEDs do not turn on. What should I do? A1: First, check that the power outlet is receiving power. Second, make sure the power adapter is firmly connected to the Fiber Converter and the power outlet. Third, make sure the Ethernet and the Fiber cables are connected. Q2: All the LEDs are on, but I can't make a connection. What should I do? A2: First, verify that you are using the proper fiber cable (e.g.
Limited Warranty TRENDnet warrants its products against defects in material and workmanship, under normal use and service, for the following lengths of time from the date of purchase. Fiber Chassis / Fiber Converters - 5-Year Warranty If a product does not operate as warranted above during the applicable warranty period, TRENDnet shall, at its option and expense, repair the defective product or deliver to customer an equivalent product to replace the defective item.
WARRANTIES EXCLUSIVE: IF THE TRENDNET PRODUCT DOES NOT OPERATE AS WARRANTED ABOVE, THE CUSTOMER’S SOLE REMEDY SHALL BE, AT TRENDNET’S OPTION, REPAIR OR REPLACEMENT. THE FOREGOING WARRANTIES AND REMEDIES ARE EXCLUSIVE AND ARE IN LIEU OF ALL OTHER WARRANTIES, EXPRESSED OR IMPLIED, EITHER IN FACT OR BY OPERATION OF LAW, STATUTORY OR OTHERWISE, INCLUDING WARRANTIES OF MERCHANTABILITY AND FITNESS FOR A PARTICULAR PURPOSE.
Certifications This equipment has been tested and found to comply with FCC and CE Rules. Operation is subject to the following two conditions: (1) This device may not cause harmful interference. (2) This device must accept any interference received. Including interference that may cause undesired operation. Waste electrical and electronic products must not be disposed of with household waste. Please recycle where facilities exist. Check with you Local Authority or Retailer for recycling advice.
TRENDnet Technical Support Toll Free Telephone: 1(866) 845-3673 US . Canada 24/7 Tech Support Europe (Germany . France . Italy . Spain . Switzerland . UK) Toll Free Telephone: +00800 60 76 76 67 English/Espanol - 24/7 Francais/Deutsch - 11am-8pm, Monday - Friday MET Telephone: +(31) (0) 20 504 05 35 Worldwide English/Espanol - 24/7 Francais/Deutsch - 11am-8pm, Monday - Friday MET Product Warranty Registration Please take a moment to register your product online. Go to TRENDnet’s website at http://www.