ISDN TA PC Card User Manual
INTRODUCTION The ISDN TA PC Card brings the latest in mobile communication technology with flexibility and convenience. With the wide range ISDN signaling protocols switches supports, mobile experts may enjoy the mobile communication across the world and the high speed digital service. System Requirements Pentium 75 or above At least 30MB free hard disk space At least 16MB RAM PCMCIA Type II/III slot PCMCIA Card Services and Socket Services v.2.
Voice (CAPI only) Line Rate 64/56 Kbps on 1 B-channel 128/112 Kbps on 2 B-channel (PPP/MP) 64/56Kbps on 1 B-channel 16Kbps on D-channel ISDN Network & Switch Compatibility National ISDN-1 (NI-1) AT&T 5ESS Custom Northen Telecom DMS-100 Custom DSS1 (Euro-ISDN) INS-Net 64 Application Program Interface Supported VCOMM WinISDN CAPI 2.0 NDIS WAN Operating System Supported Windows 95 and OSR2 Windows 98 Windows 2000 Windows NT 4.0 Physical Specifications RJ-45 ISDN line interface Dimension: 85.
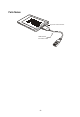
Parts Names 15-pin PC Card Connector ISDN Network Connection Cable -3-
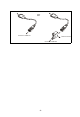
HARDWARE INSTALLATION If you are using the ISDN TA PC Card under Windows 95/98/2000, Do NOT insert the PCMCIA card until after the software installation is completed. 1. Align the PC card with the arrow sign pointing toward the computer’s PCMCIA slot. 2. Connect the 15-pin PC card connectors with the two exposed end of the PC card. Push evenly and steadily until the units ‘click’. 3. Connect the ISDN line to the opposite end of the ISDN Network Connection Cable.
Connects to ISDN TA PC Card Connects to ISDN TA PC Card or Connects to ISDN line Terminal resistor Connects to ISDN line -5-
FIRST THING TO KNOW ABOUT SOFTWARE INSTALLATION The ISDN TA PC Card is designed to support a wide bandwidth of interfaces/drivers for a total solution in different environments. The software setup procedures accordingly vary from interfaces/drivers to interfaces/drivers. To help you set up the software efficiently, the software installation is organized by interfaces under Windows 95/98/2000 and Windows NT respectively. The following figures are illustrated as guideline-like flow charts.
W indows NT Hyper Terminal DUN CAPI NDIS RVS-COM Center CAPI 2.0 Interface * PPP * Modem over ISDN * G3 Fax * Voice application NDIS Por t Driver * PPP ISDN Low Level Driver The blocked area indicate that after when setup.exe has been executed (see section titled “Installing Device Driver”), the Phone Dialer CAPI mode and NDIS were also installed. You may then use Phone Dialer or the functions with NDIS mode directly. For CAPI mode, however, it is required to install RVS.
SOFTWARE INSTALLATION FOR WINDOWS 95/98/2000 Installing the Device Driver 1. Insert the device driver compact disc or disks by sequence into your computer. 2. Double-click My Computer. 3. Double-click the drive whichever contains the device driver. For example, if you are using disks, insert the disks into drive A, double-click “3½ Floppy (A:)”. Or if you are using compact disc, select the CD-ROM drive and double-click folder Win9x when in Windows 95/98, or Win2000 for Windows 2000. 4.
7. For Windows 2000, the following picture will also appear afterwards. Click Yes to continue. 8. Select the appropriate protocol in Windows 2000. Click Next. Follow the on-screen instruction to finish setting. Installing the Application Programs Before you start, make sure the type of your Application Program Interface. The Application Program Interface (API) is used as the interface between the hardware (ISDN TA PC Card) and the application programs.
run with traditional terminal program packages, such as Windows 95 Hyper Terminal, Procom Plus for Windows, Telix, pcAnywhere, etc., to hook up to the on-line services and bulletin boards. In this mode, ISDN AT commands are usually used to drive the ISDN multifunction PC Card. Making PPP Connection (Basic Internet) 1. Go to My Computer. 2. Select Dial-Up Networking. Double-click Make a New Connection, a dialogue box will appear as shown below. 3. Name the new connection appropriately. 4.
6. From the Dial-Up Networking window right-click your newly created connection. Select Properties. On the General tab, cancel the selection of “Use area code and Dialing Properties” and click OK. 7. From the Start menu, select Programs. Select Configuration Utility. Click Config. A dialogue box will prompt you to change the settings to fit your needs. 8. Select the proper switch type corresponding to your need. Switch Type varies between countries.
as a selection, it is highly recommended that you chose a specific selection, to reduce the chance of incompatibility. Typically the selections are as follows: 9. Areas Switch Types Canada & United States Northern Telecom & NI-1 Japan INS Net 64 Taiwan DSS1 (ETSI) Europe DSS1 (ETSI) Enter the ISDN phone numbers and the Service Profile Identifier. Number (SPID) will be supplied by your local ISDN telephone company.
5. Name the new connection appropriately. For example, “V.110”. 6. Select “Intelligent PCMCIA ISDN TA (modem)” in the “Select a device” box. 7. Click Configure, and specify the V.110 user rate in the Maximum speed box. Click Next. Maximum speed=1200 V.110 user rate = 1200 bps. Maximum speed=2400 V.110 user rate = 2400 bps. Maximum speed=4800 V.110 user rate = 4800 bps. Maximum speed=9600 V.110 user rate = 9600 bps. Maximum speed=19200 V.110 user rate = 19200 bps. Maximum speed=38400 V.
7. Click “Configure” button, and give the appropriate settings. Ignore the “Maximum speed” setting (but you are still recommended to set to the speed at higher than 64000 bps, such as 115200 or higher). Click “Next”. 8. Enter the ISDN phone number of the remote party that you want to call. 9. Click “Next”, and click “Finish” to complete the setting.
CAPI Mode Before starting any applications in CAPI mode, the RVS-COM “CommCenter” is required to be executed. If the RVS.COM is not yet installed on your computer, perform the following procedures. Installing RVS.COM Lite 1. Insert the RVS-COM compact disc into your CD-ROM drive. Press Yes when the opening screen appears. 2. Follow the on-screen instruction to proceed. 3. When finished, the installation program will restart your computer. When your computer is restarted, the following screen will appear.
4. Click Express configuration main line>. Follow the on-screen instruction to finish the installation. 5. To make sure if the RVS-COM has been well installed, you may check by going to the Start menu->Settings->Control Panel->Modems to see if “RVS ISDN Internet PPP” exists in there as illustrated below.
Making PPP connections 1. Execute RVSCommCenter”. 2. Click “Make new Connection” in the Dial-Up Networking folder. Name the new connection appropriately, for example, “RVS_PPP”. Select “RVS ISDN Internet PPP”.
3. Click Configure…. Select “RVS Port (COM#)”. Click OK. 4. Click Next. Enter the ISDN phone number of your ISP. Click Next. 5. Click “Finish”. Now you are ready for Internet access through CAPI. Making Multilink PPP Connections There are two ways to setup the ISDN PC Card for Multilink PPP (MP or MLP) connections through CAPI mode. Method 1 1. Execute RVSCommCenter. 2. Complete the PPP connection setup in the previous section. 3. Execute Config. (Start->Programs->Configuration Utility). 4.
Method 2 1. Execute RVSCommCenter”. Click the Service tab. 2. When the above dialog box appear, check 2nd COM port and click OK. 3. Go to My computer. Select Control Panel. Double-click Modem. Click Add. 4. Select “Other Modem”. Click “Next”. 5. Select “Don't detect my modem; I will select it from a list”. Click Next. 6. Select “RVS Datentechnik” – “RVS ISDN Internet PPP”. Click Next.
7. Select the RVS COM ISDN port that you just added. Click Next. 8. Click “Finish”. 9. Now you can see “RVS ISDN Internet PPP #2” in the modem list in “Control Panel” Æ “Modem”.
10. Enter “Dial-Up Networking” folder in My Computer. 11. Click “Make new Connection”, and name the new connection appropriately. For example, “RVS_MP”. Select the modem “RVS ISDN Internet PPP”. Click Next. 12. Enter the ISDN phone number your ISDN ISP. Click Next to finish.
13. Right-click the new connection in Dial-Up Network. Click Property. 14. Click the “Multilink” tab. Check “Use additional device”. Click Add. Select RVS ISDN Internet PPP #2”. Click OK to complete the Multilink PPP settings. Making V.110 Connections 1. Execute “CommCenter”. And make sure all the settings are well and correctly configured. 2. Go to My Computer. Make sure Dial-Up Networking (DUN) is well installed. 3. Double-click “Make New Connection”. 4. Name the new connection appropriately.
Maximum speed=4800 V.110 user rate = 4800 bps. Maximum speed=9600 V.110 user rate = 9600 bps. Maximum speed=19200 V.110 user rate = 19200 bps. Maximum speed=38400 V.110 user rate = 38400 bps. Maximum speed=57600 V.110 user rate = 57600 bps* * Available only for Japan If the maximum speed you selected is not in the above list, the system will automatically adapt the V.110 user rate to the default setting at 38400 bps. 7. Enter the ISDN phone number of the remote party that you want to call. 8.
3. Run Windows 95 “Hypertrm”. Name the new connection appropriately. For example, “RVS_X75”. Click “OK”. 4. Enter the ISDN phone number that you want to connect to. 5. Select “RVS ISDN X.75 transparent” in “Connect using” box. Click “OK”. 6. Click “Dial” button to make dialing. After establish the ISDN link, you can use the data transmission protocol, such as Z-modem or X-modem, for data transfer. For servers which support X.75 T.70NL protocol, you have to choose “RVS ISDN X.75 T.
3. Select, by opening the list of the field Name, another party that has already been saved, or enter a Name for a new other party. Enter the Phone number of the other party and check Other party uses ISDN Eurofile transfer. Click Next. 4. Enter the details for the connection in the Connect To dialog box. Click Connect.
5. The connection will be established and you will then see the folder that the other party has made available to you for access. Use Drag & Drop or the Clipboard (Copy / Paste) to transfer files between Explorer windows or the Desktop on your PC and the folder on the other party's PC, and vice versa. Access any sub-folders on the remote PC by double-clicking on the symbols. To disconnect, select Disconnect from the Connection menu, or click the Disconnect symbol. 6.
5. Open “Switch type” tab. Choose appropriate “Voice Encoding” scheme. Now you are ready to use the RVS-COM’s Softmodem function. Refer to the RVS-COM on-line documentation for application details. Making G3 Fax over ISDN 1. Start CommCenter. 2. Open the SoftwareFax tab. Select “Use SoftwareFax to receive fax” to receive a fax. Or select “Use SoftwareFax to send fax” to send a fax. 3. Open “ISDN” tab. Select appropriate ISDN voice encoding scheme for your location.
4. Open the Service tab. Select Accept calls. Select Fax. Click OK.
Sending a fax 1. Start Create New Fax in the RVS-COM group programs. Click OK. 1. Follow the on-screen instruction to enter the necessary information. When all set, RVS will send out the fax for you automatically.
Receiving a fax 1. Wait for incoming fax calls. 2. You can go to Inbox to read the incoming fax. Voice Applications The voice applications included are: 1. Digital answering machine 2. ISDN Phone (acts like a telephone set, that you can communicate with the remote parties over ISDN line) To fully use the voice applications, especially the ISDN Phone service, a fullduplex audio device (sound card) is required.
Digital Answering Machine 1. Start RVSCommCenter. 2. Open the Service tab. Check Accept calls. Check Answerphone. 3. Open the ISDN tab, select the appropriate ISDN voice coding scheme for your location. A-law is usually used in European countries, and Mu-law for North America. 4. Make sure all the other settings in “RVS CommCenter” are correctly configured. Click Ok. 5. Run “Config” in “Configuration Utility”. 6. Open “Switch type”. Choose appropriate “Voice Encoding” scheme.
2. Click Settings to record/edit your greeting message. The incoming voice message will be stored in “Inbox”. Double-click the received voice mails to play back the messages. ISDN Phone 1. Start RVS-COM “CommCenter”. 2. Open the Service tab. Clear the selections of the Accept calls and the Answerphone check box. 3. Open the ISDN tab, select the appropriate ISDN voice coding scheme for your location. A-law is generally used in European countries, and Mu-law for North America.
4. Make sure all the other settings in “CommCenter” are correctly configured. Click OK. 5. Run “Config” in “Configuration Utility”. 6. Open “Switch type”. Choose appropriate “Voice Encoding” scheme. The setting should be consistent with RVS-COM in step (3). 7. Start Telephone in “RVS-COM Lite” program group. 8. Click “Answerphone” function bar to the OFF state (for the ON state is for “Answering machine” services). 9.
6. Click “Finish”. 7. Click “Next”. 8. Select the appropriate ISDN “Switch protocol”. Click “Next”. (The settings will be used for “Dial-Up Networking” utility through NDIS WAN application program interface.) 9. Enter the ISDN phone number(s). Click “Next”. 10. Click “Finish”. When system prompts to ask for updating Windows and NDIS drivers, enter the correct driver path(s) to complete the installation. Making PPP Connections 1. Make sure “Dial-Up Networking” (DUN) is well installed. 2.
Making Multilink PPP Connections 1. When the PPP connection settings “method 2” in the previous section is completed, right-click the NDIS connection icon in DUN and select “Properties” (or click the NDIS connection icon, then click “File”, then select “Properties”). 2. Click “Settings” button in “General” settings folder. Select “Use additional devices”.
and the secondary phone number, if available, for making Multi-Link PPP connections. 3. Click “OK” to finish the Multi-Link PPP settings. 4. Open the “Server Types” folder and complete all the TCP/IP settings accordingly, refer to the information provided by your Internet Service Provider (ISP). Click “OK”. 5. Now you can use the Internet application software, for example, Microsoft Internet Explorer or Netscape Communicator, to connect to ISP with Multilink PPP mode.
SOFTWARE INSTALLATION FOR WINDOWS NT4.X Installing the Device Driver 1. Go to Control Panel. (You may go to the Start menu, select Setting to open the Control Panel folder.) 2. Select Network. A Network dialog box will appear as illustrated below. 3. Select Adapter tab. Click Add…. 4. The following dialog box will appear. Click Have Disk… and click OK to continue.
5. If you are using disks to install the device driver, insert the disk into your free floppy drive and type in the drive name, for example, A:, to continue. Or if you are using compact disk to install, insert the compact disk into your computer and type in the CD-ROM drive letter followed by winnt\driver, and click OK to continue. 6. When the Select OEM Option dialog box appear, click OK to continue. 7. The following dialog box will prompt you to change the I/O and IRQ settings.
8. Press OK to continue. The installation program will proceed automatically. 9. When finished, a Setup Message will prompt you to invoke Remote Access Services (RAS) setup. Press OK to continue. 10. When the Network dialog box appear, select the Services tab.
11. Select Remote Access Service. Click Properties. The following figure will appear. 12. Select Add... When the Add RAS Device dialog box appear, select ISDN1 – ISDN_TA and click OK. Press Add... again to add ISDN2ISDN_TA. When completed, press Continue.
the Network dialog box again. Click Close to continue. The installation program will continue automatically. When finished, Windows will prompt you to restart your computer. Click Yes to continue.
Installing the Application Programs Before you start, make sure the type of your Application Program Interface. The Application Program Interface (API) is used as the interface between the hardware (ISDN TA PC Card) and the application programs. Up to date, the available Application Program Interface for Windows NT are NDIS and CAPI. Make sure the type of API matching your system. Move to the specific section titled the appropriate API for your need for installation. NDIS Mode 1.
Internet Access 1. Go to My Computer. Select Dial-Up Networking. 2. Click New... to name the phonebook. Enter in the name properly. 3. Shift to the next tab to enter in the required data as illustrated below. 4. When finished, click OK. Select Dial to continue. 5. When the Connect to ISDN dialogue appears, you are on the Internet.
CAPI Mode Installing RVS-COM Lite Make sure the RVS-COM Lite “CommCenter” has been executed before start any application in CAPI mode. For details, refer to the previous section with the same title in the Windows 95/98 environment. Applications All the applications applied in Windows NT can be executed as in Windows 95/98. For better illustrations, refer to the previous sections with the same titles. Making PPP connections 1. Run RVS-COM “CommCenter”. 2. Enter “Control Panel” Æ “Modems”.
15. If you are not new of using Dial-up Networking, click “New” command button. If this is your first connection, just skip it. Give a name for the new connection. For example, “RVS_PPP”. Click “Next”. 16. Select “Send my plain text password…” (recommended). Click “Next”. 17. Select “RVS ISDN Internet PPP (COM#)”. Click “ Next”. 18. Give the phone number that you want to dial to. Click “Next”. 19. Click “Finish”. 20. Click “Dial” to make connection immediately.
13. Select “COM# RVS ISDN Internet PPP #2” in RAS device list. Click “OK”. 14. Click “Continue”. Then, re-start Windows NT. 15. Run RVS-COM “CommCenter”. 16. Double click “Dial-Up Networking” in “My Computer”. 17. If you are not new of using Dial-up Networking, click “New” command button. If this is your first connection, just skip it. Give the new connection name. For example, “RVS_MP”. Click “Next”. 18. Select “Send my plain text password…” (recommended). Click “Next”. 19.
5. Open “Switch type”. Choose appropriate “Voice Encoding” scheme. The setting should be consistent with RVS-COM in step (3). Now you are ready to use the RVS-COM’s Softmodem function. Refer to the RVS-COM on-line documentation for application details. Making G3 Fax over ISDN 1. Start CommCenter. 2. Open the SoftwareFax tab. Select “Use SoftwareFax to receive fax” to receive a fax. Or select “Use SoftwareFax to send fax” to send a fax. 3. Open “ISDN” tab.
ISDN AT COMMANDS Besides using configuration utility as described in the previous section, you can alternatively use ISDN AT command to configure and use the Intelligent ISDN TA PC Card. More specifically, AT commands are usually issued to the ISDN TA PC Card to control the TA's operation and configuration. AT commands can only be entered while the TA is in command mode. The format for entering AT commands is: ATXn ↵ where X is the AT command, and n is the specific value for that command.
5ESS switch AT!Z=9 Select async to sync PPP Conversion AT&N0=0 Select Single-Link PPP mode Mostly the AT commands can also be entered in the same command line. For example, AT!C0=0!Z=9&N0=0 As shown above, it is not necessary to put spaces between the commands (there is no space between AT, !C0=0, !Z=9, and &N0=0). The ISDN TA usually returns an response at the next line if it understands the command.
APPENDIX: ISDN AT COMMAND Command Description ATA Go off-hook (answer the incoming call immediately) ATB? Display V.110 user rate for out-going calls ATBn n=0 V.110 user rate: 600 bps n=1 V.110 user rate: 1200 bps n=2 V.110 user rate: 2400 bps n=3 V.110 user rate: 4800 bps n=4 V.110 user rate: 9600 bps n=5 V.110 user rate: 19200 bps n=6 V.110 user rate: 38400 bps n=7 V.110 user rate: 48000 bps n=8 V.110 user rate: 57600 bps (for Japan only) Note : The V.
ATH Hang up the ISDN data calls ATH1 Disconnect ISDN Phone voice calls ATH3 Disconnect ISDN data calls and ISDN Phone voice calls ATI3 View driver version ATO Return to connection (on-line) mode AT!C0=n ISDN D-channel protocol and switches selection n=00 AT&T 5ESS Custom n=01 Northern Telecom DMS-100 Custom n=02 ETSI Europe ISDN n=05 U.S.
n=3 Enable 3.1K Hz audio AT!Z=n B-channel protocol selection n=05 V.120 n=06 V.110 n=09 Async to Sync PPP conversion Note: The "!" commands are used to change certain fundamental configuration parameters which are changed very infrequently - often, only once at installation. Using these "!" commands during normal operation with the telephone line connected to the Terminal Adapter (TA) can cause unpredictable results.