TEW-511BRP Dual-Band 802.11 a+g Wireless Router Quick Installation Guide Guide d'installation rapide du Routeur sans fil 802.11 a+g Dual band Anleitung zur Schnellinstallation des Drahtloser 802.11 a+g Dualband-Router Guía de Instalación Rápida Enrutador inalámbrico a+g 802.11 de Banda-Dual Маршрутизатор для беспроводной связи Dual-Band 802.11 a+g Руководство по быстрой установке Version 04.28.05 TRENDnet TRENDware, USA What's Next in Networking Copyright ©2005. All Rights Reserved.
Table of Contents English ................................................................................................................... 1. Prepare for Installation ................................................................................... 2. Install Hardware ............................................................................................. 3. Configure the computer's TCP/IP Settings ..................................................... 4. Configure your AP/Router ..................
English QIG 1. Prepare for Installation Thank you for purchasing the TEW-511BRP. This Wireless AP/Router will allow you to securely share your Internet connection, files, and other resources with multiple users. This guide will help you set up and configure your AP/Router. Following the installation instructions should be quick and easy. If you run into problems, please refer to the Troubleshooting section or the more detailed installation procedures on the User's Guide CD-ROM.
Collect Account Information from Internet Service Provider (ISP) During the installation of your AP/Router, the configuration utility will ask you to specify your ISP connection type. Therefore, please verify your Cable or DSL Internet broadband connection with your ISP and ensure you have all the information for one of the following connection types: Dynamic IP Cable Connection Nothing is required. The IP address will be automatically be assigned by your ISP.
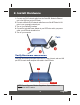
2. Install Hardware 1. Connect one RJ-45 network cable from the Cable/DSL Modem's Ethernet port to the WAN port on the AP/Router. 2. Connect a different RJ-45 network cable from one of the AP/Router's LAN ports to your computer's network port. 3. Turn on your Cable/DSL modem. 4. Connect the included Power Adapter to your AP/Router and to your power outlet; your AP/Router should turn on. 5.
3. Configure the computer's TCP/IP Settings Windows 2000/XP 1. Click Start; click Settings and click on Control Panel 2. Double-Click the Network Connections icon. 3. Right-Click on the Local Area Connection icon, and then click on Properties. The Local Area Connection Properties box will appear. 4. Under the General Configuration Tab, locate and select TCP/IP, then click Properties. The Internet Protocol (TCP/IP) Properties box will appear.
6. Click OK. 7. Click Close on the Local Area Connection Properties box. 8. Click Start; click on Run. Then type cmd and click OK. 9. The Command Prompt window will appear. Type ipconfig at the C:\ prompt and press the Enter key. 10. If your IP Configuration reads as follows, your computer is successfully connected to the router: IP Address: 192.168.1.x (x= any number from 2~255) Subnet Mask: 255.255.255.0 Default Gateway: 192.168.1.
Windows 95/98/SE/ME 1. Click Start; click Settings and then click on Control Panel. 2. Double-Click the Network icon and the Network Properties box will appear. 3. Under the Configuration Tab, locate and select TCP/IP with the corresponding network card (such as TRENDnet TE100-PCIWN 10/100Mbps Network Adapter), then click on the Properties button. 4. Under the IP Address Tab, click on the Obtain an IP address automatically option. 5. Click OK on the TCP/IP Properties box. 6. Click OK on the Network Box.
8. After the files load, the System Settings Change will appear, click Yes to reboot your system. This will update your computer with the new settings. NOTE: If the message does not appear, you need to manually restart your computer. 9. After your system reboots, click Start and click on Run. Then type winipcfg in the field and then click OK. 10. The IP configuration box will appear.
4. Configure your AP/Router The following section will help you configure your AP/Router to connect to the Internet and your PCs. The setup differs and is dependent on the type of Internet connection you have. If you are not sure what type of connection you have, please contact your ISP to obtain the required information, which is listed in the Prepare for Installation section at the beginning of this Quick Installation Guide. 1. Open your web browser, type http://192.168.1.
The “Internet Setup” page will appear. In the Optional Settings section, enter a host name and domain name (if required by your ISP). Then, select your Connection Type from the pull down menu, (Automatic Configuration DHCP, Static IP, PPPoE, or PPTP) and proceed to the appropriate subset of instructions below. Automatic Configuration - DHCP 3. Select Automatic Configuration - DHCP as the Connection Type. 4. Go to step 14.
Static IP 5. Select Static IP Address as the Connection Type. 6. Enter the IP address, subnet mask, default gateway, and domain name server (DNS) provided by your ISP. 10 7. Go to step 14. PPPoE 8. Select PPPoE as the Connection Type. 9. Enter your username and password. NOTE: By default, the “keep alive” option will be selected; this is the recommended setting for most users. 10. Go to step 14.
PPTP 11. Select PPTP as the Connection Type. 12. Enter the IP Address, Subnet Mask, Default Gateway, PPTP Server IP, username, and password provided by your ISP. 10 NOTE: By default, the “keep alive” option will be selected; this is the recommended setting for most users. 13. Go to step 14. 14. Scroll down to the Time Settings section, and select the appropriate Time Zone from the pull down menu. Click Apply, and proceed to the Wireless Configuration Section of this Quick Installation Guide.
5. Wireless Configuration 1. Click Wireless. The recommended settings will be automatically selected for you. You may, however, choose to select a different channel and/or network name (SSID). NOTE: You must remember your “network name (SSID),” as you will need it when you configure your wireless network adapter to connect to your access point. If you wish to enable WEP for encryption-based security, refer to the included User's Guide CD-ROM for instructions. 2. Click Apply (at the bottom of the page).
Configure your Wireless Network Adapter In this example, the TEW-501PC Super A+G Wireless Utility will connect to the TEW-511BRP. 1. Open the wireless utility that came with your network adapter and click AP List. 2. Select the SSID that was assigned to TEW-511BRP. Click Connect.
6. Test your Connection Windows 2000/XP NOTE: You should disconnect the RJ-45 Ethernet cable from your computer's LAN port if you wish to test your wireless connection. 1. Click the Start button; click Run, type “cmd” in the text-field, and press the Enter key. 2. At the command prompt, type “ipconfig” and press the Enter key. 3. If the application displays an IP address of “192.168.1.x,” your computer is connected to your access point. 4. Open your web browser, type www.trendnet.
Windows 95/98/98SE/98ME NOTE: You should disconnect the RJ-45 Ethernet cable from your computer's LAN port if you wish to test your wireless connection. 1. Click the Start button; click Run, type “winipcfg” in the text-field, and press the Enter key. 2. Select your Wireless Network Adapter from the dropdown menu, and the utility will display your computer's current IP Address information. If the application displays an IP address of “192.168.1.x,” your computer is connecting to your access point. 3.
Troubleshooting For help with the TEW-511BRP's configuration and advanced settings, please refer to the User's Guide CD-ROM. Q1. I specified the IP address “192.168.1.1” in my web browser, but an error message says "The page cannot be displayed." How can I get into the TEW-511BRP web configuration page? A1.
Federal Communication Commission Interference Statement This equipment has been tested and found to comply with the limits for a Class B digital device, pursuant to Part 15 of the FCC Rules. These limits are designed to provide reasonable protection against harmful interference in a residential installation. This equipment generates, uses and can radiate radio frequency energy and, if not installed and used in accordance with the instructions, may cause harmful interference to radio communications.
TRENDnet TRENDware, USA What's Next in Networking @ Product Warranty Registration Please take a moment to register your product online. Go to TRENDware’s website at http://www.TRENDNET.com TRENDnet Technical Support US/Canada Support Center Contact Telephone: 1(310) 626-6252 Fax: 1(310) 626-6267 Email: support@trendnet.