Quick Installation Guide TV-IP301 TV-IP301W
Table ofofContents Table Contents English ...................................................................................................... 1. Before You Start ................................................................................. 2. Hardware Installation ......................................................................... 3. Configure the Internet Camera .......................................................... 1 1 2 3 Troubleshooting ................................................
1. Before You Start Package Contents TV-IP301/TV-IP301W Quick Installation Guide Metal Stand Utility CD-ROM AC Power Adapter 1 x 2dBi Detachable Antenna (TV-IP301W) System Requirements 10/100Mbps Ethernet CPU: Intel Pentium 1GHz or above Memory: 256MB or above VGA Resolution: 800 x 600 or above Web Browser: Internet Explorer 5.
2. Hardware Installation 1. Mount the Internet Camera to the metal stand. 2. Attach the Antenna. (TV-IP301W) 3. Connect a RJ-45 network cable from a Switch/Router to the Ethernet port of the Internet Camera. 4. Connect the AC Power Adapter to the Internet Camera and then to a power outlet.
3. Configure the Internet Camera Note: It is recommended that you configure the Internet Camera from a wired computer. Before the Internet Camera can be configured, a Static IP address must be assigned on your computer's network adapter in the subnet of 192.168.1.x. Since the Internet Camera's default IP address is 192.168.1.30, make sure no other network devices are assigned an IP address of 192.168.1.30. (Refer to the Troubleshooting section on how to configure TCP/IP settings on your PC.) 1.
4. Click System and then click Wireless. Configure your wireless settings to match your wireless network's settings and then click Save. (TV-IP301W only) Note: The TV-IP301W will not work wirelessly until you disconnect the Ethernet cable from the back of the camera. 5. Click Live Show Active X. Your installation is now complete.
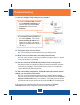
Troubleshooting Q1: How do I configure TCP/IP settings on my computer? 1. Go into the Control Panel and doubleclick the Network Connections icon, and then right-click the Local Area Connection icon and then click Properties. 2. Click Internet Protocol (TCP/IP) and then click Properties. Then click on Use the following IP address, and make sure you assign your network adapter an IP address in the subnet of 192.168.1.x. Q2: The image is blurry.
Certifications This equipment has been tested and found to comply with FCC and CE Rules. Operation is subject to the following two conditions: (1) This device may not cause harmful interference. (2) This device must accept any interference received. Including interference that may cause undesired operation. Waste electrical and electronic products must not be disposed of with household waste. Please recycle where facilities exist. Check with you Local Authority or Retailer for recycling advice.
TRENDnet Technical Support US . Canada Toll Free Telephone: 1(866) 845-3673 24/7 Tech Support Europe (Germany . France . Italy . Spain . Switzerland . UK) Toll Free Telephone: +00800 60 76 76 6 Worldwide Telephone: +(31) (0) 20 504 05 35 English/Espanol - 24/7 Francais/Deutsch - 11am-8pm, Monday - Friday MET Product Warranty Registration Please take a moment to register your product online. Go to TRENDnet’s website at http://www.trendnet.com 3135 Kashiwa Street Torrance, CA 90505 USA Copyright ©2006.