
Quick Installation Guide


3
2
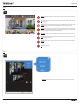
Add: How to manually add a camera or NVR on the app. Use this to manually add a remote device, for local devices you can use the Scan feature.
IPView-App
IPView_App
Host: Similar to the name assignment, devices from a local or
remote location requires separate entries. For local connections
(at home) enter the IP address of the device (camera or NVR),
usually you can find this information on your router's DHCP client
list or table. It is recommended to assign the device with a static
IP address, to avoid any changes the router may encounter. For
remote connection (away from home) enter the assigned WAN IP
address of your router. If you are using DDNS on your router, you
can simply enter your DDNS account information you have set
on your router.
Name: Enter the assigned name of your device (camera or NVR).
To view devices from a local (at home) or remote (away from
home) location requires separate entries. Consider assigning a
name based on the location of your device. For instance, to view
your patio camera from a remote location like when you are at
work assign a name like “Remote Patio Cam”. You can assign
“Patio Cam” as a different entry to view the same camera while
you are
at home.
Port: Enter the HTTP port assigned on your device (camera or
NVR). This is the same port you have assigned a virtual server or
port forwarding rule on your router's firewall settings.
Login: Enter the username of your device (camera or NVR), in
most cases the username is “admin”
Passwork: Enter the login password assigned to your device
(camera or NVR). Click save.
1