Quick Installation Guide TV-IP420P(V1)
Table of Content 1 English 1. Before You Start 2.
1. Before You Start Package Contents Ÿ TV-IP420P Ÿ CD-ROM (Utility and User's Guide) Ÿ Quick Installation Guide Ÿ Mounting kit Minimum Requirements Ÿ Power over Ethernet (PoE) switch (e.g. TPE-TG80g) or PoE Injector (e.g. TPE-113GI) Ÿ A networked computer and web browser Ÿ Wired network Ÿ Network cable Note: Ÿ The TV-IP420P only works with Power over Ethernet (PoE) devices that follow the IEEE 802.3af standard. Ÿ The TV-IP420P has a 5.5 mm barrel connector for an optional 12 V DC 1A power adapter.
2. Hardware Installation and Configuration 1. Do not install or mount the IP camera until after you complete the installation steps below. Temporarily place the IP camera next to your computer. 2. Insert the CD-ROM into your CD-ROM drive. 3. Select language from the drop down menu. 4. Click Install Camera. 5. Write down the MAC address of your camera. Then click Next.
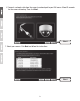
6. Connect a network cable from the camera's network port to your PoE source. Allow 60 seconds for the camera to boot up. Then click Next. Next 7. Select your camera. Click Next and follow the instructions.
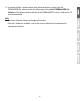
8. Select DHCP option to assign an IP by DHCP server, select “Fixed IP” to set IP address manually. Click Next. Next 9. If you select “Fixed IP”, fill out the IP address, subnet mask, default gateway, and DNS server. Please ensure that the IP address of the camera and the computer must be within the same network. Click Next. 10. Select Change Password. Enter a new password, confirm the new password and then click Next.
11. Initial Setup is complete! Your camera is now connected to your network. Click the hyperlink to confirm access to the management page. This will open up a web browser. To resume installation, minimize the web browser and then click Next. Next 12. Congratulations! Your camera is now ready to be installed in its final location. Scan the QR code to download a free mobile app to view the camera from your mobile device. Click Finish to exit the installation wizard.
13. To manage multiple cameras and for more advanced features, please install the TRENDnetVIEW Pro software. Install the software by clicking Install TRENDnetVIEW Pro Software in the Autorun window and refer to the TRENDnetVIEW Pro User's Guide on the CD for more information. Note Ÿ See User's Guide for advanced management functions Ÿ Two User's Guides are included – one for the camera and one for the complimentary management software.
14. Install the camera in your desired location. To connect the IP camera to your network with PoE, please use either of the following examples: Using the TV-IP420P with a PoE switch (TPE-TG80g) TV-IP-420P PoE Internet TPE-TG80g Non-PoE Ÿ Connect a network cable from the Power over Ethernet switch (e.g. TPE-TG80g) to the network port on the IP Camera. Ÿ Connect the switch to your network.
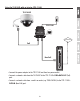
Using the TV-IP420P with an Injector (TPE-113GI) TV-IP-420P TPE-113GI PWR+DATA OUT DATA IN Internet PoE Non-PoE Ÿ Connect the power adapter to the TPE-113GI and then to a power outlet. Ÿ Connect a network cable from the TV-IP420P to the TPE-113GI's PWR+DATA OUT (PoE) port. Ÿ Connect a network cable from a switch or router (e.g. TEW-818DRU) to the TPE-113GI's DATA IN (Non-PoE) port.
Mounting the camera 1. Twist and loosen the mounting plate. 2. Place the provided template label on the mounting surface. Ceiling Mounting Hole Hole Hole 3. Drill holes for the provided screw anchors at each marked position. Make sure the drill bit matches the size of the provided screw anchors. 4. Insert the provided screw anchors into the holes. 5. Align the mounting bracket with the screw anchors, and then use the provided wood screws to secure the plate to the mounting surface. 6.
Manufacturer’s Name and Address TRENDnet, Inc. 20675 Manhattan Place Torrance, CA 90501 USA Product Information Model Number: TV-IP420P Indoor / Outdoor 3 MP Motorized PTZ Dome Network Camera Product Name: TRENDnet Trade Name: TRENDnet hereby declare that the product is in compliance with the essential requirements and other relevant provisions under our sole responsibility.
Informations générales GPL/LGPL Ce produit TRENDnet comprend un logiciel libre gratuit par des programmeurs tiers. Ces codes sont sujet à la GNU General Public License ("GPL" Licence publique générale GNU) ou à la GNU Lesser General Public License ("LGPL" Licence publique générale limitée GNU). Ces codes sont distribués SANS GARANTIE et sont sujets aux droits d'auteurs des programmeurs. TRENDnet ne fournit pas d'assistance technique pour ces codes.
Limited Warranty TRENDnet warrants its products against defects in material and workmanship, under normal use and service. Specific warranty periods are listed on each of the respective product pages on the TRENDnet website. Garantie Limitée TRENDnet garantit ses produits contre les problèmes de matériel ou de fabrication, dans des conditions normales d'utilisation et de service. Les périodes de garanties précises sont mentionnées sur chacun des pages produits du site web de TRENDnet.
Safety notes Before using your TRENDnet device for the first time, it is essential to read and understand all safety and operating instructions. Keep instructions in a safe place for future reference. Some TRENDnet products are rated for outdoor applications and can sustain certain weather conditions. Please refer to the product's Ingress Protection (IP) rating and the operating humanity and temperature range. DANGER due to electricity Warning: Never open TRENDnet devices.
Certifications This device complies with Part 15 of the FCC Rules. Operation is subject to the following two conditions: (1) This device may not cause harmful interference. (2) This device must accept any interference received. Including interference that may cause undesired operation. Waste electrical an electronic products must not be disposed of with household waste. Please recycle where facilities exist. Check with your Local Authority or Retailer for recycling advice.