TRENDnet User’s Guide Contents ........................................................................................................ 1 TV‐IP420P Playback ................................................................................................................ 21 Search for video recordings ..................................................................................................... 21 Time Line ..............................................................................................
TRENDnet User’s Guide TV‐IP420P Video Settings .................................................................................36 Restore Default Password .............................................................. 57 Video Format ........................................................................................................ 36 Software Reset ..................................................................................................... 57 Display Settings...........................
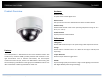
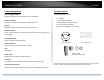
TRENDnet User’s Guide Product Overview TV‐IP420P Hardware Powerful Zoom 4x optical zoom and 16x digital zoom Motorized PTZ 350° pan tilt zoom and user defined 3D zoom within the web interface Outdoor Ready Outdoor IP66 weather rated and an operating temperature range of ‐30 – 60 °C (‐22 – 140 °F) Vandal Resistant Impact protection rated with IK10 Performance 3 Megapixel Record 2048 x 1536 at 25 fps in the space saving H.
TRENDnet User’s Guide TV‐IP420P Camera Management Package Contents Multi‐Language Interface Support for English, French, Spanish, German, and Russian TV‐IP420P package includes: Advanced Playback Advanced in‐camera archived video review functionality Storage SMB/CIFS support with notification if storage drive is full • TV‐IP420P • Quick Installation Guide • CD‐ROM (Utility and User’s Guide) • Camera mounting hardware (Optional power adapter not included) Motion Detection Create motion detection wind
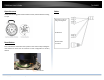
TRENDnet User’s Guide TV‐IP420P Cables Open the cover Loosen the mounting plate screws and base screws, twist the bottom housing to open. Alarm line in, line out and grounding wires RS‐485 wires Network cable connection Reset Button Push and hold the reset button then power on the camera. Keep holding the reset button for more than 10 seconds to reset configuration to factory default. Reset Button © Copyright 2016 TRENDnet. All Rights Reserved.
TRENDnet User’s Guide TV‐IP420P Warnings Cautions Serious injury or death may be caused if any of these warnings are neglected. Follow these safety guards to prevent serious injury or death. Injury or equipment damage may be caused if any of these cautions are neglected. Follow these precautions to prevent potential injury or material damage.
TRENDnet User’s Guide TV‐IP420P Installation Procedure There are number of factors involved in a successful camera installation. Follow the suggested installation steps and go through the check lists. This guide will help you make your camera installation smoothly and easily.
TRENDnet User’s Guide Setup Your Camera with CD 1. Insert the Installation CD‐ROM into your computer’s CD‐ROM drive to initiate the Auto‐Run program. Choose your preferred language and then click the Install Camera. 2. Write down the MAC Address of the camera. © Copyright 2016 TRENDnet. All Rights Reserved. TV‐IP420P 3. Connect a PoE capable network cable to the camera’s network port and then to a PoE switch and wait for the camera to boot up, click Next.
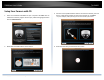
TRENDnet User’s Guide 5. The installation wizard will list cameras found on your network. If only one camera is found, it will be selected by default. If you have more than one camera on the network, please choose the camera you wish to set up by identifying its MAC address. Select the camera and then click Next. TV‐IP420P 7. If you select Fixed IP, enter the IP address, subnet mask, default gateway, and DNS server address.
TRENDnet User’s Guide 8. Enter a new password. The default password is admin. You are required to change the password from the default setting to prevent unauthorized access. Enter the default password: admin and enter the new passwords for a brand new installation. The password must be between 8 and 16 characters. (Alphanumeric: a‐z, A‐Z, 0‐9, !, @, #, $) TV‐IP420P 9. Click here to access to the camera’s web page or click Next for mobile app installation.
TRENDnet User’s Guide TV‐IP420P Hardware Installation Access your Camera with the Web Browser Cabling System Management and Default Settings It’s recommended that the wiring the cable in your home or office by a professional. If you already have the cable deployed, make sure the cable and the connectors meet the category 5 Ethernet cable standards. At least 2 pairs of twisted lines are required for power and data. Poor cable quality may cause unexpected problems.
TRENDnet User’s Guide Logging‐in to the Camera for the First Time (Windows) 1. Open the web browser (Internet Explorer, Firefox or Safari) on your computer. In the address bar, enter the IP address you setup through the setup CD or 192.168.10.30. (If you have a DHCP server on your network, the IP address will be assigned dynamically. For example, if you have a home gateway on your network and you plug‐in the camera on the same network, you can find the camera’s IP address on your home gateway.
TRENDnet User’s Guide 5. Permission request may show up depends on the Internet security settings on your computer. Click More Info and then Run anyway to install the plug‐ in. TV‐IP420P 7. Refresh the browser and the Live View page will show up and begin streaming video. 6. Click Finish to finish the installation. © Copyright 2016 TRENDnet. All Rights Reserved.
TRENDnet User’s Guide Logging‐in to the Camera for the First Time (OS X) 1. Open the web browser on your computer. In the address bar, enter the IP address of the camera 192.168.10.30. (If you have a DHCP server on your network, the IP address will be assigned dynamically. For example, if you have a home gateway on your network and you plug‐in the camera on the same network, then you can find the camera IP address on your home gateway), and then press Enter. TV‐IP420P 3.
TRENDnet User’s Guide 5. Go to the Finder and navigate to the Download folder. Command‐Click the WebComponents.pkg and then click Open. (If you are install the plug‐ in from the CD when you don’t have internet connection, just browse to /Mac folder and double click the WebComponents.pkg file.) TV‐IP420P 7. Click Continue to install the plug‐in. 8. Select a destination to install the plug‐in. Then click Continue. 6. Click Open with Installer to start installation. © Copyright 2016 TRENDnet.
TRENDnet User’s Guide TV‐IP420P 9. Use the default location and click Install. 11. Installation will process automatically. 10. Enter your password and click Install Software 12. Click Close to exit the installation. © Copyright 2016 TRENDnet. All Rights Reserved.
TRENDnet User’s Guide 13. Open the browser and login again with the default IP 192.168.10.30 or the IP that was dynamically assigned by your router. TV‐IP420P 16. The Live View page shows up and the video starts to stream. 14. Enter the user name, admin, and the default password, admin, and then click OK. 15. The TV‐IP420P will ask you to change your password from the default setting. Please enter the new password twice and click OK. The password must be between 8 and 16 characters.
TRENDnet User’s Guide TV‐IP420P Live View After you log‐in into the camera management page, you’ll see the Live View page. Snapshot Click this icon to take a video snapshot. Zoom Click once to enable zoom. When enabled, click and drag the area on the picture to zoom in. Right click to resume 100% zoom. Click the icon again to disable zoom. The zoom function works in full screen mode as well. Recording Click once to start recording. Click it again to stop recording.
TRENDnet User’s Guide Snapshot TV‐IP420P Click this icon to take a video snapshot Status Bar Zoom Recording Video Stream Click once to enable zoom. Then, click and drag the area on the picture to zoom in. Click once on picture for 100% zoom. Click the icon again to disable zoom. The zoom function works in full screen mode as well The icon expands the PTZ control panel Pan / Tilt / Zoom control panel Zoom in / out Click once to start recording. Click it again to stop recording.
TRENDnet User’s Guide TV‐IP420P Playback Time Line You can playback the video recording on the network storage and download the video clip and snapshots to your local computer. There is a play back head in the center of the time line represented in a yellow vertical line. To look for a specific video recording, move the time line by clicking and dragging it. If the recording is short, zoom in by clicking button. Click to zoom out the time scale.
TRENDnet User’s Guide TV‐IP420P Playback Slice images from video playback Use playback controls to play back the video recording. You can take snapshots from playback video or make new video clips from the video you are playing back. Click this button to play the video. Click this button to pause video playback. Click this button to stop playback. Click this button increase playback speed*. Click this button decrease playback speed*. Click to playback video frame by frame.
TRENDnet User’s Guide Download sections of video TV‐IP420P Download snapshots To save complete video sections or snapshots, you can download the files directly. Click Click button to list snapshots to download button to download video sections. Check the time of the recording, select the videos you want to download, and then click Download. © Copyright 2016 TRENDnet. All Rights Reserved. Select the type of event that triggered the snapshots. Choose the Start Time and End Time.
TRENDnet User’s Guide Log The log of the TV‐IP420P will be saved on the network storage. You can search the relevant records and save to your local computer. (See Network Storage on page 50 to setup the storage.) TV‐IP420P Search for logs Click the type of log and then the Start Time and End Time. Click Search to start searching. Click First Page, Prev Page, Next Page, and Last Page to show the logs. Click Save Log to save the logs to your computer. © Copyright 2016 TRENDnet. All Rights Reserved.
TRENDnet User’s Guide TV‐IP420P System Information System Information page shows the camera’s basic information. Network Information IP Address: IP address of the TV‐IP420P Subnet Mask: Network range of IP address Default Gateway: The default route going from the TV‐IP420P subnet. Primary DNS: Primary DNS server address Secondary DNS: Secondary DNS server address Basic Information Device Name: Human readable device name for easy identification.
TRENDnet User’s Guide System Configuration Device Settings Setup your camera name and location for easy identification. This camera name will also be recognized by other network camera software as the name of this camera. OSD, On Screen Display, camera name is referring to this setting as well. TV‐IP420P Authentication RTSP: TV‐IP420P’s video stream can be accessed with RTSP, Real Time Streaming Protocol.
TRENDnet User’s Guide TV‐IP420P User Accounts Time Settings You can setup up to 16 user accounts to access the camera’s video stream with a web browser or real time video stream (RTSP). Only one administrator account can be setup to configure the TV‐IP420P and cannot be deleted. The accuracy of the system clock is important for scheduling and accurate logging. You can synchronize the system time with your computer, or automatically check the time accuracy with a network time server (NTP server).
TRENDnet User’s Guide TV‐IP420P Daylight Savings Live View Settings Setup daylight savings. Setup the live view video quality, file size and file saving directories. Automatic Update Enable DST: Check this box if your time zone has daylight savings. Start Time: Enter the date that daylight savings starts End Time: Enter the date that daylight savings ends DST Bias Enter how much time the daylight saving adjusted by daylight savings. Click Save to save the changes © Copyright 2016 TRENDnet.
TRENDnet User’s Guide Record File Settings Record file size: This size of live view video recording. You can choose 256MB, 512MB, or 1GB a file. Smaller file size is good for many short recordings. Save record Click Browse and then choose a new destination if you files to: want to save the file somewhere else. Save Click Browse and then choose a new destination if you downloaded want to save the file somewhere else.
TRENDnet User’s Guide Inport Config. File Config File: To load previously saved settings, click Browse to find the configuration file and then click Import. Status: Shows the status in loading configuration file. TV‐IP420P Network Settings TCP/IP Setup your basic IPv4 and IPv6 network settings on this page. Export Config. File Export: Click Export to download configuration file. The file will be downloaded to the Download folder by default.
TRENDnet User’s Guide Network Interface MAC Address: Click this button to reboot this camera. Duplex and Choose one of the Ethernet duplex and speed to Speed: match your network. Default: auto. MTU: Maximum transmission unit. The maximum field size in the Ethernet packet. Primary DNS: Enter your first IPv4 or IPv6 DNS server address TV‐IP420P Port You can change the service port numbers of TV‐IP420P and enable/disable RTSP or HTTPS services.
TRENDnet User’s Guide TV‐IP420P DDNS PPPoE Dynamic Domain Name Service, DDNS, allows you to find your camera from the Internet with an easy to remember domain name. Setup PPPoE (ADSL) connection to connect your camera with your ISP, Internet Service Provider. DDNS Enable DDNS: Check this box to enable DDNS Service. DDNS Type: Select a DDNS service provider. Server Address: Enter the DDNS server address. Domain: Enter your registered domain/host name on selected DDNS service.
TRENDnet User’s Guide SNMP SNMP Settings allows you to assign the contact details, location, community name and trap settings of SNMP. This is a networking management protocol used to monitor network‐attached devices. SNMP allows messages (called protocol data units) to be sent to various parts of a network. Upon receiving these messages, SNMP compatible devices (called agents) return data stored in their Management Information Bases.
TRENDnet User’s Guide TV‐IP420P 802.1X Setup 802.1X for remote authentication service. Authentication Algorithm: Authentication Password: Private‐key Algorithm: Private‐key Password: Choose the authentication method to verify the source of information: MD5 or SHA. Specify the authentication password between 8 to 32 letters. Choose the privacy key to encrypt SNMP messages: DES or AES. Specify the privacy key between 8 to 32 letters. SNMP Other Settings SNMP Port: SNMP service port number.
TRENDnet User’s Guide TV‐IP420P IP Address Filter Quality of Service (QoS) Set up a list of clients allow only the clients on the list to access this camera or to reject clients on the list from access this camera. Setup traffic prioritization tags the video packets to go through network switches and routers with assigned priority. You can set the Differentiated Services Code Point (DSCP) bits on outgoing data streams. The QoS capable network device will forward different data in different priorities.
TRENDnet User’s Guide TV‐IP420P UPnP Video Settings Universal Plug‐and‐Play is a device discovery protocol set. It allows your camera to easily be found, for example, on a Windows operation system. Video Format UPnP Enable UPnP: Check this box to enable UPnP connection. Friendly Name: The name that will be appeared when searched. Port Mapping Enable Port Check this box to enable UPnP connection. Mapping: Port Mapping Choose Manual or Auto port mapping.
TRENDnet User’s Guide TV‐IP420P Video Encoding: Choose the video stream you want to modify. H.264 and MJPEG videos are always streaming and can be configured separately. H.264+ Higher compression option Resolution: H.264 Adjust video image quality, lightness, and color settings here. MJPEG Bitrate Type: Choose between variable bit rate or constant bit rate for video compression. The default is variable rate. Video Quality: Choose the video quality. The default is medium quality.
TRENDnet User’s Guide TV‐IP420P Light sensitivities Smart IR: Smart IR can adjust the strength of infrared lights at night depending on the distance of an object to maintain the maximum IR light distance and while maintaining a clear picture when object is close by. Default: On. Max. Exposure Adjust this value for exposure time for Time: each picture. You can choose a value between 1/3 second to 1/100,000 second. The default value is 1/30 second exposure time for each picture.
TRENDnet User’s Guide Schedule: Use quick selection or enter the time down below. Click OK to confirm the time you want to set. TV‐IP420P Image adjustments Back Light Compensation and Wide‐Dynamic‐ Range: Back light compensation: Setup a fixed light source position to compensate and adjust the image in the dark. Choose the area that you want to enhance (dark area, not light source). Note: By default, the WDR is disabled. Please enable WDR to set up back light compensation.
TRENDnet User’s Guide TV‐IP420P On Screen Display Settings Text Overlay Display the camera name and the time the video is shooting on the screen Display extra information on the screen over the image. Display Check this box to display the product name that was Name: setup in the device settings Display Date: Check this box to display system time. Display Week: Check this box to display time of the week. Time Format: Select 12 or 24‐hour time format.
TRENDnet User’s Guide Privacy Mask TV‐IP420P Video Recording Create a masking area to keep your privacy. You can create up to four independent masking areas by clicking and dragging on the screen. Enable Privacy Mask: Check this box to enable privacy masking. Stop Drawing: Click this button to stop drawing. Clear All: Click this button to clear all the masking areas. Click Save to save the changes © Copyright 2016 TRENDnet. All Rights Reserved. Pre‐record: Recording time before trigger event.
TRENDnet User’s Guide TV‐IP420P Events Edit: Click Edit to edit the recording schedule. The Edit Schedule window will pop up. Motion Detection Set up how the motion detection event will be triggered and what actions will be triggered. 1. Select day of the week you want to edit. 2. Select All Day or Customized schedule of the day. 3. Set the time period and the event you want to trigger the video recording continuous (always recording) or motion detection. 4.
TRENDnet User’s Guide TV‐IP420P Draw Area: Click Draw Area button to start drawing. Click and drag on the area you want to set up the motion detection. You can draw up to 8 different areas. Click Stop Drawing to stop drawing motion detection areas. The red grids represent the motion detection area. Sensitivity: Move the slider to adjust detection sensitivity. Clear All: Click this button to clear all the set up areas. Arming Schedule Edit: Click Edit to edit the recording schedule.
TRENDnet User’s Guide 3. Set the time period and the event you want to trigger the video recording continuous (always recording) or motion detection. 4. Click Select All or the weekday you want to have the same schedule on different day. 5. Click another day of the week by clicking on its tab to set the next schedule. Click OK when you have finished your settings. TV‐IP420P Video Tampering This is to detect if the camera has been tampered with and surveillance is compromised.
TRENDnet User’s Guide TV‐IP420P Arming Schedule Edit: Click Edit to edit the recording schedule. The Edit Schedule window will pop up. Enable Check this box to enable tamper detection. Click Save Tamper to save the settings. Detection: Draw Area: Click Draw Area button to start drawing. Click and drag on the area you want to set up the tamper detection. You can setup only one area for tamper detection. Click Stop Drawing to stop drawing motion detection areas. The gray block represents the detection area.
TRENDnet User’s Guide TV‐IP420P Notification Snapshot Provide notifications for other system events, set up your notifications here. You can set up your camera to continuously taking snapshots or taking snapshots only when events happening. Notification Notification First, choose the exception type, and then choose Type: the corresponding action. Send Email: Check this box to send an e‐mail notification when motion is detected. Click Save to save the changes © Copyright 2016 TRENDnet.
TRENDnet User’s Guide Event triggered Enable: Check this box to take snapshots when an event is occurred. Format: Save snapshots in JPEG format Resolution: Uses the same resolution set in Video Format for the snapshot resolution. Quality: Choose a compression quality for snapshot. Interval: State the time interval between this series of snapshots. The default interval is 1 second. Capture State how many snapshots you want to take in a single Number: triggered event. Default: 3 pictures.
TRENDnet User’s Guide SMTP Port: Enable SSL: Attach Image/Interval: Authentication: User name: Password: Confirm: address as your incoming email server, maybe not. Please ask your email service provider for detail. Service port number for outgoing email.* Check this box if your service provider requires a SSL secured connection. Check Attach Image if you want to send a snapshot image with the email notification and select the interval of snapshots in seconds.
TRENDnet User’s Guide Alarm Input TV‐IP420P Alarm Output Alarm Input No. Alarm Name Alarm Type Select the alarm input number Input the alarm name Two alarm types. NO for (Normally Open) and NC (Normally Closed). Choose Alarm Input number, name and alarm type. The alarm type could be NO (Normally Open) and NC (Normally Closed). Normal Linkage Send Email When the alarm is triggered, the camera will send an email notification.
TRENDnet User’s Guide TV‐IP420P Network Storage Network Storage Network Storage must be setup before it can be managed. For storage management, please refer to the next section. The TV‐IP420P supports two formats of network storage file systems: NFS and CIFS. NFS, Network File System, is natively supported by Linux computers and most NAS, Network Attached Storage. CIFS, Common Internet File System, is natively supported by Windows® systems and now is generally supported by Linux.
TRENDnet User’s Guide Storage Management Network Storage must be setup before it can be managed. To setup storage, please refer to the previous section. TV‐IP420P Format: Select a network storage volume and then click Format to format your network storage. This action will format the network volume (shared folder) for video recording. Placeholder files (formatting files) will be created to make sure disk allocation is appropriate and the file searching is optimized.
TRENDnet User’s Guide FTP Server TV‐IP420P Enable Snapshot to FTP: Server Address: Port: User Name/Anonymous : Password: Confirm: Check this box if you want to store snapshots on the FTP. Enter the FTP server IP address. Enter the service port number of the FTP server. Check Anonymous if the FTP server does not require authentication. Enter the User Name if the FTP server requires authentication. Enter the password of the FTP account.
TRENDnet User’s Guide TV‐IP420P Auto Scan Speed: PTZ (Pan/Tilt/Zoom) Basic Max. Tilt‐angle: Auto Flip: The camera provides 5 scan modes: auto scan, tilt scan, frame scan, random scan and panorama scan. The scan speed can be set from level 1 to 40. The maximum angle that the camera can revolve in the tilt direction is adjustable.
TRENDnet User’s Guide TV‐IP420P Limit Initial Position The camera can be programmed to move within the configured stops. (left, right, up or down) Set the camera initial position, you can also call a preset for the position. Click Set to save the limits and Clear to clear the limits. Steps 1. 2. 3. Check the Enable Limit box and select Manual Stops or Scan Stops from the Limit Type list. a. When manual limit stops re set, you can operate the PTZ control panel manually only in the limited area. b.
TRENDnet User’s Guide TV‐IP420P Park Action Private Mask The feature allows the camera to start at a predefined park action. (scan, preset, pattern) automatically after a period of inactivity (park time). Create masking area to keep your privacy. You can create up to four independent masking areas by clicking and dragging on the screen. Scheduled Tasks function has higher priority over Park Action function therefore when two functions are set at the same time, Scheduled Tasks function takes effect.
TRENDnet User’s Guide TV‐IP420P Schedule Tasks You can configure the camera to perform a certain action automatically in a user‐defined time period. Enable the Scheduled Task, define the Park Time and Edit the Tasks that you would like to perform at certain time. © Copyright 2016 TRENDnet. All Rights Reserved. 1. Choose the day you would like to set the task schedule 2. Click All Day or Customize to enter the Start Time and End Time for each task. 3. Choose the task type from the drop down list. 4.
TRENDnet User’s Guide TV‐IP420P Clear Config Restore Default Password You can clear PTZ configurations all at once in this section, select the desire function and click Save to clear. Software Reset Refer to Advanced Settings, Maintenance section. Hardware Reset Follow the steps to perform a hardware reset © Copyright 2016 TRENDnet. All Rights Reserved. 1. Disconnect the power source (Network Cable from PoE injector or switch) e from the camera 2.
TRENDnet User’s Guide Appendix Direct video access ‐ RTSP To access the video directly through RTSP, just visit the camera IP address on port 554 by default. For example: 192.168.10.30:554 use the admin or user password the login. TV‐IP420P FCC Caution: Any changes or modifications not expressly approved by the party responsible for compliance could void the user’s authority to operate this equipment. This device complies with Part 15 of the FCC Rules.
TRENDnet User’s Guide TV‐IP420P Europe – EU Declaration of Conformity This device complies with the essential requirements of the Directive 2004/108/EC and 2006/95/EC.
TRENDnet User’s Guide TV‐IP420P Limited Warranty TRENDNET NEITHER ASSUMES NOR AUTHORIZES ANY OTHER PERSON TO ASSUME FOR IT ANY OTHER LIABILITY IN CONNECTION WITH THE SALE, INSTALLATION MAINTENANCE OR USE OF TRENDNET’S PRODUCTS. TRENDnet warrants its products against defects in material and workmanship, under normal use and service, for the following lengths of time from the date of purchase.