
User's Guide
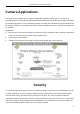
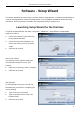
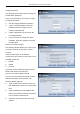
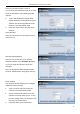
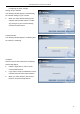
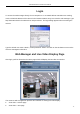
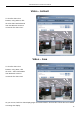
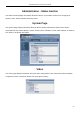
Table Of Contents
- About this User’s Guide
- Before you start
- Packing List
- System Requirements
- Default Settings
- Introduction
- Camera Hardware Components
- Camera Hardware Components
- Hardware Installation
- Camera Applications
- Security
- Software - Setup Wizard
- Browser Configuration
- Accessing the Camera Video Display
- Login
- Web Manager and Live Video Display Page
- Administration - Status Section
- System Page
- Video
- Audio
- Wireless
- Network
- Active Users
- Configuration Section
- System
- Video
- Audio
- Wireless
- Network
- User
- Upload
- Tools Section
- FTP Server Test
- E-Mail Test
- Restart
- Factory Reset
- Firmware Upgrade
- Backup and Restore
- Software – IPViewPro 2.0
- Launching IPViewPro 2.0 for the first time
- Add a camera for monitoring
- Display Controls
- Snapshot, recording and audio controls
- Live video display controls
- Camera configuration with IPViewPro
- Schedule Recording with IPViewPro 2.0
- Motion Detection and Digital Input
- IPViewPro Miscellaneous Options
- Load Saved Video Files
- Technical Specifications
- Limited Warranty

TV-IP501W Internet Camera User Manual
12
Software - Setup Wizard
This section describes the how to setup a camera using the Setup Wizard. To install the Setup Wizard on
a system running Windows, launch the Setup Wizard on the installation CD-ROM and follow the setup
instructions. Once the software is installed, the Setup Wizard utility is ready for use.
Launching Setup Wizard for the first time
To launch the Setup Wizard, click Start > Programs > TRENDnet > Setup Wizard > Setup Wizard
Install Your Camera
Connect the camera to your LAN using
the provided RJ45 cable.
Connect the AC Power Adapter to the
back of the camera and to a live power
socket.
Click Next to continue.
Select Your Camera
The following screen appears showing the
cameras that have been found on your
network.
Click on the camera you want to configure.
Click Next to continue
Authentication
On the following screen type in the ID and
Password that you will use to configuring the
camera settings.
Type a User ID in the ID field.
Type the password of the User in the
Password field.
Click Next to continue