CONTENTS ABOUT THIS USER’S GUIDE .......................................................................................................... 1 INTRODUCTION ........................................................................................................................... 2 Features and Benefits................................................................................................................................. 2 Unpacking the Package ........................................................
Video Audio ............................................................................................................................................ 41 Video and Audio ........................................................................................................................................... 41 Video Profile 1‐4 ....................................................................................................................................... 41 Audio Setup ............................
A. Frequently Asked Questions ............................................................................................................... 80 B. PING your IP Address .......................................................................................................................... 82 C. Troubleshooting .................................................................................................................................. 84 D. Time Zone Table .............................................
TV-IP612P/WN (Wireless N) Pan/Tilt/Zoom Internet Camera About This User’s Guide This User Guide provides instructions on how to install the TV-IP612P/W Wireless Network camera and use it for camera monitoring applications. Camera monitor applications are accessible through an Ethernet or 802.11b/g/n wireless local area network. The following chapters are included in this User Guide: • Chapter 1, Introduction, provides general information about the Camera.
TV-IP612P/WN (Wireless N) Pan/Tilt/Zoom Internet Camera 1 Introduction Thank you for purchasing the TV-IP612P/TV-IP612WN Pan/Tilt/Zoom (Wireless) Internet Camera, a standalone system that can be connected directly to an Ethernet or Fast Ethernet connection. The TV-IP612WN also supports wireless transmissions based on the IEEE 802.11b/g/n standard.
TV-IP612P/WN (Wireless N) Pan/Tilt/Zoom Internet Camera allows the Administrator to manage and control the Camera from anywhere in the World at anytime. The Camera can be used to monitor many different objects and places, including homes, offices, banks, hospitals, child-care centers, amusement parks and all kinds of industrial and public monitoring tasks. The Camera can also be used to detect intruders, capture still images for archiving and many other applications.
TV-IP612P/WN (Wireless N) Pan/Tilt/Zoom Internet Camera System Requirements Networking • Local Area Network: 10Base-T Ethernet or 100Base-TX Fast Ethernet • Wireless Local Area Network: IEEE 802.11b/g/n Wireless LAN (TV-IP612WN only) Computer • CPU: P4 2.
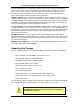
TV-IP612P/WN (Wireless N) Pan/Tilt/Zoom Internet Camera Default Settings Use the default settings to access the web-based management software and live video display. Default configuration settings Username This is the Username you will be prompted to enter when you access the TVIP612P/WN configuration screens using a Web browser. The default Username is admin. Password This is the Password you will be prompted to enter when you access the configuration windows using a Web browser.
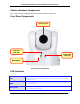
TV-IP612P/WN (Wireless N) Pan/Tilt/Zoom Internet Camera Camera Hardware Components This section provides information about the Camera’s hardware components: Front Panel Components Camera lense Link LED indicator Power LED indicator Microphone Front panel of TV-IP612P/W LED Indicators LNK This LED indicator lights steady orange when a valid Ethernet link is established. It blinks orange when traffic is received or transmitted through the Ethernet link.
TV-IP612P/WN (Wireless N) Pan/Tilt/Zoom Internet Camera Rear Panel Components The power connection to the camera when fitted with the Infrared lens is split between the camera body and lens using the power connection adapter cable attached to the infrared lens. All other cables connect to the camera at the rear panel.
TV-IP612P/WN (Wireless N) Pan/Tilt/Zoom Internet Camera MIC Used this jack to connect and record audio from an external microphone. Reset Button Use to reset device to factory default settings including IP address and administrator user name and password. Antennas A threaded post is used for attaching the antenna. Fasten the antenna securely to the post.
TV-IP612P/WN (Wireless N) Pan/Tilt/Zoom Internet Camera 2 Installing the Camera The camera is intended for indoor use. The camera, the power adapter and power source should be protected from water and moisture, excessive heat, direct sunlight and cold. Make sure the power adapter and its cord and the Ethernet cable are safely arranged so they do not create a tripping hazard and will not be disturbed by people or objects moving past.
TV-IP612P/WN (Wireless N) Pan/Tilt/Zoom Internet Camera Connect Ethernet Cable To connect the camera to your network, connect a Category 5 or better Ethernet cable to the network cable connector located on the camera’s left side panel, and then attach it to the network. The Ethernet port will automatically detect and adjust to the speed (10 or 100 Mbps) and polarity (MDI-II or MDI-X) of the connection.
TV-IP612P/WN (Wireless N) Pan/Tilt/Zoom Internet Camera Reset Camera A manual reset can be conducted by following the procedure below. The reset button is located on the rear panel of the camera. To reset the system settings to factory defaults, please follow these steps: 1. Use a paper clip or similar object to hold down the reset button for three seconds. The reset button is located on the rear panel of the device. See the Rear Panel Components picture above to locate the reset button. 2.
TV-IP612P/WN (Wireless N) Pan/Tilt/Zoom Internet Camera 3 Security To ensure the highest level of security and prevent unauthorized usage of the Camera, the Administrator account has exclusive access to the camera’s configuration settings. The Administrator account can create up to 20 users. A User only has access to the Live View portion of the browser software to view and record video. Access to the Camera is strictly restricted to User’s that have been created in the Setup-System-Device Management menu.
TV-IP612P/WN (Wireless N) Pan/Tilt/Zoom Internet Camera 4 Application The TV-IP612P / TV-IP612WN camera can be applied in a wide range of applications, including: • Monitoring of local and remote places and objects, such as construction sites, hospitals, amusement parks, schools and day-care centers by using a web browser. • Using the IPView Pro 2 application to capture singles frame images. • Configuring the Camera to upload images to an FTP Server or sending e-mail messages with single frame images.
TV-IP612P/WN (Wireless N) Pan/Tilt/Zoom Internet Camera 5 Using the Utility This chapter describes the software utilities for the IP Camera, including how to set up your Camera with the utility. The SetupWizard has a user-friendly interface that allows you to setup the Camera easily. SetupWizard This section describes how to install the SetupWizard and how to use the SetupWizard to setup and install your Camera quickly and easily.
TV-IP612P/WN (Wireless N) Pan/Tilt/Zoom Internet Camera 2. The next window asks you whether you want to accept the License Agreement or not. • If you agree with the Licensing Agreement, click the I Agree radio button and the Next > button. • If you don’t agree with the Licensing Agreement, click the I Do Not Agree radio button to exit the install wizard. 3. The following window appears asking you to choose the desired installation location.
TV-IP612P/WN (Wireless N) Pan/Tilt/Zoom Internet Camera 5. The software will start to install. The following window appears, showing the progress of the installation: 6. When installation is complete the following window appears to confirm that the SetupWizard has installed successfully: • Click Close to exit the installation After installing the SetupWizard, the application program for the Camera is automatically installed on your computer.
TV-IP612P/WN (Wireless N) Pan/Tilt/Zoom Internet Camera Launching the SetupWizard To launch the SetupWizard, click the SetupWizard icon on your desktop or go to Start > Programs > TRENDnet > SetupWizard > SetupWizard to start the appilcation. SetupWizard- Install Your Camera Connect the camera to your LAN using the provided RJ45 cable. Connect the AC Power Adapter to the back of the camera and to a live power socket. Click Next to continue.
TV-IP612P/WN (Wireless N) Pan/Tilt/Zoom Internet Camera SetupWizard- Select Your Camera The following screen appears showing the cameras that have been found on your network: Click on the camera you want to configure. Click Next to continue.
TV-IP612P/WN (Wireless N) Pan/Tilt/Zoom Internet Camera SetupWizard- Authentication On the following screen type in the ID and Password that you will use to configuring the camera settings: Type a User ID in the ID field. Type a password for the User in the Password field. Click Next to continue.
TV-IP612P/WN (Wireless N) Pan/Tilt/Zoom Internet Camera SetupWizard- Other Settings The screen below allows you to set the camera name and the camera’s time settings. Type a name to help you identify the camera in the Camera Name field. Set the camera date and time from the Camera Time drop-down menus. To use the time settings from your computer, click the Copy Local Time button. Click Next when you have finished configuring the other settings.
TV-IP612P/WN (Wireless N) Pan/Tilt/Zoom Internet Camera SetupWizard- Change Password The following screen allows you to change the default admin password: Carry out the following if you want to change the admin password: Tick the Change Password checkbox Type in a New Password in the New Password field and confirm it in the Confirm Password field Click the Next button to proceed to the next Setup window If you don’t want to change the admin password, leave the checkbox un-ticked and click Nex
TV-IP612P/WN (Wireless N) Pan/Tilt/Zoom Internet Camera SetupWizard- Select a Connection Option The following window allows you to specify the connection method used by your camera network. Click the radio button of the network environment your camera is connected to.
TV-IP612P/WN (Wireless N) Pan/Tilt/Zoom Internet Camera SetupWizard – Select a Connection Option - PPPoE If your connection method is PPPoE, click the PPPoE radio button and click Next: The following window appears: Type the User Name used to connect to your PPPoE connection in the User Name field. Type the Password of the PPPoE User Name in the Password field and confirm it in the Confirm Password field. Click Next to proceed to the next setup window.
TV-IP612P/WN (Wireless N) Pan/Tilt/Zoom Internet Camera SetupWizard- Select a Connection Option- DHCP If your connection method is DHCP, click the DHCP radio button and click Next: 24
TV-IP612P/WN (Wireless N) Pan/Tilt/Zoom Internet Camera SetupWizard- Select a Connection Option- Fixed IP If your connection method is Fixed IP, click the Fixed IP radio button: The following window appears: Type in the IP Address, Subnet Mask, Default Gateway, Primary DNS Server IP address and Secondary DNS Server IP Address in the appropriate fields. Click Next to proceed to the next setup window.
TV-IP612P/WN (Wireless N) Pan/Tilt/Zoom Internet Camera SetupWizard- Setup Wireless (For TV-IP612WN only) After choosing your connection method, the following window appears: Choose if you want to connect to your camera using the wireless connection or not by clicking the appropriate radio button. Click Next to continue.
TV-IP612P/WN (Wireless N) Pan/Tilt/Zoom Internet Camera SetupWizard- Setup Wireless (For TV-IP612WN only) If you selected the option to use a wireless connection to connect to your camera the following window appears: Choose the Access Point you want to connect the camera to from the Available AP dropdown menu. If the Wireless LAN you want to connect to doesn’t appear in the Available AP list, click the Re-Scan button to scan for additional Wireless LAN’s.
TV-IP612P/WN (Wireless N) Pan/Tilt/Zoom Internet Camera SetupWizard- Setting Up The Camera The following window appears, summarizing the network settings of your camera: When you have finished setting up the Camera click the Next button. To make any changes to your Camera settings, click the Previous button.
TV-IP612P/WN (Wireless N) Pan/Tilt/Zoom Internet Camera SetupWizard- Complete After the camera has restarted, the following window will appear: Click the hyper-link to connect to the camera web interface. If you want to setup an additional camera, click the Setup Another Camera button. When you have finished, click the Exit button to close the Setup Wizard.
TV-IP612P/WN (Wireless N) Pan/Tilt/Zoom Internet Camera 6 Using the Camera Web Manager The camera is easy to use and manage. Use a normal web browser to access the camera’s live video display, as well as the configuration software. It is recommended to check and make sure the computer can access and use the camera before placing it in the location where it will be used, especially if it is mounted to a ceiling or other area that is difficult to physically access.
TV-IP612P/WN (Wireless N) Pan/Tilt/Zoom Internet Camera Login To access the web manager directly from a computer or on a network without a DHCP server running, use the default IP address of the camera in the browser address entry to access the web manager. Type http://192.168.10.30 in the address bar and press Enter. The login dialog appears when accessing the camera. Type the default user name “admin”, default password “admin” and click on the OK button to access the camera’s management interface.
TV-IP612P/WN (Wireless N) Pan/Tilt/Zoom Internet Camera Wizard The first menu to appear after clicking on Setup is the the automatic setup wizard. You can use this wizard to configure settings for your camera’s Name, LAN and Internet, DDNS and Time/Date. Click on Next to start the wizard otherwise select another menu choice from the left hand menu buttons. System menu in Administration directory The different menus that are available are presented and described in the following pages.
TV-IP612P/WN (Wireless N) Pan/Tilt/Zoom Internet Camera Step 1 Setup LAN Settings Select the DHCP Connection option if your wired or wireless connection will use a dynamically assigned IP address Select the Static IP Address option and then manual enter in the network settings your camera will use. Click Next to continue to step 2 Step 2 Setup Internet Settings To connect a camera directly to the internet using a PPPOE connection enter the username and password here.
TV-IP612P/WN (Wireless N) Pan/Tilt/Zoom Internet Camera Step 3 Setup DDNS Settings To synchronize the public IP address of the Modem, when it has been modified, use the DDNS service settings. You must supply the Username and Password when utilizing the DDNS service. Server Address: Select your service providers Dynamic DNS web address.. Host name: Enter the Domain name you were given from the DDNS service provider User name: Enter the account user name your DDNS service provider has given you.
TV-IP612P/WN (Wireless N) Pan/Tilt/Zoom Internet Camera Step 5 Setup Time Zone Use this step to configure the Time and Date, the Time Zone and the Daylight savings configuration of the camera. Time Zone: Select the Time Zone for your camera in the drop-down list. Enable Daylight Saving: Select this to enable Daylight Savings for the Time Zone you have chosen above. This will automatically set daylight savings time depending on the date and time for each time zone.
TV-IP612P/WN (Wireless N) Pan/Tilt/Zoom Internet Camera System The system menu item configures the devices users, associated passwords, device name, OSD settings, and LED light control. Device Management Admin Password Settings: Use the fields to change the administrator password used to access the System Administration settings. Enter, a password in the New Password field and confirm the password in the Retype Password field.
TV-IP612P/WN (Wireless N) Pan/Tilt/Zoom Internet Camera Time and Date Time Configuration Time Zone: Select the Time Zone for your camera in the drop-down list. Enable Daylight Saving: Select this to enable Daylight Savings for the Time Zone you have chosen above. This will automatically set daylight savings time depending on the date and time for each time zone. Auto Daylight Savings: This setting automatically is enabled when you check Enable Daylight Savings.
TV-IP612P/WN (Wireless N) Pan/Tilt/Zoom Internet Camera Network Use the menu selections in this section to configure the network settings for both wired and wireless LAN setups (TV-IP612WN only) of the camera. Network Setup DHCP Connection: Select this option to automatically configure the Camera IP settings from a DHCP server. Static IP Address: Select this opton to manual configure the IP settings in the below 5 fields for your camera.
TV-IP612P/WN (Wireless N) Pan/Tilt/Zoom Internet Camera Port Settings HTTP Port: Configure this with the HTTP Port to be used for viewing the camera over the internet. RTSP Port: Configure this with the Real Time Streaming Protocol port used by an RTSP client to view the camera from for example, a mobile or smart phone. User Authentication: Checking this box forces the user to supply their credentials upon every camera access.
TV-IP612P/WN (Wireless N) Pan/Tilt/Zoom Internet Camera Selecting a SSID from the Site Survey When you click on the Scan button in the Wireless menu a list of networks is available in the pulldown list immediately below. Selecting one of these items automatically populates the Wireless Mode, Channel, Authentication and Encryption fields. Once you select the SSID you must enter the security key if authentication is selected.
TV-IP612P/WN (Wireless N) Pan/Tilt/Zoom Internet Camera Video Audio Video and Audio Video Profile 1-4 Encode Type: Select one of H264, JPEG, or MPEG4 encoding from the drop-down menu. Profile 4 is always set to MPEG4. Resolution: Select the size of the desired screen viewing resolution. FPS: Select the FPS (Frames per Second). 30 is the maximum (best quality). bps: To control the amount of bandwidth that the camera uses select the BPS (Bits per Second). to fix the bandwidth rate.
TV-IP612P/WN (Wireless N) Pan/Tilt/Zoom Internet Camera Audio Setup Enable Speaker: Check this box to enable the local external speaker on the camera. Using the microphone on your computer allows you to speak to anyone near the camera. Volume: Adjusts the volume of the external speaker turned on above. Enable Microphone: Check this to enable the camera’s built-in microphone so that the you can receive audio along with the video from the camera.
TV-IP612P/WN (Wireless N) Pan/Tilt/Zoom Internet Camera Advance Image Settings Auto Gain Control: When the level of input luminance is too dark, setting the AGC to high will automatically increase the image brightness. Back Light Compensation: When the background of the input image is too bright, use the BLC function to make the objects in the image clearer. 2D Noise Reduction: When you increase the gain, noise in the image is also amplified.
TV-IP612P/WN (Wireless N) Pan/Tilt/Zoom Internet Camera Shutter Mode (Shutter-preferred) • Select Auto to have the camera shutter-speed be automatically set. • Select Manual to adjust the shutter-speed of the camera using the Shutter Value settings in the below pull-down menu • Select Anti-Flicker to remove the flicker caused by indoor lighting of the image. Shutter Value: Select the desired shutter speed (in seconds) of the camera when the Shutter Mode setting is set to Manual.
TV-IP612P/WN (Wireless N) Pan/Tilt/Zoom Internet Camera Night mode: If the camera is used only in a low-light and dimly lit area then select this option to increase the camera sensitivity by operating it in Black and White mode. Scheduled Mode: This item allows you to manually program the time when the camera is in day mode using the From (24hr) and to (24hr) fields.
TV-IP612P/WN (Wireless N) Pan/Tilt/Zoom Internet Camera Recording Options Resolution: Select the profile from the drop-down menu. Refer to the Audio and Video section for more information on profiles. Record File Size: Select from 1 to 10 minutes in the pull-down menu. Record until: Enter the minimum available hard drive space that must be left free and available for use when recording. When Storage is Full: Use the Stop Recording setting to stop the recording when there is no longer any hard drive space.
TV-IP612P/WN (Wireless N) Pan/Tilt/Zoom Internet Camera Snapshot Enable Snapshot: This option allows you to send an snapshot or still image from the camera attached to an E-mail or via an FTP server. Trigger Event: These 2 options determine when to transfer an image via email or ftp. The image is sent either based on a Motion Detection trigger or a D/I Signal 1 going active option. Continuous (FTP Only): This option causes snapshots to be sent non-stop. See the FTP Time Interval Setting.
TV-IP612P/WN (Wireless N) Pan/Tilt/Zoom Internet Camera FTP Settings FTP Server: Check this option to send the image captured to a FTP server. User Name: The account user name assigned and used for accessing the FTP server. Password: The password used for the account username configured above. Host Name: The FTP server’s hostname or IP address. For example: ftp.trendnet.com. Path: The FTP server file system path to the directory where the image is uploaded to.
TV-IP612P/WN (Wireless N) Pan/Tilt/Zoom Internet Camera Patrol Selection: This box shows the available Preset Locations saved which can be moved to the Selected Locations box below by highlighting them and clicking on the Select button. Selected Locations: The preset locations in this box: determine the locations the camera will view when the Patrol button is pressed in the Live View window. Pan/Patrol Speed: Set the speed from 1 to 5 with 5 being the fastest.
TV-IP612P/WN (Wireless N) Pan/Tilt/Zoom Internet Camera Trigger Enable D/O Signal: Checking this box turns on the Digital Output to trigger external equipment such as alarm lights or sirens. Trigger Event Motion Detection:Checking the motion detection box causes the D/O pins to activate connected alarm devices upon motion being detected. D/I Signal 1 Check this box to enable input on the D/I pins connected to a traditional alarm detection device. Click the OK button to save and activate your settings.
TV-IP612P/WN (Wireless N) Pan/Tilt/Zoom Internet Camera Motion Detection Live Video Enable Video Motion: The camera can be setup to record whenever motion is detected in the camera’s field of view and programmable predefined areas. Check this box to the motion detection function. Sensitivity: This field allows you to to specify how much movement will trigger motion detection in the trigger area. A higher sensitivity value means less movement is required.
TV-IP612P/WN (Wireless N) Pan/Tilt/Zoom Internet Camera Tools Backup and Restore Save to Local Hard Drive: To save the configuration to a file clock on the Save Configuration button. Load From Local Hard Drive: If you need to load a saved configuration file into the camera click the Browse button and find and select the configuration file to be loaded. Then click the Load Configuration button to load the file which will apply the saved settings once loaded.
TV-IP612P/WN (Wireless N) Pan/Tilt/Zoom Internet Camera Device Info Device Info Detailed information about your camera’ system and network settings can be found on this page Log Logs recorded by the camera can be viewed on this page. Click the Download button at the bottom of the page to save the log file to a text file on your hard drive.
TV-IP612P/WN (Wireless N) Pan/Tilt/Zoom Internet Camera Viewing Video The TV-IP612P /TV-IP612WN camera allows you to view video images using in your web browser. Click the Live View button on the screen to access the video images. Note: If you Left Click anywhere in the image this will cause the camera to position the center of the image over the point you clicked.
TV-IP612P/WN (Wireless N) Pan/Tilt/Zoom Internet Camera Controlling the Camera You can control the Camera’s viewing angle using the control buttons on the left-hand side of the viewing window. You can control video modes, audio modes, recording settings and digital output using the control panel underneath the image (described on the next page). Outer Ring: Click on the arrows on the outer ring to move the camara.
TV-IP612P/WN (Wireless N) Pan/Tilt/Zoom Internet Camera 1 2 3 4 5 6 7 8 9 10 11 12 1. Video 1 - Click this button to view the image using Video Profile 1 settings. Go to the Setup section Video/Audio – Video and Audio to change the Profile settings. 2. Video 2 - Click this button to view the image using Video Profile 2 settings. Go to the Setup section Video/Audio – Video and Audio to change the Profile settings. 3. Video 3 - Click this button to view the image using Video Profile 3 settings.
TV-IP612P/WN (Wireless N) Pan/Tilt/Zoom Internet Camera 7 IPView Pro 2.0 This section describes the how to setup a camera using the IPView Pro 2.0 camera monitoring software. To install IPView Pro 2.0 on a system running Windows, launch the IPView Pro 2.0 installation software on the installation CD-ROM and follow the setup instructions. Once the software is installed, the IP Cam Center camera monitoring utility is ready for use. Add up to 32 network cameras to monitor using the software.
TV-IP612P/WN (Wireless N) Pan/Tilt/Zoom Internet Camera Add a camera for monitoring The Add camera menu is presented the first time the IPView Pro 2.0 software is launched. This menu is used to add cameras to the user interface for monitoring. After the first time running the software, this menu can be accessed at anytime from the Configuration menus. The Configuration menus are described in a later section of this chapter. Notice that the IPView Pro 2.
TV-IP612P/WN (Wireless N) Pan/Tilt/Zoom Internet Camera If the camera does not appear listed, click the Input the location of camera tab above the list to view a new menu. Enter the IP address or the URL (for example, ipcam.ddns.org) of the camera being added, type the user name and password and click the Preview to verify that a link can be established. The live video of the camera should appear in the Live preview display.
TV-IP612P/WN (Wireless N) Pan/Tilt/Zoom Internet Camera IPView Pro 2.0 User Interface Below is a general description of the user interface. 2 1 3 4 5 6 7 8 NO. 1 2 3 Item Live video display area Minimize and Exit Pan and Tilt control (cameras using RS-485 Pan/Tilt device only) 4 Zoom 5 Snapshot, recording and audio controls 9 Description Display area for single or multiple cameras of live video.
TV-IP612P/WN (Wireless N) Pan/Tilt/Zoom Internet Camera 6 Live video display controls See below for detailed information. 7 Camera configuration menu See below for detailed information. 8 Camera status Use to quickly assess the status of operating cameras. Click on box to select camera display. The status indicators for each camera display recording, motion detection and GP input status. 9 Camera information Displays basic information on selected camera.
TV-IP612P/WN (Wireless N) Pan/Tilt/Zoom Internet Camera Notice that when these functions are activated, the color of the icon changes from white to yellow.
TV-IP612P/WN (Wireless N) Pan/Tilt/Zoom Internet Camera Live video display controls Use the video display controls to change the view of the live video display. This is useful for multiple camera application. Click the arrows to manually cycle through the active camera’s live displays when using a single camera display screen. Click multi-screen display icons to change the number of camera’s displayed at one time.
TV-IP612P/WN (Wireless N) Pan/Tilt/Zoom Internet Camera Camera configuration with IPView Pro 2.0 Access the camera configuration menus by clicking on the gear icon at the bottom of the right hand panel of the IPView Pro 2.0 user interface. Configuration options include adding and deleting cameras from the display view, configuration of motion detection and digital input with schedules, recording options, email alerts and other network settings.
TV-IP612P/WN (Wireless N) Pan/Tilt/Zoom Internet Camera 2. Select the camera to add from the list, enter the administrator’s user name (ID:) and password, a preview of the live video display will appear. Click the OK, add this camera button, a confirmation message informs when the camera is connected and added to the IPView Pro 2.0 monitoring group. Repeat this procedure for all the cameras being added. Click the Exit button after all the cameras have been added. 3.
TV-IP612P/WN (Wireless N) Pan/Tilt/Zoom Internet Camera Schedule Recording with IPView Pro 2.0 Use the Monitorng Settings menu to create schedules for recording and apply the schedules to any camera. Click the Monitoring Settings tab to view the Schedule Recording menu (the first menu viewed in the Camera Settings menu tab).
TV-IP612P/WN (Wireless N) Pan/Tilt/Zoom Internet Camera Create Schedule Templates To make a new schedule template, click the Edit Template button to view the Select schedule profiles dialog box. Use this new dialog box to create new schedules for recording.
TV-IP612P/WN (Wireless N) Pan/Tilt/Zoom Internet Camera Setup Motion Detection and Digital Input with IPView Pro 2.0 The Camera Settings menus include Motion Detection setup and Digital Input control. Each menu has the schedule option to apply a schedule for the action taken or always take the specified action. For Motion Detection, use the Config motion detection area menu to create the area to which it is applicable.
TV-IP612P/WN (Wireless N) Pan/Tilt/Zoom Internet Camera IPView Pro 2.0 Recording Options The Recording Options configured in the IPView Pro 2.0 help to conserve and manage allowed memory storage (disk space) and for video file management. Recorded files can be limited by time elapsed or by size. Use the select storage folder to choose an alternative destination for stored video files. Storage limits can be set for each camera by time elapsed or hard disk space allowed.
TV-IP612P/WN (Wireless N) Pan/Tilt/Zoom Internet Camera IPView Pro 2.0 Miscellaneous Options The Other Options available for configuration include Proxy server setup, email notification, scan interval and alert type settings.
TV-IP612P/WN (Wireless N) Pan/Tilt/Zoom Internet Camera 8 Playing Video Files on a Computer IPCamPlayer software is installed on the monitoring station or administrator’s system along with the IPView Pro 2.0 monitoring software. Use it to playback and manage recorded video from the cameras added to the IPView Pro 2.0 group. In order to use the software however, it is necessary to first install the ffdshow package of codecs used for media files.
TV-IP612P/WN (Wireless N) Pan/Tilt/Zoom Internet Camera Load Saved Video Files Each camera has a file created automatically for storing video files. These files are normally located in the My Documents folder in Windows. The file folders are named according to the IP address and camera model. For example, 192.168.10.30_TV-IP612P/W is the name of the file folder for the TV-IP612P/W using the default (non-DHCP) IP address. IPCamPlayer User Interface 1 2 3 4 NO.
TV-IP612P/WN (Wireless N) Pan/Tilt/Zoom Internet Camera To view recorded video files in the IPCamPlayer, it is first necessary to locate and select the files to be viewed and add them to the list. Click the Search Files button in the IPCamPlayer main interface and a new menu appears. In the new menu, use the Select Camera pull-down menu to choose the video file folder of the camera to be reviewed. Use the Search Time menu to narrow the search to a specific time and date.
TV-IP612P/WN (Wireless N) Pan/Tilt/Zoom Internet Camera ffdshow The ffdshow software is used for audio and video encoding and decoding, especially for MPEG-4 formats. It is free software used on Windows systems and enables the user to tweak media playback and select specific codecs and formats. For use with the IPCamPlayer, the default settings used for ffdshow installation are all that is needed.
TV-IP612P/WN (Wireless N) Pan/Tilt/Zoom Internet Camera 3. The InstallShield Wizard will appear, click Next in the welcome screen. 4. Accept the default location (Windows Programs folder) on the system for placement or Browse to choose an alternative, Click Next to continue.
TV-IP612P/WN (Wireless N) Pan/Tilt/Zoom Internet Camera 5. Click to check the components that will be installed. For IPCamPlayer it is only necessary to use the default components already selected. Click Next to continue. 6. Accept the default destination folder (ffdshow) or Browse to choose an alternative, Click Next to continue.
TV-IP612P/WN (Wireless N) Pan/Tilt/Zoom Internet Camera 7. Click to check the additional tasks that will be installed. For IPCamPlayer it is only necessary to use the default formats already selected. Click Next to continue. 8. Click to check the video applications that use ffdshow. For IPCamPlayer it is only necessary to use the default applications already selected. Click Next to continue.
TV-IP612P/WN (Wireless N) Pan/Tilt/Zoom Internet Camera 9. Click to check the audio applications that use ffdshow. For IPCamPlayer it is only necessary to use the default applications already selected. Click Next to continue. 10. Choose a speaker setup or choose Disable mixer if unsure. The audio function will work regardless of what speaker setup is chosen. Usually it will choose the default arrangement used on system on which it is being installed. Click Next to continue. 11.
TV-IP612P/WN (Wireless N) Pan/Tilt/Zoom Internet Camera 12. If desired, any of the three configuration utilities included with the ffdshow installation can be launched by checking the appropriate box. Click Finish to complete the installation. NOTE: To download the latest copy of ffdshow please check the ffdshow website http://ffdshow.en.softonic.
TV-IP612P/WN (Wireless N) Pan/Tilt/Zoom Internet Camera 9 Appendix A. Frequently Asked Questions Internet Camera Features Q: What is an Internet Camera? A: An Internet Camera is a stand-alone system connecting directly to an Ethernet or Fast Ethernet network and supported by the wireless transmission based on the IEEE 802.11b/g/n standard.
TV-IP612P/WN (Wireless N) Pan/Tilt/Zoom Internet Camera Internet Camera Installation Q: Can the Internet Camera be used outdoors? A: The Camera is not water-proof and it is not recomended to use it outdoors. But you can use our Outdoor Internet Camera Enclosure TV-H500 or the one with Heater and Fan model TV-H510 to install the camera outdoor. Q: What type of network cabling is required for the Camera? A: The Camera uses Category 5 UTP cable allowing 10 Base-T and 100 Base-TX networking.
TV-IP612P/WN (Wireless N) Pan/Tilt/Zoom Internet Camera B. PING your IP Address The PING (Packet Internet Groper) command can determine whether a specific IP address is accesible by sending a packet to the specific address and waiting for a reply. It can also be a useful tool in confirming whether an IP address conflicts with the Camera’s on the network. To find out if the Camera conflicts with another IP address on the network follow the steps below: 1. Disconnect the Camera from the network. 2.
TV-IP612P/WN (Wireless N) Pan/Tilt/Zoom Internet Camera 4. Type ping x.x.x.x, where x.x.x.x is the IP address of the Camera, as shown below: Reply messages indicate that there is another device on the nework, as indicated in the above window.
TV-IP612P/WN (Wireless N) Pan/Tilt/Zoom Internet Camera C. Troubleshooting Q: I cannot access the Camera from a web browser? A1: The possible cause might by that the IP address of the Camera is already being used by another device. To correct the possible problem, you need to disconnect the Camera from the network first. Then run the PING utility (follow the instructions in Appendix B – PING your IP Address for more information).
TV-IP612P/WN (Wireless N) Pan/Tilt/Zoom Internet Camera A2.
TV-IP612P/WN (Wireless N) Pan/Tilt/Zoom Internet Camera A2.
TV-IP612P/WN (Wireless N) Pan/Tilt/Zoom Internet Camera Click the Properities button. Double-click the Internet Protocol (TCP/IP) item and check that the first 3 bytes of your computer’s IP address correspond with the first 3 bytes of the Camera’s. If the Camera is situated on a different subnet than your workstation, you will not be able to configure the Camera. Therefore, you must connect to the Camera from a PC on the same subnet to configure the Camera settings.
TV-IP612P/WN (Wireless N) Pan/Tilt/Zoom Internet Camera A3: The wireless connection might be faulty. If your Camera is operating in Ad-Hoc mode make sure the Camera wireless channel and SSID are set to match the PC/Notebook and the Camera must match with the Access Point’s SSID. Q: Why does the Camera work locally but not externally? A1: The Camera’s connection might be being blocked by a Firewall. Please check with your System Administrator to see if your Firewall allows access to the Camera.
TV-IP612P/WN (Wireless N) Pan/Tilt/Zoom Internet Camera D.
TV-IP612P/WN (Wireless N) Pan/Tilt/Zoom Internet Camera Time Zone Location/Description (GMT + 01:00) Brussels, Copenhagen, Madrid, Paris, Vilnius (GMT + 01:00) Sarajevo, Skopje, Sofija, Warsaw, Zagreb (GMT + 02:00) Athens, Istanbul, Minsk (GMT + 02:00) Bucharest (GMT + 02:00) Cairo (GMT + 02:00) Harare, Pretoria (GMT + 02:00) Helsinki, Riga, Talinn (GMT + 02:00) Jerusalem (GMT + 03:00) Baghdad, Kuwait, Riyadh (GMT + 03:00) Moscow, St.
TV-IP612P/WN (Wireless N) Pan/Tilt/Zoom Internet Camera Time Zone Location/Description (GMT + 09:00) Seoul (GMT + 09:00) Yakutsk (GMT + 09:30) Adelaide (GMT + 09:30) Darwin (GMT + 10:00) Brisbane (GMT + 10:00) Canberra, Melbourne, Sydney (GMT + 10:00) Guam, Port Moresby (GMT + 10:00) Hobart (GMT + 10:00) Vladivostok (GMT + 11:00) Magadan, Solomon Islands, New Caledonia (GMT + 12:00) Auckland, Wellington (GMT + 12:00) Fiji, Kamchatka, Marshall Islands 91
TV-IP612P/WN (Wireless N) Pan/Tilt/Zoom Internet Camera E.Technical Specifications Camera General Sensor: 1/4” CCD Sensor Focal Length: f(wide) 3.8mm to f(tele) 38.0mm F/No: F(wide)=1.8 , F(tele) = 2.8 LENS: Auto focus zoom lens with IR cut filter Zoom Ratio: 10x optical zoom plus 16x digital zoom Color: full color or black and white mode Day & Night image modes: Automatic or scheduled transition between modes Minimum illumination: Color: 0.7 lux@F1.8 B/W: 0.02 lux@F1.8 View: ‐Wide Angle: Horizontal: 51.
TV-IP612P/WN (Wireless N) Pan/Tilt/Zoom Internet Camera GPIO Input: 1 set Output: 1 set Micro SD slot Micro Secure Digital card (up to 16G) Hardware Network IEEE 802.3u 10/100Mbps Auto‐MDIX Fast Ethernet LED Power, Link/Act Reset Button Reset to factory default Power Consumption 12 Watts (max.) Power 12V, 2A external power adapter Dimension 125 x 130 x 125 mm (4.9 x 5.1 x 4.9 in.) Weight Camera: 800 g (28.22 oz.
TV-IP612P/WN (Wireless N) Pan/Tilt/Zoom Internet Camera Modulation DQPSK, DBPSK, DSSS and CCK OFDM: BPSK, QPSK, 16QAM, 64QAM Antenna 2 x detachable 2dBi dipole antennas (Reverse‐SMA connector) Date Rate 802.11b: up to 11Mbps 802.11g: up to 54Mbps 802.11n: up to 300Mbps Security 64/128‐bit WEP, WPA/WPA2‐PSK Output Power 802.11b: 18dBm (typical) 802.11g: 15dBm (typical) 802.11n: 13dBm ((typical) Receiving Sensitivity 802.11b: ‐85dBm at 11Mbps 802.11g: ‐73dBm at 54Mbps 802.
TV-IP612P/WN (Wireless N) Pan/Tilt/Zoom Internet Camera Dynamic DNS Yes Time Synchronize with NTP server or set time / date manually 95
TV-IP612P/WN (Wireless N) Pan/Tilt/Zoom Internet Camera Limited Warranty TRENDnet warrants its products against defects in material and workmanship, under normal use and service, for the following lengths of time from the date of purchase. TV‐IP612P / TV‐IP612WN – 3 Years Warranty Camera’s motor, AC/DC Power Adapter, Cooling Fan, and Power Supply carry 1 year warranty.
TV-IP612P/WN (Wireless N) Pan/Tilt/Zoom Internet Camera TRENDNET SHALL NOT BE LIABLE UNDER THIS WARRANTY IF ITS TESTING AND EXAMINATION DISCLOSE THAT THE ALLEGED DEFECT IN THE PRODUCT DOES NOT EXIST OR WAS CAUSED BY CUSTOMER’S OR ANY THIRD PERSON’S MISUSE, NEGLECT, IMPROPER INSTALLATION OR TESTING, UNAUTHORIZED ATTEMPTS TO REPAIR OR MODIFY, OR ANY OTHER CAUSE BEYOND THE RANGE OF THE INTENDED USE, OR BY ACCIDENT, FIRE, LIGHTNING, OR OTHER HAZARD.
TV-IP612P/WN (Wireless N) Pan/Tilt/Zoom Internet Camera 98