
Assembly Instructions

GENERAL
1. Be sure to read these instructions and review the diagrams thoroughly before
beginning.
2. Electrical connections must be in accordance with local codes, ordinances, or the
National Electric Code. If you are unfamiliar with methods of installing electrical wiring,
secure the services of a qualified licensed electrician.
3. Before starting the installation, disconnect the power by turning off the circuit
breaker or by removing appropriate fuse at fuse box. Turning the power off at the light
switch is not sufficient to prevent electrical shock.
PREPARE THE FIXTURE
NOTE: First turn off electricity
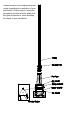
FINAL ASSEMBLY
1. Pull the black, white and ground wires out of mounting post.
2. While supporting the fixture, connect electrical wires. If your post has a ground wire
(green or bare copper), connect the fixture ground wire to it. If not, consult your
electrician for proper grounding.
ELECTRICAL CONNECTIONS 120V~, 60Hz
Connect white wire(s) from fixture to white neutral wire from supply circuit.
Connect black wire(s) to black hot wire from supply circuit. Connect green wire to
green or bare wire or grounding screw on mounting bracket. In all cases grounding
conductor to earth must be used. Use UL/CSA Listed wire connects suitable for the
size, type, and number of conductors. No loose strands or loose wires should be
present. Secure wire connectors with UL/CSA Listed electrical tape.
After wires are connected, tuck them carefully inside the post cup.
3. Align the lantern with mounting post and secure with screws
4. Installation is complete. Turn on the power at the circuit breaker or fuse box. Turn
the light switch on to activate the fixture.
CAUTION: LED fixtures can operate at high temperatures
please use caution when touching during operation or after
operation.