
Installation & Assembly

AA
D
D
CARE & MAINTENANCE
:
The touch of a soft cloth is all the maintenance the finish will ever need. Please do not use harsh or abrasive cleaners for polishing,
as they may cause damage to the finish. Periodic checks are recommended to make sure that all hardware is securely tightened.
HARDWARE LIST
A (4) 1/4” x 1/2” Allen Bolts
B (4) 1/4” x 2” Allen Bolts
C (4) Nuts
D (8) Flat Washers
E (1) Allen Wrench
F (1) Open Wrench
PARTS LIST
G (1) Headboard Panel
H (2) Leg Extensions
4A
4C
1E
4
8
1
B
D
F
QTYPART HARDWARE QTYPART HARDWARE
Bed Frame
Not Included
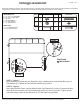
FIGURE 1
H
HH
G
G
DD
D
D
FIGURE 2
H
CC
C
C
STEP 1 - Figure 1
Begin assembly by connecting Leg Extensions (H) to Headboard (G) using 2 Allen Bolts (A) & 2
Flat Washers (D). Tighten all bolts with Allen Wrench (E) provided.
STEP 2 - Figure 2
Next, attach the Bed Frame (*Not Included) to each Leg Extension (H) using 2 Countersunk Allen
Bolts (B) from the outside, and 2 Flat Washers (D) and 2 Hex Nuts (C) per post. Tighten all nuts
and bolts using the Allen & Hex Wrenches (E & F) that have been provided.
BB
B
B
TWIN/KING HEADBOARD
Page 1 of 1
King
Examine all packaging material for small parts that may have come loose during shipment. Periodic checks are recommended to insure that all
components are in proper position, tight and free from damage. Keep this assembly instruction for future reference.