
Assembly Instructions

Please carefully real and save this instruction
Caution:To avoid possible electric shock.turn off the main
power circuit breaker before installing the fixture .
1.Upack the fixture
You should have received the following hardware:
Universal Mounting plate(1pc),8/32"*1.25"
Fixture Mounting Screw (2pcs), 8/32*2.56"Mounting Screw (2pcs)
Hex Nut (4pcs).Decorative Nut (2pcs),Wire Connector (3pcs).
2.Wiring Assembly :
(1).Remove the Decorative Nut (2pcs) under the Canopy and take out the Mounting Plate,Attach the
Universal Mounting Plate to the ceiling Outlet using two Mounting Screw . (see the Diagram beside)
(2).Attach the power supply wires to the fixture wire by connecting Black to Black(or Smooth)
and White to White(or Ribbed), using two Twist-on Wire Connectors. Attach the Power
Supply ground wires from the Ceiling Outlet Box and the Fixture Ground wire from the fixture
to the Green Ground Screw on the Mounting Bracket. After the Wires are connected, Tuck them
carefully in the Outlet Box
(3).Place the Canopy over the Ceiling Outlet Box and onto the Fixture Mounting Screws until they
protrude out from the Canopy for about1/4,,.Remove the Canopy and secure the position by
tightening the Hex Nut(4pcs)against the Mounting Plate
Place the Canopy back onto the Fixture Mounting Screws and secure into place by using the
Decorative Nut(2pcs) provided.
3. Put two Decorative Nuts onto shade's backboard installation completed.
Install1 Light Bulb1(Not included). See relampling label located at socket area for type and wattage
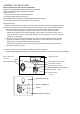
White to White wire Ceiling Outlet Box
Connector
Universal Mounting Plate Black to Black Wire Connector
Ground Wire Connector
Green Ground wire Screw
Fixture Mounting Screw (2pcs)
Small Hex Nut (4PCS)
Mounting Screw
(2PCS)
Bulb (Not included)
Shade 's backboard
Socket
Decorative Nut (2pcs)
ASSEMBLY INSTRUCTIONS