INSTRUCTION MANUAL ENCLOSED MANUEL D’INSTRUCTION À L’INTÉRIEUR MANUAL DE INSTRUCCIONES ADJUNTO STOP ATTENTION STOP IF YOU HAVE ANY PROBLEMS OR QUESTIONS, EMAIL OR CALL CUSTOMER SERVICE BEFORE YOU RETURN THIS PRODUCT TO THE STORE WHERE IT WAS PURCHASED. For Customer Service: www.twinstarhome.
KITCHEN CART KC7005-T401-42 INSTRUCTION MANUAL Españo p. 9 Français p. 19 For Customer Service: www.twinstarhome.com In English call: 866-485-7879 In French call: 866-634-0147 In Spanish call: 866-485-7879 Twin-Star International, Inc.
PACKAGE CONTENTS N O P I G K F J L C E B H D Q H C B R U V A T S Part A Description Base Quantity 1 B C D E F G H I J K L M N O P Q R S T U V Left Door Right Door Upright middle panel Left Side Panel Right Side Panel Top Interior wood shelf Left Connect block Right Connect block Towel Rack Left Center Panel Cutting Board Spice bottle Rack Silverware Rack Dividers Right Center Panel Sliding frame upper panel Sliding frame lower panel U-Shaped wood shelf Sliding frame back panel Sliding fr
HARDWARE CONTENTS Part Description Quantity AA Hex screw 8 BB Flat Washer 16 CC Wood Dowel ø8 18 DD Allen Key 1 EE Hex screw 8 FF Knob (with bolt) 9 GG Shelf Pin 4 HH Shelf Pin 8 II Caster 2 JJ Caster (with stopper) 2 KK sponge cushions 4 LL Screw 3x12mm 40 MM Screw 4x12mm 16 NN Nut 8 OO Camlock (O-1,O-2) 8 PP Wood Dowel ø6 2 QQ Screw 14 ZZ Touch-up Pen 1 Picture O-2 3 O-1
SAFETY INFORMATION WARNING • Before assembly, carefully use scissors or utility knife to cut and unwrap all parts. Make sure you do not discard the hardware. CAUTION • Use care in assembling your new kitchen cart. Take your time and use the hardware provided and a quality Phillips head screwdriver. Never overtighten bolts. • Do not sit on any part of the kitchen cart. • All panels are labeled left and right as viewed from the front of unit.
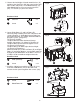
2. Crew 2 caster (II) and 2 caster (JJ) with screw (MM) on the base, use Phillips head screwdriver to tighten the screws. Fig. 2 JJ MM Hardware Used II Caster x2 JJ Caster (with stopper) x2 Screw x 16 MM II 3. Screw (O-1) In the holes of the center panels (L, Q). Attach the upright middle panel (D) on the assembly step 2, use a phillips head screwdriver to tighten (O-2). JJ Fig. 3 O-2 Hardware Used OO Camlock (O-1,O-2) x4 O-1 D 4.
5. Choose desired height of Interior wood shelves (H) and place the Shelf Pins (HH) into same height shelf holes inside side panels. Insert Wood Shelves (H), allow Wood Shelves (H) to rest on the Shelf Pin (HH), use Screws (LL) to fix the shelves. Fig. 5 Hardware Used HH Shelf Pin x8 H LL Screw x8 HH LL 6. Locate Right Doors (C) and Left Doors (B), attach the hinge another part to the side panels with screws (Diagram 1). Slide door hinge keyhole into panel hinge bracket.
. Push the slide frames in and align the slide rail, attach the knob (FF) to the sliding frames. Fig. 8 Hardware Used FF Knob (with bolt) x1 FF 9. Choose desired height of U-shaped wood shelf (T) and place the Shelf Pins (GG) into same height shelf holes inside side panels. Insert the U-shaped wood shelf (T), allow U-shaped wood shelf (T) to rest on the Shelf Pin (GG). Fig. 9 Hardware Used GG Shelf Pin x4 T GG GG 10.
11. Insert wood dowels (CC) in the holes on the top side , push the bar to cart body using the camlock (O-1, O-2) to connect them. Fig. 11 CC Hardware Used O-1 O-2 CC Wood Dowel ø8 x2 OO Camlock (O-1, O-2) x4 12. strip off the paper from the rear of sponge cushions (KK), stick it on the four corners of the Silverware rack (O) from the bottom. Fig. 12 Hardware Used KK Sponge cushions KK x4 13.
14. Along with the cart have a cutting board (M) for you free. Fig.
CARRITO DE COCINA KC7005-T401-42 INSTRUCCIÓN DE MONTAJE English p. 1 Français p. 19 Servicio de atención al cliente: Twin-Star International, Inc. Delray Beach, FL 33445 www.twinstarhome.
CONTENIDO DEL PAQUETE N O P I G K F J L C E B H D Q H C B R U V A T S Pieza A Descripción Base Cantidad 1 B C D E F G H I J K L M N O P Q R S T U V Puerta Izquierda Puerta Derecha Panel medio Superior Paneles laterales Izquierdo Paneles laterales Derecho Cubierta Estante de madera Interior Bloque conector Izquierdo Bloque Conector Derecho Colgador de Toallas Panel Central Izquierdo Tabla de cortar Estante de botellas Estante de cuchillos Separadores Panel Central Derecho Panel superior c
HERRAJES INCLUIDOS Parte Descripción Imagen (Tamaño real) Cantidad AA Tornillo de Rosca 8 BB Arandela 16 CC Espiga De Madera ø8 18 DD Llave Allen 1 EE Tornillo de Rosca 8 FF Botón (Con Perno) 9 GG Clavijas Del Estante 4 HH Clavijas Del Estante 8 II Ruedecillas 2 JJ Ruedecillas (con bloqueo) 2 KK Cojines esponja 4 LL Tornillo 40 3x12mm Tornillo 16 MM 4x12mm NN Nuez 8 OO Atornille (O-1,O-2) 8 PP Espiga De Madera ø6 2 QQ Tornillo ZZ Bolígrafo Para Retocar
INFORMACIÓN DE SEGURIDAD ADVERTENCIA • Antes del montaje, corte con unas tijeras o un bisturí y desenvuelva las piezas cuidadosamente. Asegúrese de no desechar los herrajes. PRECAUCIÓN • Vaya con cuidado durante el montaje de su carrito de cocina. Tómese su tiempo y use los elementos suministrados y un destornillador Phillips de calidad. No apriete demasiado los pernos. • No se siente en ninguna pate del carrito de cocina.
2. Atornille 2 ruedas (II) y 2 ruedas (JJ) con tornillos (MM) a la base, use un destornillador Phillips para apretar los tornillos. Fig. 2 JJ MM Herrajes utilizados II Ruedecillas x2 JJ Ruedecillas (con bloqueo) x2 Tornillo x 16 MM II 3. Atornille (O-1) en los agujeros de los paneles centrales (L,Q). Adjunte el Panel Medio superior (F) al montaje del paso 2, utilice un destornillador Phillips para apretar (O-2). Herrajes utilizados OO Atornille (O-1,O-2) JJ Fig. 3 O-2 O-1 x4 D 4.
5. Escoja la altura deseada de los estantes (H) y coloque los Topes (HH), utilice tornillos (LL) para fijar los estantes. Fig. 5 Herrajes utilizados HH LL Clavijas Del Estante x8 Tornillo x8 H HH LL 6. Localice las Puertas Derecha (C) e Izquierda (B), adjunte la bisagra a los paneles laterales con los tornillos (Diagrama 1). Deslice el agujero la bisagra en el soporte de la bisagra. Utilice un Destornillador Phillips para apretar tornillos. (Diagrama 2).
8. Empuje los marcos deslizante y alinee los raíles deslizantes, adjunte el pomo (FF) a los marcos deslizantes. Fig. 8 Herrajes utilizados FF Botón (Con Perno) x1 FF 9. Elija la altura que desee del Estante de Madera con forma de U (T) y coloque los Topes (GG) en la misma altura dentro de los marcos deslizantes. Inserte el estante deslizante con forma de U (T), deje que el estante (T) repose en los Topes (GG). Fig. 9 Herrajes utilizados GG Clavijas Del Estante x4 T GG GG 10.
11. Inserte Toneles de Madera (CC) en los agujeros en la parte superior, empuje el colgador de toallas al cuerpo utilizando el perno de fijación (O-1, O-2) para conectarlos. Fig. 11 CC Herrajes utilizados CC OO Espiga De Madera ø8 Atornille (O-1, O-2) O-1 O-2 x2 x4 12. Saque el papel de los cojines con esponja (KK), péguelos en las cuatro esquinas del Reposador de Cuchillos (O) desde las puntas. Fig. 12 Herrajes utilizados KK KK Cojines esponja x4 13.
14. Junto con el carrito tiene una mesa para cortar de forma totalmente gratuita. Fig.
DESSERTE DE CUISINE KC7005-T401-42 INSTRUCTION DE L'ASSEMBLAGE English p. 1 Españo p. 10 Pour le service à la clientèle : www.twinstarhome.com Appel en anglais : 866-485-7879 Appel en français : 866-634-0147 Appel en espagnol : 866-661-1218 Twin-Star International, Inc.
CONTENU DU CARTON N O P I G K F J L C E B H D Q H C B R U V A T S Pièce A Description Base Quantité 1 B C D E F G H I J K L M N O P Q R S T U V Porte Gauche Porte Droite Panneau central vertical Panneaux latéraux Gauche Panneaux latéraux droit Plaque Supérieure Etagère intérieure en bois Bloc de Connexion Droit Etagère en bois de Gauche Porte-serviette Panneau Central Gauche Planche à découper Rangement à Epices Coffret à Argenterie Séparateurs Panneau Central Droit Panneau supérieur du
CONTENU DU MATÉRIEL Description Pièce Illustration (en taille réelle) Quantité AA Vis Hexagonale Creuse 8 BB Rondelle 16 CC Goujon en bois ø8 18 DD Clé Allen 1 EE Vis Hexagonale Creuse 8 FF Boutons (arec boulon) 9 GG Cheville pour tablette 4 HH Cheville pour tablette 8 II Roulette (avec cale) 2 JJ Roulette (avec cale) 2 KK sponge cushions 4 LL Vis 3x12mm 40 MM Vis 4x12mm 16 NN Ecrou 8 OO Camloc (O-1,O-2) 8 PP Goujon en bois ø6 2 QQ Vis 14 ZZ Crayon pou
INFORMATION DE SÉCURITÉ AVERTISSEMENT • Avant l’assemblage, à l’aide de ciseaux ou d’un couteau universel, coupez et déballez soigneusement toutes les pièces. Assurez-vous de ne pas jeter de matériel. MISE EN GARDE • Montez votre desserte de cuisine avec précaution. Prenez votre temps et utilisez le matériel fourni et un tournevis cruciforme de qualité. Ne serrez pas trop les boulons. • Ne s’asseoir sur aucune partie de la desserte de cuisine.
2. Fixez les 2 roulettes (II) et les 2 roulettes (JJ) à la base à l’aide des vis (MM), en utilisant un tournevis à tête Philips pour serrer les vis. Fig. 2 JJ MM Matériel utilisé II Roulette x2 JJ Roulette (avec cale) x2 Vis x 16 MM II 3. Insérez les vis (O-1) dans les trous des panneaux centraux (L, Q). Fixez le Panneau Central Droit (D) à l’assemblage complété à l’étape 2, en utilisant un tournevis à tête Philips pour serrer les vis (O-2). JJ Fig.
5. Choisissez la hauteur désirée des étagères en bois Intérieures (H) et insérez les Supports d’Etagère (HH) dans les trous des panneaux latéraux, à la même hauteur. Insérez les Etagères en Bois (H), assurez-vous qu’elles sont correctement installées sur les supports d’Etagère (HH) et utilisez les Vis (LL) pour fixer les étagères. Fig. 5 Matériel utilisé HH LL Cheville pour tablette Vis x8 H x8 HH LL 6.
8. Ajustez et insérez le tiroir coulissant dans les glissières, et fixez la Poignée (FF) du Tiroir coulissant. Fig. 8 Matériel utilisé FF Boutons (arec boulon) x1 FF 9. Choisissez la hauteur désirée de l’Etagère en bois en forme de U (T) et insérez les Supports d’Etagère (GG) dans les trous du tiroir coulissant, à la même hauteur. Insérez l’Etagère en bois en forme de U (T), et assurez-vous qu’elle est correctement installée sur les Supports d’Etagère (GG). Fig.
11. Insérez des chevilles en bois (CC) dans les trous du haut, poussez le porte-serviette sur l’unité centrale en utilisant les raccords à came (O-1, O-2) pour les connecter. Fig. 11 CC Matériel utilisé Goujon en CC bois ø8 Camloc OO (O-1,O-2) O-1 O-2 x2 x4 12. Décollez le papier à l’arrière des coussinets en mousse (KK) et collez-les sur les quatre coins du Coffret à Argenterie (O) en partant du bas. Fig. 12 Matériel utilisé KK Coussinets en mousse KK x4 13.
14. Une planche à découper vous est fournie à l’achat de cette desserte de cuisine. Fig.