
Installation Guide
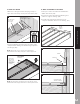
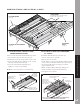


PICTURE FRAME
(See pg. 14)
CANTILEVERS
(Trex RainEscape can accommodate any angle
or radius – max. of 3') (See pg. 15)
EXTENDED
DECK
(See pg. 18)
DOUBLE OR TRIPLE BEAM
(See pg. 17)
MODIFICATIONS AND SPECIAL CASES
MODIFICATIONS & SPECIAL CASES
13
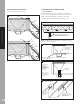
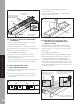
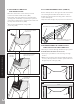
10A. FLAT BLOCKING, SINGLE PICTURE
FRAME/BREAKER BOARD
»
Place a horizontal nailer flush with the top of the
joist from the ledger board to the rim joist.
»
Caulk between the blocking and the joists seam.
»
Cover nailer with trough, making sure to overlap
adjoining downspout and trough.
»
Cover all seams with 4" butyl tape and
anywhere a screw can penetrate.
NOTE:
Do not use larger than 2" x 6" flat blocking.
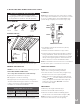
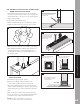
10B. DOUBLE OR TRIPLE PICTURE FRAME:
2 X 4 SHIMS
»
Install the Trex RainEscape system as per
previous instructions. (pp 5-9)
»
Tape all joints and seams.
»
Screw down 2" x 4" pressure-treated shim blocking
on top of the installed the RainEscape system over
the joists and wherever blocking is needed to
support deck boards.
»
Attach decking. (When attaching decking use
fasteners that do not penetrate all the way
through the 2 "x 4" shim).
SINGLE PICTURE FRAME
10A
HORIZONTAL BLOCKING
RUNS THE ENTIRE
LENGTH OF THE JOISTS
TROUGH OVERLAPS
BY AT LEAST 1"
TAPE OVER
SEAMS AND
ANYWHERE
SCREW MAY
PENETRATE
APPLY BUTYL CAULK
BETWEEN THE BLOCKING
AND THE JOISTS SEAM
DOUBLE OR TRIPLE PICTURE FRAME (2 X 4 SHIM)
SCREW DOWN 2 X 4
PRESSURE TREATED
SHIM BLOCKING ON TOP
OF THE INSTALLED DOWN
SPOUT AND TROUGH
DIAGONAL SHIM ON CORNERS
TO ACCEPT DECKING
DOWNSPOUTS
TROUGHS
TAPE OVER ALL
JOINTS AND SEAMS
DO NOT USE SCREWS THAT PENETRATE THROUGH THE 2X4 SHIM AND PUNCTURE
HOLES IN THE TROUGH MATERIAL WHERE ITS NOT TAPED OR SEALED
10B