DECK DRAINAGE SYSTEM I N S TA L L AT I O N G U I D E C R E AT E A D R Y S PAC E below yo ur d e c k
Protect the space below your deck F R O M R A I N , S U N & OT H E R E L E M E N TS WAT E R I S D I R E C T E D AWAY F R O M YO U R D E C K A N D I N TO A WAT E R D R A I N AG E S Y S T E M E X PA N D YO U R O U T D O O R L I V I N G S PAC E
DECK DRAINAGE SYSTEM I N S TA L L AT I O N G U I D E This installation guide provides step-by-step instructions on how to install Trex RainEscape on an elevated deck. Please read through these instructions carefully. For additional information on how to install Trex RainEscape, please view our videos on the Trex RainEscape YouTube channel or call a Trex RainEscape Specialist at 1-877-348-1385.
CONTENTS T R E X ® R A I N E S C A P E ® I N S TA L L AT I O N G U I D E BASIC INSTALLATION Parts ............................................................................................................................................................... 4 Tools ............................................................................................................................................................... 4 Preparation ......................................................................
B E F O R E YO U B E G I N DO'S DON'TS Make all joists straight and square. Do not staple Trex RainEscape products anywhere other than into or over floor joists, ledger, rim joists, or headers. Add outlets to gutter every 12' - 14'. Cover all joists and blocking with trough material, then tape. Cover the Trex RainEscape system with deck boards. Ensure the troughs and downspouts are dry and clear of debris before applying tape.
BAS I C I NSTA L LATIO N PARTS TOOLS TROUGH - 20mil 20" x 16' (50 cm x 4.8 M) DOWNSPOUT - 40mil BASIC INSTALLATION WALL FLASH 1/4" x 1" x 25' (6.35 mm x 25.4 mm x 7.62 M) CAULKING* (10.5 oz tube) * One tube covers 25 ln. ft. w/1/4" bead STAPLE GUN CAULKING GUN REGULAR STAPLES (3/8" or longer) UTILITY KNIFE TROUGH - 20mil 20" x 12' (50 cm x 3.6 M) TAPE 4" x 50' (102mm x 15.24 M) DOUBLE SIDED ELEVATIONS TAPE 21/2" x 50' (63.5 mm x 15.
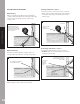
1. PREPARATION »Read all instructions completely before beginning. » Place midspan nailer (1) or vertical blocking (1A) to keep joist straight and prevent rolling. 2A 12" CENTER 16" CENTER 10-1/4" 14-1/2" » Midspan nailer can be removed when soffit or ceiling is installed. 10" 1 4" 5-1/4" BASIC INSTALLATION » Downspout should extend 1" into gutter: cut or extend as necessary.
3. FOUR TYPES OF FLASHING: With Flashing » When using flashing add a bead of caulk at the ledger board and between the flashing and trough. Tape over the flashing to the top of the of the trough. (3A) Flashing with Brick or Stucco » Cut into mortar or cement joint. (3C) Caulk "Z" flashing into mortar. Install trough under flashing as shown in (3A). Tape over flashing to the top of the trough.
4. I NSTALLING THE TREX RAINESCAPE TROUGHS 4D NOTE: If installing when temperatures fluctuate drastically, be sure to acclimate trough material before installing. Especially if you are using black. Here are two ways. » Fold a soft crease down the center of the trough. Be sure to account for the offset if installing for a 12" joist bay.
4F CUT OFF EXCESS TROUGH 1" AWAY FROM THE BACK OF THE DOWNSPOUT WALL » To test for correct slope, pour a cup of water on trough at ledger board ensuring water runs to the downspout. (4G) » Follow above step for the remaining troughs.
5. TAPE ALL SEAMS » Trim excess trough at seams, keeping overlap so tape will cover the top of the joist and seams. (5A) 6. WALL FLASHING FOAM STRIP » Cut a piece of the self-adhesive wall flash the width of the deck. (6A) 5A » Peel release paper from the wall flashing and adhere to edge of decking. (6B) KEEP KNIFE FLAT TO AVOID SLICING INTO TROUGH TRIM EXCESS TROUGH AT SEAMS, KEEPING OVERLAP » Push first deck board up against house to compress wall flash. Then secure decking.
INSTALLING A GUTTER SYSTEM (not included) » Before installing a gutter system perform a water test to clean out the system and check for any leaks. 7. INSTALLATION OF FASCIA » Two suggested ways to seal fascia: –Deck board go over fascia (7A) » Attach a standard gutter system to collect the water from the Trex RainEscape downspouts.
M O D I F I C AT I O N S A N D S P E C I A L C A S E S CANTILEVERS (Trex RainEscape can accommodate any angle or radius – max. of 3') (See pg. 13) PICTURE FRAME (See pg. 12) MODIFICATIONS & SPECIAL CASES EXTENDED DECK (See pg. 16) DOUBLE OR TRIPLE BEAM (See pg.
9A SINGLE PICTURE FRAME TAPE OVER SEAMS AND ANYWHERE SCREW MAY PENETRATE TROUGH OVERLAPS BY AT LEAST 1" HORIZONTAL BLOCKING RUNS THE ENTIRE LENGTH OF THE JOISTS 9B DOUBLE OR TRIPLE PICTURE FRAME (2 X 4 SHIM) DIAGONAL SHIM ON CORNERS TO ACCEPT DECKING DOWNSPOUTS SCREW DOWN 2 X 4 PRESSURE TREATED SHIM BLOCKING ON TOP OF THE INSTALLED DOWN SPOUT AND TROUGH TAPE OVER ALL JOINTS AND SEAMS CAULK BETWEEN THE BLOCKING AND THE JOISTS SEAM MODIFICATIONS & SPECIAL CASES 9A.
9C. DOUBLE OR TRIPLE PICTURE FRAME: LADDER BOX » Place a 11" blocking horizontally on the ends of the bay to support 45° decking. 11. D RAINING SECOND STORY GUTTER ON DECK » Block out a 14" x 16" o.c. rectangle where the second story gutter discharges onto the deck. (11B) » Install a 2 x 4 ladder box to support downspouts. » Trim off all downspout nozzles to accommodate gutter. 11A DOWNSPOUT » Place downspouts into ladder box (DO NOT REMOVE OPENINGS).
13 BEFORE INSTALLING THE POST FLASHING, APPLY A BEAD OF CAULK 1" ABOVE THE TROUGH, THEN SLIDE THE POST FLASHING DOWN POST SLEEVE 12. R AILING POSTS, 6X6 POSTS AND OBSTRUCTIONS WHEN NOT USING 4X4 POST FLASH » To install a post or obstruction on the inside rim joist, first mark the edges of the post on the trough and draw two lines, corner to corner. Cut along the diagonal lines. » Pull up tabs and install the post. » Staple trough as per the previous instructions.
14. S URFACE MOUNT POST TO SOLID BEAM OR FLAT BLOCKING » When using surface mount post, pre-drill holes then use a small amount of Butyl caulk on screw threads to seal holes. » DO NOT use too much caulk or it will overflow on deck and post mount. 15. I NSTALLING A TROUGH OVER A DOUBLE OR TRIPLE BEAM » Caulk between each beam to ensure a water tight seal between the beams. » Cover the top of the beam with the trough material that overlaps into both adjacent bays.
17. M ODIFYING DOWNSPOUT FOR OBSTRUCTIONS » Trace the obstruction on the downspout and remove the material with a knife. (17A) » Cut a patch of trough material 2" larger than the opening and create flaps on patch as per previous instructions (obstructions and posts) and slide over the top of the obstruction. (17B) » Tape over trough material, using caulking if necessary. (17C) 18.
» Cut hole to fish wire going up through side of joists. Caulk around wire piece and tape over wire. (19C) SIDE VIEW DECKING MAXIMUM DEPTH FOR TROUGH IS 4" 4" JOIST TAPE PATCH JOIST 19C 20 TROUGH WIRE TROUGH SHOULD NOT MAKE CONTACT WITH THE RECESSED CAN LIGHT #2 T HROUGH OPENING WHERE DOWNSPOUTS MEET TROUGH 21. DECK STEP » (1) Install the downspouts and troughs on the lower deck. » (2) Install trough material starting from the lower deck working your way up the stair tread to the upper deck.
INSTAL L I N G TR E X SO F F IT LI GHT TOOLS NEEDED PLANNING NOTE: When designing your deck, plan locations of lights, power supply, timer, and dimmer. These should be accessible for service. Installing a GFCI outlet is REQUIRED to help prevent damage to lighting from electrical surges. CAULKING GUN HAMMER JIG SAW 4-5/8" (120 mm) HOLE SAW 1. The dimmer remote will work in a 30' (9.1 m) radius of the unit. 2. Dimmer should be installed in a dry location. LIGHTING LAYOUT GFCI Outlet To Splitter 3.
To Splitter GFCI Outlet To Splitter GFCI Outlet = SPLITTER 1 6" (15.2 cm) = LIGHT TREX Transformer To Splitter House Deck Width Timer Timer Dimmer (Optional) Dimmer (Optional) 8’ (2.44 m) or less 2 TREX Transformer Joist Length 2 EXAMPLE OF A 2 ROW LIGHT INSTALLATION FOR JOISTS BETWEEN 9' AND 12' (2.76 - 3.65 M) Light 9’ - 12’ connection Dimmer (Optional) 1 1 Connection wire 1 Light connection Connection wire 2 9'- 12' (2.76 3.
I N S TA L L AT I O N U S I N G T R E X E L E VAT I O N S S T E E L J O I S T SYS T E M 1 TWO METHODS: 2A 1. PREP » Apply blocking mid-span between joists. TREX 4" TAPE NOTE: To properly install the Trex RainEscape system over the Trex Elevations system requires a minimum of 2 people.
4. DOWNSPOUTS » Remove the backing on the double-sided tape and place the downspout in the joist bay. » Repeat the process the same as you would in a stan- dard Trex RainEscape installation. 4 SEALING THE SYSTEM » Tape the finished system with 4" Trex RainEscape Tape as you would for a standard installation. 5A ADD NEW TAPE TO THE TOP OF THE INSTALLED TROUGH AND PLACE SECOND TROUGH.
2 0 -Y E A R WA R R A N T Y READ THESE WARRANTY TERMS CAREFULLY BEFORE INSTALLING OR USING THE TREX RAINESCAPE DECK DRAINAGE SYSTEM. YOUR INSTALLATION AND USE OF THE SYSTEM OR ANY OF ITS COMPONENTS INDICATES THAT YOU AGREE TO BE BOUND BY THESE TERMS. IF YOU DO NOT AGREE TO ALL OF THE TERMS OF THIS WARRANTY, RETURN THE PRODUCT TO THE PLACE OF PURCHASE FOR A FULL REFUND. This warranty gives you specific legal rights, and you may also have other rights which vary from State to State. WARRANTY 1.
F R E Q U E N T LY A S K E D Q U E S T I O N S Q: Do you have installation videos? A: Yes, visit the Trex RainEscape YouTube channel. Q: Can I install the system myself? A: Yes, however it is easier to install with two people. Follow these instructions to install the system. If you have any questions, call a Trex RainEscape specialists at 1-877-348-1385. Q: Can I install this over an existing deck? A: Yes, however, it is ideally installed during new construction.
N OT E S 24 26
Protect your deck from moisture with T R E X ® P R OT E C T ® J O I S T A N D B E A M TA P E TREX PROTECT IS A NON-SKID, SELF-ADHESIVE BUTYL TAPE DESIGNED TO PROTECT THE TOP OF JOISTS AND BEAMS FROM MOISTURE THAT CAN LEAD TO WOOD ROT AND THE LOOSENING OF DECK SCREWS AND FASTERNERS. JOIST & BEAM TAPE trexprotect.com FOR USE WITH ANY TYPE DECK Trex Protect cannot be used when installing Trex RainEscape *Visit trexprotect.
DECK DRAINAGE SYSTEM trexrainescape.com © 2020 Trex Company, Inc. All rights reserved. Trex® RainEscape® products are manufactured and sold by Dri-Deck Enterprises, LLC under a Trademark License Agreement with Trex Company, Inc. RainEscape® is a federally registered trademark of Dri-Deck Enterprises, LLC.